
Introduction
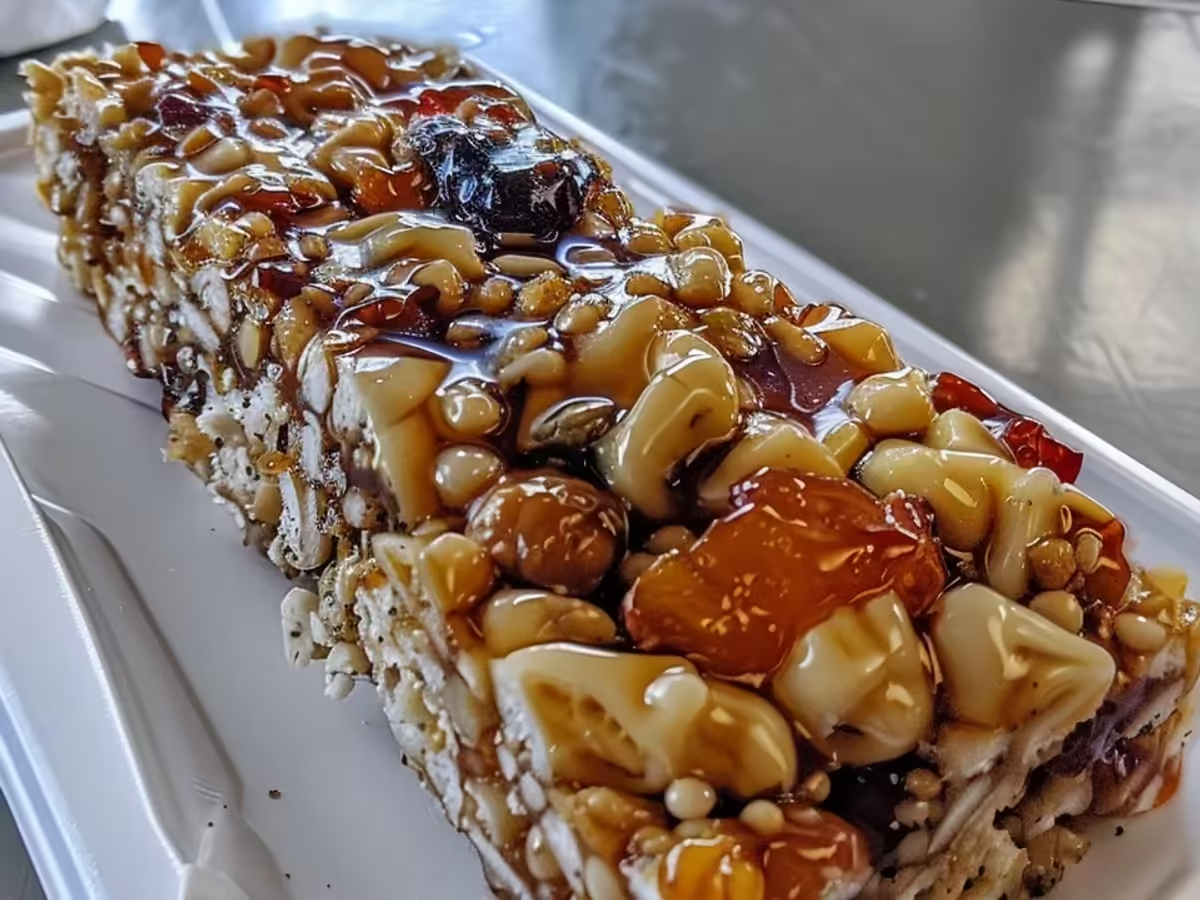
As a kid, nothing brought more joy than the sweet crunch of a Turtle Bar after school. Those nice layers of chocolate, caramel, and nuts felt like a little piece of heaven tucked away in a blissful bite. Fast forward to today, and when life gets busy, I find myself craving that nostalgic treat. Whether you’re juggling work calls or soccer practice, this Turtle Bars recipe is your new best friend. It combines simplicity with indulgence, making it perfect for a quick dessert that impresses friends and family alike.
These Turtle Bars are not just a sweet fix; they offer a delicious escape from the ordinary. The rich, gooey caramel paired with chocolate provides a decadence that can lift your spirits on the toughest days. Plus, they’re incredibly versatile. You can whip them up for a special occasion or as a nice end to a weeknight dinner. So, gather your ingredients and get ready to enjoy in a dessert that’s sure to become a favorite in your home. With this Turtle Bars recipe, sweet satisfaction is just a bake away!

Why You’ll Love Turtle Bars
Picture this: a rainy afternoon, and the sweet aroma of Turtle Bars fills your kitchen. These treats are like a cozy blanket for your taste buds, wrapping you in layers of chocolate, caramel, and crunchy pecans. Whether you’re juggling work calls or soccer practice, this recipe is your new best friend. No more 6 PM panic—Turtle Bars come together quickly, making them a nice surprise for family or friends.
Not only do they save time, but they also satisfy that sweet tooth craving in a way that few desserts can. Each bite is a well-balanced blend of flavors and textures, elevating your dessert game to new heights. The gooey caramel melds perfectly with rich chocolate, while the pecans add a nice crunch. Plus, these bars are versatile enough to serve at parties, as an afternoon snack, or even as a special treat after dinner.
As you whip up these Turtle Bars, you’ll find yourself feeling like a pastry chef, impressing everyone around you with minimal effort. So, why not enjoy in a recipe that brings joy and flavor to your day? Turtle Bars aren’t just a dessert; they’re a celebration of sweet moments. Dive in and enjoy every delicious layer!
Ingredients For Turtle Bars
When I first discovered the joy of making Turtle Bars, it felt like unearthing a treasure chest filled with flavor. Whether you’re juggling work calls or soccer practice, this Turtle Bars recipe is your new best friend. With its nice blend of chocolate, caramel, and pecans, these bars are a guaranteed hit for any occasion. Let’s dive into the essential ingredients you’ll need to create this sweet indulgence.
To whip up these delicious Turtle Bars, gather the following:
- 1 cup unsalted butter – This is your base, adding richness that melts in your mouth.
- 1 cup brown sugar – For that deep caramel flavor, you simply can’t skip this.
- 1 cup all-purpose flour – The backbone of your bars, providing the perfect texture.
- 1 cup semi-sweet chocolate chips – These little morsels bring a satisfying sweetness.
- 1 cup chopped pecans – They add a nice crunch that complements the other flavors.
- 1 cup caramel sauce – This will drape over your bars like a warm hug, making them irresistible.
While the essentials are a must, consider these fun optional additions. Not a pecan fan? You can easily swap in walnuts or even almonds—your secret’s safe with me! For a touch of flair, a sprinkle of sea salt on top can improve the flavor to new heights. Feel free to get creative; the beauty of Turtle Bars lies in their versatility!
Now that you have your ingredients ready, let’s get cooking and create these nice Turtle Bars that are sure to impress.
How To Make Turtle Bars
Making turtle bars is not just about baking; it’s about creating a nice experience that brings the family together. I still remember the first time I made these rich, gooey treats. My kids were hovering around the kitchen, eyes wide with anticipation, as the sweet aroma of chocolate and caramel filled the air. Whether you’re juggling work calls or soccer practice, this turtle bars recipe is your new best friend. So let’s dive into the fun of making these indulgent snacks that are sure to satisfy your sweet tooth!
Gathering Your Ingredients
Start by assembling all your ingredients. You’ll need flour, brown sugar, butter, pecans, chocolate chips, and caramel sauce. Make sure you have everything on hand to avoid any last-minute dashes to the store. Meanwhile, preheat your oven to 350°F (175°C) to get it ready for baking. This step sets the stage for your turtle bars to turn out perfectly!
Measuring Ingredients
Now it’s time to measure your ingredients. I find that storing my flour and sugar in clear containers makes it easy to grab what I need without rummaging around. Remember, precision is key for the crust, so measure carefully. It’s okay to take your time here—good things come to those who wait!
Mixing the Crust
In a large mixing bowl, combine the flour, brown sugar, and softened butter. Use your fingers or a pastry cutter to blend until the mixture resembles coarse crumbs. This crust will be the foundation of your turtle bars, so make sure it’s well combined. As you mix it, imagine the delicious layers that will soon come to life!
Pressing into the Pan
Once your crust is ready, press it into a greased baking dish evenly. This is the base layer that will hold all the delicious toppings. Bake it for about 10-12 minutes until it’s slightly golden. While it’s baking, take a moment to appreciate how your kitchen smells—it’s already starting to feel like dessert!
Layering with Chocolate and Pecans
After the crust has cooled slightly, sprinkle a generous layer of chocolate chips and chopped pecans on top. The chocolate will melt and create a luscious layer that pairs beautifully with the crunchy nuts. Then, drizzle warm caramel sauce over everything. This step is where the magic happens, transforming your simple crust into a rich turtle bar.
Baking to Perfection
Finally, return the dish to the oven and bake for an additional 15-20 minutes until everything is bubbly and golden. As they bake, your home will be enveloped in the sweet, inviting scent of chocolate and caramel. This is the moment you’ve been waiting for, and soon you’ll have a batch of turtle bars that will make everyone swoon!
Expert Tips and Tricks
When it comes to making Turtle Bars, a few insider secrets can improve your treats from tasty to truly unforgettable. Here are some expert tips to ensure your Turtle Bars turn out perfectly every time!
- Chill Your Ingredients: For the best texture, chill your butter and eggs before mixing. Cold ingredients help create that nice chewy texture.
- Use Fresh Nuts: Toast your pecans or walnuts in a dry skillet before adding them to the mix. This simple step enhances their flavor and adds a satisfying crunch to your Turtle Bars.
- Don’t Overbake: Keep an eye on your bars while they’re in the oven. Overbaking can lead to dry bars, so take them out when the edges are golden and the center is set but still slightly soft.
- Layer Wisely: For the ultimate flavor experience, layer your chocolate and caramel generously. If you’re feeling adventurous, try swirling the two together for a marbled effect!
- Let Them Cool: After baking, allow your Turtle Bars to cool completely in the pan before cutting. This helps them set and makes for cleaner slices.
- Experiment with Toppings: Feel free to get creative! A sprinkle of sea salt or a drizzle of dark chocolate on top adds a gourmet touch to your Turtle Bars.
- Storage Secrets: Keep your bars fresh by storing them in an airtight container with a slice of bread. This trick keeps them moist and delicious for days!
With these tips, your Turtle Bars will not only impress your family and friends but also make you feel like a pro in the kitchen. Happy baking!
Equipment Needed
When it comes to making Turtle Bars, having the right equipment can make all the difference. Whether you’re juggling work calls or soccer practice, this recipe is your new best friend, especially when you have the right tools at your disposal. Here’s what you’ll need:
- Mixing Bowl: A large mixing bowl is essential for combining your ingredients smoothly. Opt for a glass or stainless steel bowl to withstand the heat when melting chocolate.
- Measuring Cups and Spoons: Precision is key in baking! Grab a set of measuring cups for dry ingredients and spoons for liquids to ensure your Turtle Bars come out just right.
- Spatula: A sturdy spatula is perfect for folding in the ingredients and scraping down the sides of the bowl. Choose a silicone spatula for easy mixing and cleanup.
- Baking Pan: A 9×13-inch baking pan works best for Turtle Bars. Make sure it’s non-stick, or line it with parchment paper to avoid any sticky situations.
- Double Boiler or Microwave-Safe Bowl: For melting chocolate, you can use a double boiler or a microwave-safe bowl. The goal is to melt it gently to avoid burning.
- Cooling Rack: Once your Turtle Bars are baked, a cooling rack will help them cool evenly. This step is vital to achieve that perfect texture.
- Knife or Pizza Cutter: When it’s time to slice your Turtle Bars, a sharp knife or a pizza cutter will give you clean, even cuts that show off those delicious layers.
With these essential tools at your side, you’ll be well on your way to creating Turtle Bars that are not just delicious but also a joy to make. Remember, good equipment can turn a good recipe into a great one!
Variations and Substitutions
When it comes to Turtle Bars, creativity is your best friend! Whether you’re juggling work calls or soccer practice, this dish can easily adapt to suit your taste buds and dietary needs. Explore these variations and substitutions to make this recipe truly yours!
- Dietary-Friendly Tweaks: Want to make Turtle Bars vegan? Simply swap out any meat for hearty vegetables or legumes. For a creamy texture without dairy, try using coconut milk instead of traditional cream—your dairy-free crew will cheer!
- Protein Swaps: Not a tofu fan? No worries! You can easily substitute chicken or shrimp. If you prefer plant-based options, chickpeas or lentils work beautifully in Turtle Bars as well.
- Seasonal Twists: Embrace the seasons by adding fresh, seasonal ingredients. In the summer, toss in ripe cherry tomatoes for a burst of sweetness. Meanwhile, in fall, roasted squash adds a cozy, warm flavor—it’s like Thanksgiving in a bowl!
- Herb Alternatives: Fresh herbs improve Turtle Bars like nothing else. If you’re out of basil, fresh parsley or cilantro can provide a nice twist. Dried herbs can also substitute in a pinch—just remember to use less, as they are more concentrated!
- Spice It Up: Adjust the heat level based on your preference. A sprinkle of red pepper flakes can give your dish a fiery kick, while a dash of smoked paprika adds a nice depth of flavor to Turtle Bars.
With these variations and substitutions, you’ll never get bored of Turtle Bars. Feel free to experiment and make it your own! The possibilities are endless, and each twist will bring a new flavor experience to your table.
Serving and Storage Suggestions
When it comes to enjoying your delicious Turtle Bars, think about how to improve the experience even further. Here are some serving and storage suggestions to keep your meal as fresh and nice as possible:
- Serving Temperature: Serve Turtle Bars warm, as the flavors truly come alive when heated. A quick reheat can work wonders if it’s been sitting.
- Garnishing: A sprinkle of fresh herbs, like parsley or basil, can turn your everyday dish into a great dish. It adds not just flavor but also a burst of color!
- Side Pairings: Pair Turtle Bars with a crisp salad or garlic bread for a balanced meal. It’s like the perfect dance partner, enhancing every bite.
- Storage Tips: If you have leftovers, store them in an airtight container in the fridge. They’ll stay fresh for up to three days. It’s a lifesaver for those busy nights ahead!
- Freezing Options: Want to keep your Turtle Bars for later? Freeze it in individual portions. This way, you’ll always have a homemade meal ready to go, making future dinners a breeze.
- Reheating: When reheating, add a splash of broth or water. This helps retain moisture and keeps your dish from drying out. Think of it as a rejuvenating spa treatment for your leftovers!
- Creative Leftover Ideas: Transform any extra Turtle Bars into a new meal. Toss it into a wrap or serve over rice for a quick lunch. It’s like having a culinary chameleon in your fridge!
With these serving and storage suggestions, your Turtle Bars will remain a nice choice, whether it’s fresh from the stove or a quick reheated meal on a busy day.
Conclusion
At the end of the day, this recipe isn’t just dinner—it’s sanity saved. Whether you’re juggling work calls or soccer practice, Turtle Bars is your new best friend, effortlessly sliding into your busy routine. The nice aroma wafting through your kitchen will have everyone eagerly anticipating mealtime. The beauty of this dish lies in its versatility; you can easily adjust flavors or ingredients to suit your family’s preferences.
Imagine sitting down to a table filled with laughter and the rich flavors of Turtle Bars. It’s like wrapping yourself in a warm, cozy blanket after a long day. Plus, the best part? You can whip it up faster than a microwave meal, leaving you with more time to unwind. So, when the clock strikes six and hunger pangs hit, remember that you have this scrumptious recipe ready to save the day.
Give it a try, and watch how Turtle Bars can transform your weeknight dinners into something extraordinary. It’s not just a meal; it’s a moment to cherish with loved ones. So roll up your sleeves, gather your ingredients, and dive into the deliciousness that awaits!
Print
Turtle Bars
Description
Deliciously rich and chewy bars layered with chocolate, caramel, and pecans, perfect for any dessert lover.
Ingredients
- 1 cup unsalted butter, softened
- 1 cup brown sugar, packed
- 1 cup granulated sugar
- 2 large eggs
- 2 teaspoons vanilla extract
- 2 cups all-purpose flour
- 1 cup oats
- 1 teaspoon baking soda
- 1/2 teaspoon salt
- 1 cup chocolate chips
- 1 cup caramel sauce
- 1 cup chopped pecans
Instructions
- Preheat your oven to 350°F (175°C) and grease a 9×13-inch baking pan.
- In a large bowl, cream together the softened butter, brown sugar, and granulated sugar until smooth.
- Add the eggs and vanilla extract, mixing well to combine.
- In another bowl, whisk together the flour, oats, baking soda, and salt.
- Gradually add the dry ingredients to the wet mixture, stirring until fully incorporated.
- Spread half of the dough into the prepared baking pan, pressing it down evenly.
- Drizzle the caramel sauce over the dough layer, then sprinkle the chocolate chips and chopped pecans on top.
- Drop spoonfuls of the remaining dough over the caramel layer.
- Bake in the preheated oven for 25-30 minutes, or until golden brown.
- Allow to cool before cutting into bars and serving.
Notes
- For extra flavor, toast the pecans before adding them to the bars.
- These bars can be stored in an airtight container for up to a week.
- Try adding a pinch of sea salt on top before baking for a sweet-salty combination.
Nutrition
- Serving Size: 1 bar
- Calories: 220
- Sugar: 15g
- Sodium: 150mg
- Fat: 10g
- Saturated Fat: 5g
- Unsaturated Fat: 3g
- Trans Fat: 0g
- Carbohydrates: 30g
- Fiber: 1g
- Protein: 2g
- Cholesterol: 30mg


