
I remember the first time I attempted a red velvet dessert, it was a total disaster, honestly. The cake was dry, the color was more brown than red, and the frosting? Let’s just say it didn’t quite make it onto the cake. But then, a few years back, I had this craving a deep, insistent yearning for something truly decadent, something that combined all my favorite things. Red velvet, cheesecake, AND Oreos? It sounded like a dream, a glorious, slightly messy dream. This Red Velvet Oreo Cheesecake isn’t just a recipe, it’s a testament to kitchen resilience, a celebration of flavor, and a reminder that sometimes, the most ambitious ideas turn out to be the most comforting.
My very first attempt at this specific Red Velvet Oreo Cheesecake was a bit chaotic. I thought I could skip chilling the crust, and let’s just say the crumbs decided to stage a dramatic escape when I pressed them. And the red food coloring? It ended up on my favorite white shirt, naturally. But despite the mess, the first bite was pure magic. The tangy creaminess, the chocolatey crunch, the subtle cocoa it was worth every single crumb and stain, I swear.

Ingredients for Red Velvet Oreo Cheesecake
Crust Essentials
- Oreo Cookies: Honestly, don’t skimp here. You need that classic chocolatey crunch. I tried a generic brand once, and the crust just didn’t have the same depth. About 30-35 cookies, whole ones, not the double-stuffed kind unless you want a super sweet crust, which, I mean, I wouldn’t judge.
- Unsalted Butter: Melted, please! This is what binds those Oreo crumbs together. I used salted once, thinking ‘oh, a little extra flavor,’ but it just made the crust a bit too salty against the sweet filling. Stick to unsalted, trust me on this one.
Creamy Cheesecake Filling
- Cream Cheese: Full-fat, room temperature! This is non-negotiable for a truly rich and creamy Red Velvet Oreo Cheesecake. I tried a low-fat version once, thinking I was being healthy, and the texture was just… off. It didn’t set right. Block cream cheese, always.
- Granulated Sugar: Just enough sweetness to balance the tang of the cream cheese. Nothing too wild here, but don’t cut back too much, or it won’t taste like dessert!
- Large Eggs: Room temperature helps them incorporate better, preventing overmixing. I’ve cracked cold eggs straight into the batter before, and it made the mixture a bit lumpy. Oops.
- Sour Cream: Another room temperature hero! This adds an extra layer of tang and moisture, making the cheesecake super smooth. Greek yogurt works in a pinch, but the texture is a little different, a bit denser.
- Vanilla Extract: Use good quality vanilla! It makes a huge difference. The cheap stuff just doesn’t hit the same. I’m a bit heavy-handed with vanilla, always adding a splash more than the recipe calls for because, why not?
- Unsweetened Cocoa Powder: This is where the red velvet magic gets its subtle chocolate notes. Just a little bit, don’t go overboard, or it’ll taste too chocolatey and not enough red velvet. I always smell it before I add it, that rich chocolate aroma is everything.
- Red Food Coloring: Gel food coloring is your best friend here. Liquid can thin out the batter too much. I’ve had many a ‘pink velvet’ rather than ‘red velvet’ cheesecake because I was too shy with the coloring. Be bold, but not crazy!
Oreo Swirl & Topping
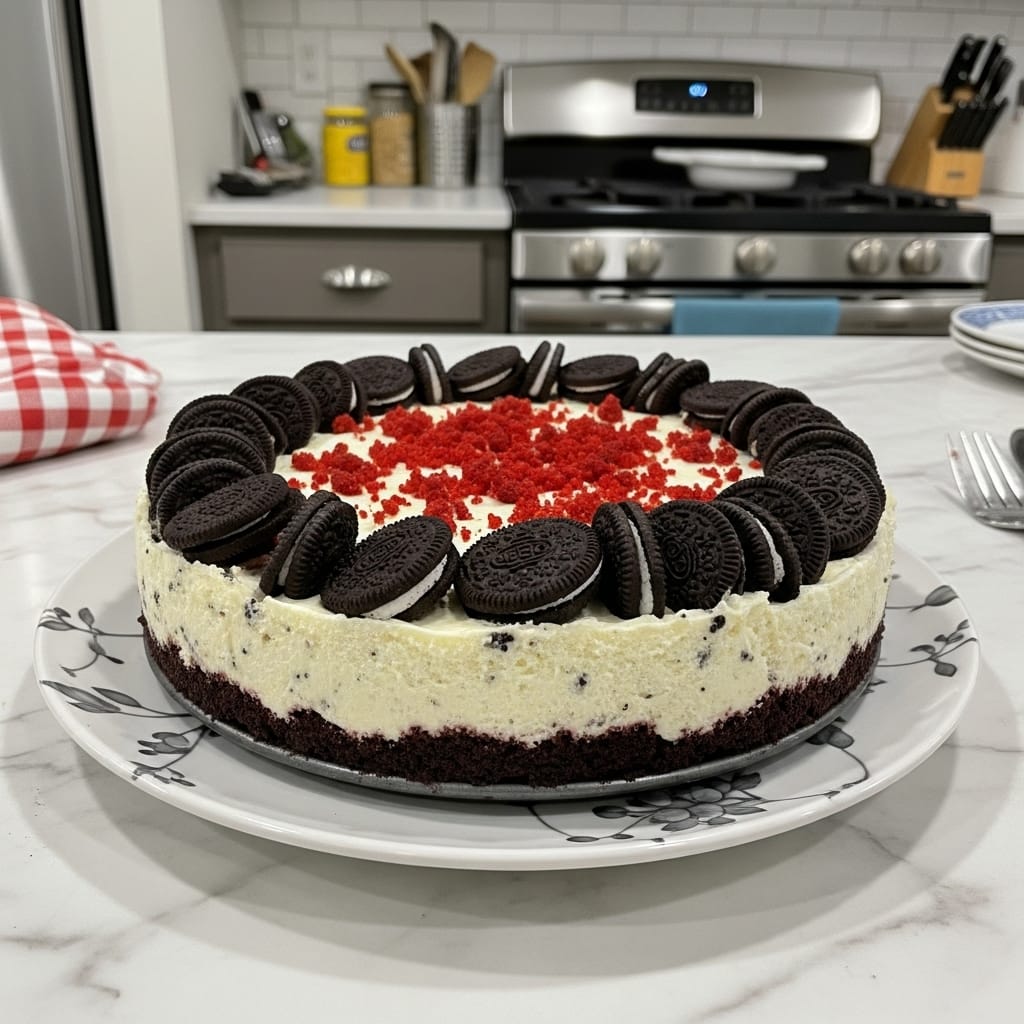
- Extra Oreo Cookies: Crushed, for swirling into the batter and for a glorious topping. This adds another layer of texture and that unmistakable Oreo flavor. I usually sneak a few while crushing them, it’s tradition.
- Heavy Cream: For a luscious whipped cream topping. Make sure it’s cold, cold, cold!
- Powdered Sugar: To sweeten that whipped cream just right.
- More Vanilla Extract: A little extra vanilla in the topping ties everything together beautifully.
Crafting Your Red Velvet Oreo Cheesecake
- Crust Chaos & Creation:
- First things first, let’s get that crust going. Grab your Oreos and smash ’em up! I usually toss them in my food processor, but if you’re feeling a bit of aggression, a Ziploc bag and a rolling pin work wonders. You want fine crumbs, like sand, but with a few tiny chunks gives it character, you know? Melt your butter, pour it over the crumbs, and mix until it looks like wet sand. Press it firmly into the bottom of a 9-inch springform pan. I always use the bottom of a glass to get it super packed. Pop it in the freezer for 15 minutes while you get the filling ready. This helps prevent a crumbly crust later, a mistake I’ve made too many times.
- Creamy Dream Filling:
- Preheat your oven to 325°F (160°C). In a large bowl, beat your room temperature cream cheese until it’s super smooth and fluffy no lumps allowed! Add the granulated sugar and beat until it’s well combined. Now, one egg at a time, beat them in, scraping down the sides of the bowl after each addition. This is where I always remind myself not to overmix, just combine. Too much air means cracks later, and nobody wants a cracked cheesecake, right? Stir in the sour cream, vanilla extract, and that little bit of cocoa powder. This mixture should smell so good, like a bakery!
- Red Velvet Hue:
- Time for the color! Add your red food coloring to the cheesecake batter. Start with a good amount, maybe 1-2 teaspoons of gel coloring, and mix until you get that rich, vibrant red velvet hue. You might need a little more or less depending on your coloring and how deep you want the red. I once added too little and it was more ‘blush velvet,’ which was pretty, but not what I was aiming for. Keep mixing until it’s evenly colored and looks like a dream. This step always feels like magic to me, seeing that color bloom!
- Oreo Swirl & Bake:
- Pour about half of your gorgeous Red Velvet Oreo Cheesecake batter over your chilled Oreo crust. Sprinkle about half of your extra crushed Oreos over the batter. Now, pour the remaining red velvet batter over the top. Take a spoon or a knife and gently swirl the remaining crushed Oreos into the top layer. You don’t want to mix it all in, just create pretty ribbons. Wrap the bottom of your springform pan tightly with heavy-duty aluminum foil to prevent any water bath leaks a kitchen disaster I’ve experienced! Place the pan in a larger roasting pan.
- Water Bath Wisdom:
- Carefully pour hot water into the roasting pan, making sure it comes about halfway up the sides of your springform pan. This water bath is key for an evenly baked, crack-free cheesecake. Trust me, it makes all the difference. Bake for 60-70 minutes, or until the edges are set but the center still has a slight jiggle. Don’t worry, that jiggle means it’s still creamy! I always peek at it around the 50-minute mark, just to check on my baby.
- Cool Down & Chill Out:
- Once baked, turn off the oven and leave the Red Velvet Oreo Cheesecake in there with the door slightly ajar for about an hour. This slow cool-down prevents cracks. After an hour, remove it from the water bath, take off the foil, and let it cool completely on a wire rack at room temperature. Once cool, cover it loosely with plastic wrap and chill in the refrigerator for at least 4-6 hours, or even better, overnight! This is the hardest part, waiting, but it’s so worth it for a perfectly set, sliceable cheesecake.
There was one time I was so excited to serve this Red Velvet Oreo Cheesecake that I pulled it out of the oven too fast, straight into the fridge. Big mistake, hon! The sudden temperature change made a huge crack right down the middle. It still tasted amazing, of course, but it looked like a dessert earthquake. Now I always, always let it cool slowly. Patience is a virtue, especially with cheesecake.
Red Velvet Oreo Cheesecake Storage Tips
This Red Velvet Oreo Cheesecake keeps really well, which is great because sometimes you just need a slice for a few days straight! Store any leftovers tightly covered with plastic wrap or in an airtight container in the refrigerator. It’ll stay fresh and delicious for up to 4-5 days. I’ve found that if you’ve already topped it with whipped cream, the cream might deflate a bit after a day or two, so sometimes I add the whipped cream just before serving each slice. Freezing? Oh yeah, you can totally do that! Slice the cheesecake, wrap individual slices tightly in plastic wrap, then aluminum foil, and pop them in a freezer-safe bag. It’ll last for up to 1-2 months. Just thaw a slice in the fridge for a few hours or on the counter for about 30 minutes. I once tried to microwave a frozen slice, thinking it’d be quick, and it turned into a sad, soggy mess. Don’t do that, lol.

Red Velvet Oreo Cheesecake Ingredient Substitutions
Okay, so while this Red Velvet Oreo Cheesecake recipe is pretty solid as is, sometimes you gotta work with what you’ve got, right? For the Oreo crust, if you’re out of Oreos (gasp!), chocolate wafer cookies or even graham crackers with a tablespoon of cocoa powder can work. I tried chocolate wafers once, and it was pretty good, but it lacked that distinct Oreo flavor. For the red food coloring, if you’re really against artificial colors, you could try using beet powder, but honestly, the color won’t be as vibrant, and it might add a subtle earthy note. I tried it once, and my family looked at me funny. As for the sour cream, full-fat Greek yogurt is a decent stand-in for that tangy creaminess, but the texture might be slightly thicker. Just be sure it’s plain, unsweetened yogurt, please!
Serving Your Red Velvet Oreo Cheesecake
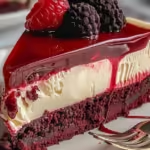
This Red Velvet Oreo Cheesecake is a showstopper all on its own, but a few little touches can make it even more special. My go-to is a generous dollop of homemade whipped cream just heavy cream, a touch of powdered sugar, and a splash of vanilla, whipped until fluffy. Then, a sprinkle of extra crushed Oreos on top for that satisfying crunch and a little visual flair. A drizzle of chocolate sauce also wouldn’t hurt, if you’re feeling extra. This cheesecake pairs wonderfully with a strong cup of coffee or a glass of cold milk. For a cozy night in, I love a slice with a warm mug of herbal tea and a good book. It’s comforting, celebratory, and just makes you feel happy, you know?
Cultural Backstory of Red Velvet Oreo Cheesecake
The story of red velvet cake is a bit of a mystery, with origins often tied to the Waldorf-Astoria Hotel in New York or even the Great Depression era when beet juice was used for coloring. It’s truly an American classic, known for its mild cocoa flavor and signature crimson hue. Cheesecake, on the other hand, has ancient roots, dating back to ancient Greece! The New York-style cheesecake, with its dense, creamy texture, became iconic in the early 20th century. Combining these two legends, then adding the beloved Oreo cookie, creates a modern, decadent dessert that feels both nostalgic and exciting. For me, this Red Velvet Oreo Cheesecake isn’t just a dessert, it’s a fusion of comforting traditions, a dish that feels like home and a party all at once, always bringing a smile to my face.
This Red Velvet Oreo Cheesecake has become a staple in my kitchen for celebrations, or just when I need a little pick-me-up. It’s a labor of love, for sure, but the look on everyone’s faces when they take that first bite? Pure gold. It’s that kind of rich, satisfying dessert that makes you want to sit back, sigh happily, and maybe go for another slice. I hope you give it a whirl and share your kitchen adventures with it!

Frequently Asked Questions about Red Velvet Oreo Cheesecake
- → Why did my Red Velvet Oreo Cheesecake crack?
Oh, the dreaded crack! It usually happens from overmixing the batter, which incorporates too much air, or from a sudden temperature change during cooling. Always cool it slowly in the oven with the door ajar, like I do, it helps a ton!
- → Can I use gluten-free Oreos for this cheesecake?
Absolutely! I’ve made this Red Velvet Oreo Cheesecake with gluten-free Oreos before, and it worked beautifully. The texture and flavor of the crust were pretty spot on, so go for it if you need a gluten-friendly option!
- → How do I know when the cheesecake is done baking?
The edges should look set and slightly puffed, but the very center (about 2-3 inches) should still have a slight wobble when you gently shake the pan. It will continue to set as it cools, so don’t overbake it!
- → Can I make this Red Velvet Oreo Cheesecake ahead of time?
Yes, please do! This cheesecake is actually even better the next day after a good, long chill in the fridge. The flavors really get a chance to meld together, making it extra delicious and easier to slice. It’s my secret weapon for parties!
- → What if I don’t have a springform pan?
You can try a regular 9×13 inch baking dish, but it won’t be as tall or have that classic cheesecake look. You’d also need to adjust baking time and serving might be a bit messier. A springform is truly ideal for this kind of Red Velvet Oreo Cheesecake.
Creamy Red Velvet Oreo Cheesecake: A Decadent Treat
- Prep Time: 30 Minutes
- Cook Time: 70 Minutes
- Total Time: 1 Hour 30 Minutes (plus 4-6 hours chilling)
- Yield: 12-16 Servings 1x
- Category: Breakfast
Description
Experience the layers of rich Red Velvet Oreo Cheesecake. My recipe combines tangy cream cheese, chocolatey Oreos, and a hint of cocoa for pure bliss.
Ingredients
- Crust Essentials:
- 30–35 Oreo cookies, finely crushed
- 6 tablespoons unsalted butter, melted
- Creamy Cheesecake Filling:
- 3 (8-ounce) blocks full-fat cream cheese, softened to room temperature
- 1 ½ cups granulated sugar
- 4 large eggs, room temperature
- ½ cup sour cream, room temperature
- 1 teaspoon vanilla extract
- 1 tablespoon unsweetened cocoa powder
- 1–2 teaspoons red gel food coloring (or more, to desired hue)
- Oreo Swirl & Topping:
- ½ cup extra crushed Oreo cookies (for swirl & topping)
- 1 ½ cups heavy cream, very cold
- ¼ cup powdered sugar
- ½ teaspoon vanilla extract
Instructions
- Crust Chaos & Creation:: First things first, let’s get that crust going. Grab your Oreos and smash ’em up! I usually toss them in my food processor, but if you’re feeling a bit of aggression, a Ziploc bag and a rolling pin work wonders. You want fine crumbs, like sand, but with a few tiny chunks – gives it character, you know? Melt your butter, pour it over the crumbs, and mix until it looks like wet sand. Press it firmly into the bottom of a 9-inch springform pan. I always use the bottom of a glass to get it super packed. Pop it in the freezer for 15 minutes while you get the filling ready. This helps prevent a crumbly crust later, a mistake I’ve made too many times.
- Creamy Dream Filling:: Preheat your oven to 325°F (160°C). In a large bowl, beat your room temperature cream cheese until it’s super smooth and fluffy – no lumps allowed! Add the granulated sugar and beat until it’s well combined. Now, one egg at a time, beat them in, scraping down the sides of the bowl after each addition. This is where I always remind myself not to overmix; just combine. Too much air means cracks later, and nobody wants a cracked cheesecake, right? Stir in the sour cream, vanilla extract, and that little bit of cocoa powder. This mixture should smell so good, like a bakery!
- Red Velvet Hue:: Time for the color! Add your red food coloring to the cheesecake batter. Start with a good amount, maybe 1-2 teaspoons of gel coloring, and mix until you get that rich, vibrant red velvet hue. You might need a little more or less depending on your coloring and how deep you want the red. I once added too little and it was more ‘blush velvet,’ which was pretty, but not what I was aiming for. Keep mixing until it’s evenly colored and looks like a dream. This step always feels like magic to me, seeing that color bloom!
- Oreo Swirl & Bake:: Pour about half of your gorgeous Red Velvet Oreo Cheesecake batter over your chilled Oreo crust. Sprinkle about half of your extra crushed Oreos over the batter. Now, pour the remaining red velvet batter over the top. Take a spoon or a knife and gently swirl the remaining crushed Oreos into the top layer. You don’t want to mix it all in, just create pretty ribbons. Wrap the bottom of your springform pan tightly with heavy-duty aluminum foil to prevent any water bath leaks – a kitchen disaster I’ve experienced! Place the pan in a larger roasting pan.
- Water Bath Wisdom:: Carefully pour hot water into the roasting pan, making sure it comes about halfway up the sides of your springform pan. This water bath is key for an evenly baked, crack-free cheesecake. Trust me, it makes all the difference. Bake for 60-70 minutes, or until the edges are set but the center still has a slight jiggle. Don’t worry, that jiggle means it’s still creamy! I always peek at it around the 50-minute mark, just to check on my baby.
- Cool Down & Chill Out:: Once baked, turn off the oven and leave the Red Velvet Oreo Cheesecake in there with the door slightly ajar for about an hour. This slow cool-down prevents cracks. After an hour, remove it from the water bath, take off the foil, and let it cool completely on a wire rack at room temperature. Once cool, cover it loosely with plastic wrap and chill in the refrigerator for at least 4-6 hours, or even better, overnight! This is the hardest part, waiting, but it’s so worth it for a perfectly set, sliceable cheesecake.


