Description
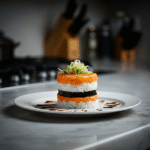
Sushi Stack: Get all the sushi flavor you love, no rolling required! This vibrant, easy tuna stack recipe makes fresh, fun dining simple for you.
Ingredients
Scale
- Base Ingredients:
- 1.5 cups sushi rice, uncooked
- 2 cups water (for rice)
- 1 lb sushi-grade tuna, cubed
- 2 ripe avocados, diced
- 4–5 sheets nori, torn into small pieces
- Sushi Rice Seasoning:
- 1/4 cup rice vinegar
- 2 tbsp sugar
- 1 tsp salt
- Flavor Boosters & Dressing:
- 2 tbsp soy sauce (plus more for serving)
- 1 tsp sesame oil
- 1/4 cup sriracha mayo (store-bought or homemade)
- 2 green onions, thinly sliced
- Finishing Touches:
- 2 tbsp toasted sesame seeds
- Pickled ginger, for serving
Instructions
- Prepare the Sushi Rice:: First things first, get that sushi rice rinsed! I usually rinse it under cold water until it runs clear, about 3-4 times. This gets rid of excess starch, which means fluffier, less sticky rice. Cook it according to package directions, usually 1 part rice to 1.25 parts water. While it’s cooking, I mix my rice vinegar, sugar, and salt in a small bowl. Once the rice is done and still warm, gently fold in that seasoned vinegar. You want to be gentle here, no smashing! I remember one time I was in a hurry and just stirred it like crazy; the rice ended up mushy, a real tragedy.
- Prep Your Tuna:: Now for the star of the show! Grab your beautiful sushi-grade tuna and cut it into small, uniform cubes, about 1/4 to 1/2 inch. You want bite-sized pieces, not chunks you have to wrestle with. In a bowl, gently toss the tuna with a splash of soy sauce, a tiny bit of sesame oil, and a sprinkle of those toasted sesame seeds. If you like a kick, a tiny dollop of sriracha mayo can go in here too. I once cut my tuna too big, and it made the stacking a bit wobbly, plus it just wasn’t as pleasant to eat. Learn from my oops moment, friends!
- Assemble Your Sushi Stack Layers:: Time to build! Grab a round cookie cutter or a small bowl – this is your stacking mold. Lightly oil the inside of your mold to prevent sticking. I usually use a pastry brush. First, press a layer of seasoned sushi rice firmly into the bottom. Next, add a layer of diced avocado. Then, a layer of your seasoned tuna. I love how the colors pop as you layer them – it’s just so satisfying to watch it come together!
- Add More Flavor and Texture to Your Sushi Stack:: After the tuna, I usually add a sprinkle of those chopped green onions and a few torn pieces of nori. The nori adds that essential sea flavor that just makes it feel like sushi. You can also add thin slices of cucumber or jalapeño here if you’re feeling fancy. I remember trying to put too much nori in one layer once, and it made the stack a bit dry. Balance is key, my dears!
- Repeat and Press:: Repeat the layers: more rice, then avocado, then tuna, green onions, and nori. Make sure to press each layer down gently but firmly with the back of a spoon. This is crucial for keeping your Sushi Stack from falling apart when you unmold it. I’ve had stacks collapse on me before because I didn’t press enough – it was a sad, delicious pile, but still a pile! It’s all part of the kitchen chaos, right?
- Unmold and Garnish Your Sushi Stack:: Once you’ve got your desired height (I usually do 2-3 layers of each), place a plate over the mold and carefully invert it. Give it a gentle tap or two, and the Sushi Stack should slide right out! Garnish with an extra drizzle of sriracha mayo, more toasted sesame seeds, and a side of pickled ginger. It should look vibrant, smell fresh, and honestly, taste like a dream. Seeing that perfectly formed stack always makes me smile after all that layering!