
Honestly, I used to think sushi was this super fancy, unattainable thing you only got from restaurants. My first attempt at rolling a maki was a disaster rice everywhere, seaweed tearing, tuna escaping! I remember standing in my kitchen, covered in sticky rice, just laughing at the mess. It felt like a culinary wrestling match I was losing. That’s when I stumbled upon the idea of a Sushi Stack. It was like a lightbulb moment! All the incredible flavors and textures I loved, but without the stress. This dish quickly became a staple for those weeknights when I craved something fresh and exciting, but my energy for kitchen acrobatics was, well, zero. It’s a comforting hug of flavors, truly, and reminds me that sometimes the simplest approach is the most brilliant.
I once tried to impress a friend with my sushi-rolling skills, and let’s just say the results were… abstract art. The rice was too wet, the seaweed refused to seal, and the whole thing disintegrated into a pile of deconstructed sadness. My friend was super polite about it, but I could tell. That’s when I promised myself to stick to the Sushi Stack when company was involved. No more public sushi failures for me, hon! It’s a testament to embracing kitchen chaos and finding joy in the simpler things.

Ingredients for Your Sushi Stack
- Sushi Rice: Use proper short-grain sushi rice, long-grain just doesn’t have that satisfying chew. It felt all wrong, honestly.
- Fresh Tuna (sushi-grade): This is the star, so get the best quality you can. Ask your fishmonger, they know what’s up.
- Avocado: Ripe but firm, not too mushy or hard. Adds that essential creamy, dreamy texture.
- Nori Sheets: Classic sushi flavor! I tear them for layering, easier than cutting.
- Rice Vinegar: Gives your sushi rice its distinctive tang. Don’t use regular vinegar unless you’re desperate.
- Sugar & Salt: For seasoning the rice vinegar mixture. Balances the tang. I once forgot the sugar, and it tasted flat.
- Soy Sauce: A must-have for dipping! I prefer low-sodium to control saltiness.
- Sesame Oil: Just a drizzle adds lovely depth and nutty aroma. Don’t overdo it, a little goes far.
- Sriracha Mayo: My secret weapon for a spicy kick. Buy it or whip it up easily.
- Green Onions: Fresh, mild oniony bite and a pop of color. I love their smell when chopping.
- Toasted Sesame Seeds: Delightful crunch and nutty flavor. I toast extra, they make everything better, honestly.
- Pickled Ginger: That refreshing, palate-cleansing zing! It just completes the Sushi Stack experience beautifully.
Building Your Sushi Stack: Instructions
- Prepare the Sushi Rice:
- First things first, get that sushi rice rinsed! I usually rinse it under cold water until it runs clear, about 3-4 times. This gets rid of excess starch, which means fluffier, less sticky rice. Cook it according to package directions, usually 1 part rice to 1.25 parts water. While it’s cooking, I mix my rice vinegar, sugar, and salt in a small bowl. Once the rice is done and still warm, gently fold in that seasoned vinegar. You want to be gentle here, no smashing! I remember one time I was in a hurry and just stirred it like crazy, the rice ended up mushy, a real tragedy.
- Prep Your Tuna:
- Now for the star of the show! Grab your beautiful sushi-grade tuna and cut it into small, uniform cubes, about 1/4 to 1/2 inch. You want bite-sized pieces, not chunks you have to wrestle with. In a bowl, gently toss the tuna with a splash of soy sauce, a tiny bit of sesame oil, and a sprinkle of those toasted sesame seeds. If you like a kick, a tiny dollop of sriracha mayo can go in here too. I once cut my tuna too big, and it made the stacking a bit wobbly, plus it just wasn’t as pleasant to eat. Learn from my oops moment, friends!
- Assemble Your Sushi Stack Layers:
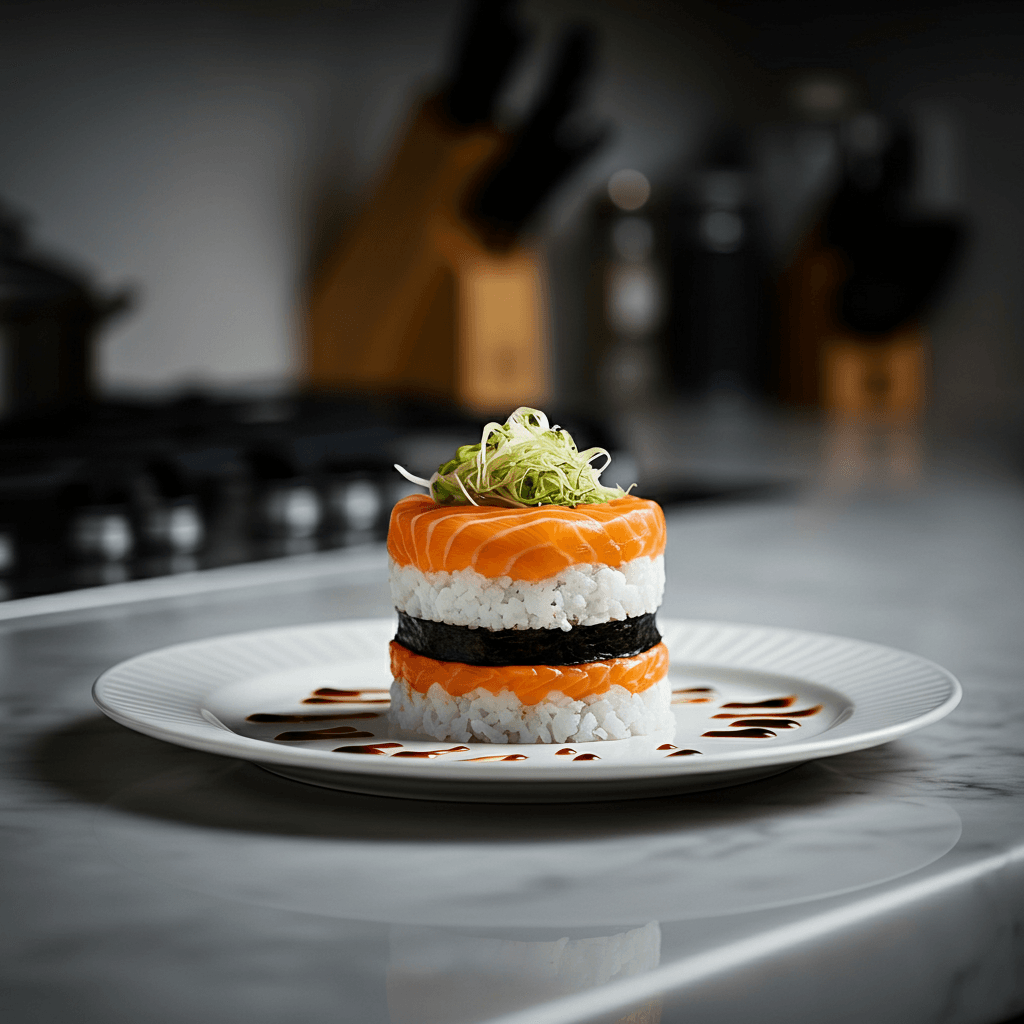
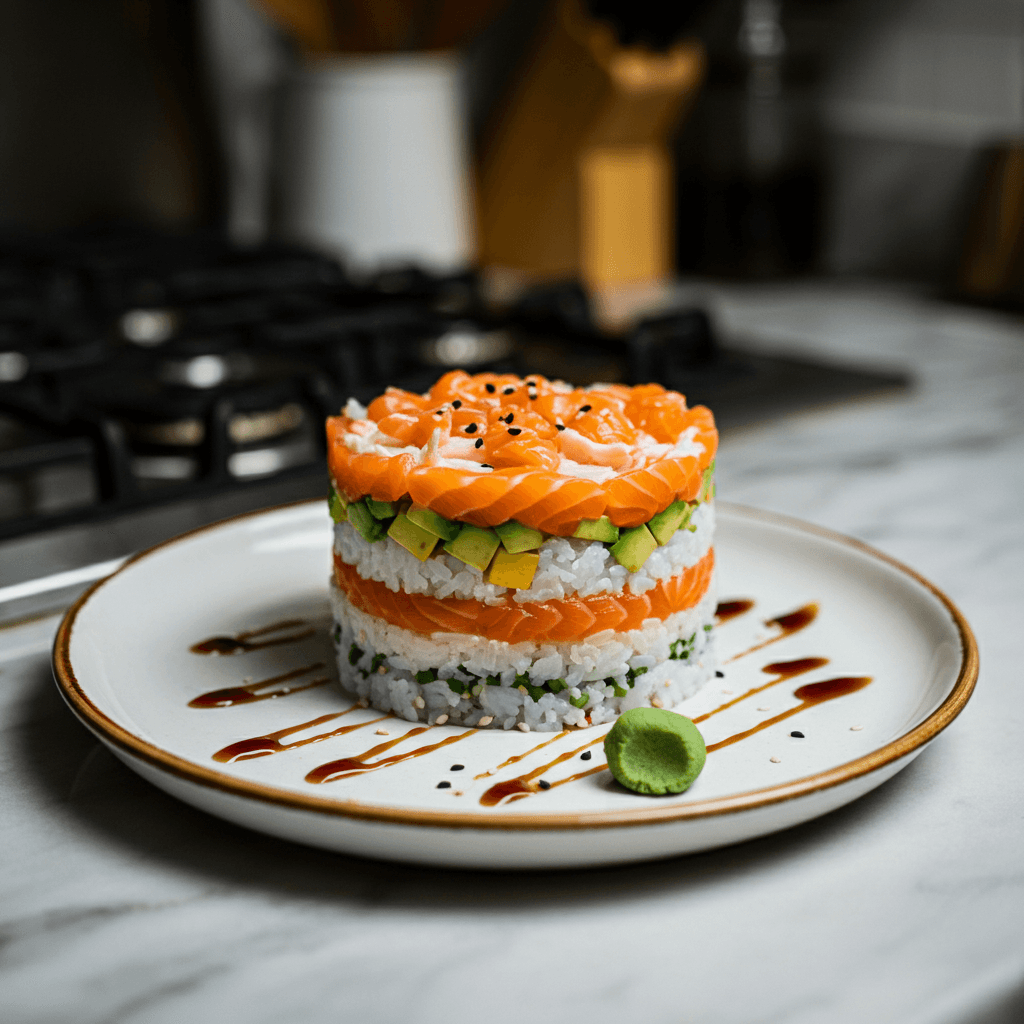
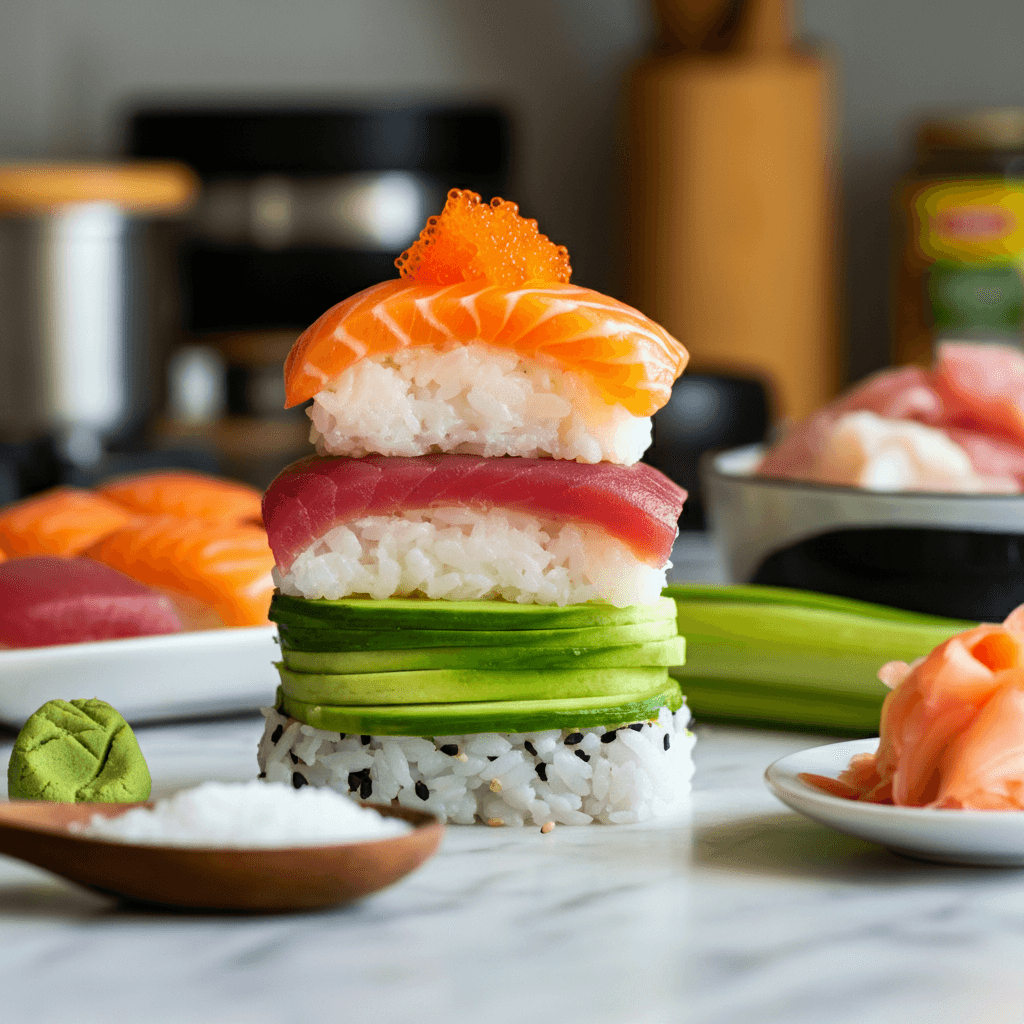
- Time to build! Grab a round cookie cutter or a small bowl this is your stacking mold. Lightly oil the inside of your mold to prevent sticking. I usually use a pastry brush. First, press a layer of seasoned sushi rice firmly into the bottom. Next, add a layer of diced avocado. Then, a layer of your seasoned tuna. I love how the colors pop as you layer them it’s just so satisfying to watch it come together!
- Add More Flavor and Texture to Your Sushi Stack:
- After the tuna, I usually add a sprinkle of those chopped green onions and a few torn pieces of nori. The nori adds that essential sea flavor that just makes it feel like sushi. You can also add thin slices of cucumber or jalapeño here if you’re feeling fancy. I remember trying to put too much nori in one layer once, and it made the stack a bit dry. Balance is key, my dears!
- Repeat and Press:
- Repeat the layers: more rice, then avocado, then tuna, green onions, and nori. Make sure to press each layer down gently but firmly with the back of a spoon. This is crucial for keeping your Sushi Stack from falling apart when you unmold it. I’ve had stacks collapse on me before because I didn’t press enough it was a sad, delicious pile, but still a pile! It’s all part of the kitchen chaos, right?
- Unmold and Garnish Your Sushi Stack:
- Once you’ve got your desired height (I usually do 2-3 layers of each), place a plate over the mold and carefully invert it. Give it a gentle tap or two, and the Sushi Stack should slide right out! Garnish with an extra drizzle of sriracha mayo, more toasted sesame seeds, and a side of pickled ginger. It should look vibrant, smell fresh, and honestly, taste like a dream. Seeing that perfectly formed stack always makes me smile after all that layering!
There was this one time, mid-stacking, my dog decided to “help” by nudging my elbow, and a whole spoonful of rice went flying. Total kitchen chaos! But honestly, those little moments are what make cooking real. This Sushi Stack recipe has seen me through so many moods from celebratory dinners to “I just need something good and comforting” nights. It’s more than just food, it’s a little bit of joy I can create right here at home.
Storing Your Sushi Stack
Okay, so storing a Sushi Stack can be a bit tricky because, well, raw fish and avocado. I’ve learned from experience that it’s best enjoyed fresh, ideally within a few hours of making it. If you have leftovers, which honestly, rarely happens in my house, you can store the components separately. The seasoned rice will keep in an airtight container in the fridge for up to 2 days. The tuna, if it’s still sushi-grade and hasn’t been sitting out for long, can be stored separately in an airtight container in the coldest part of your fridge for a maximum of 1 day. The avocado, once cut, tends to brown quickly, so I usually only prepare what I need. I tried to store a fully assembled Sushi Stack once, and by morning, the avocado was brown, and the tuna just didn’t taste as vibrant. So, my honest advice? Eat it fresh, or store components if you must, but don’t expect the same magic.
Sushi Stack Ingredient Substitutions
I’ve played around with this Sushi Stack recipe quite a bit, and I have some honest thoughts on substitutions. For the tuna, if raw fish isn’t your jam or you can’t find sushi-grade, cooked shrimp or even smoked salmon works beautifully. I tried shredded cooked chicken once, and it worked… kinda. The texture was different, but the flavors were still there! For the rice, a mix of quinoa and cauliflower rice can be a lighter option, though you’ll lose that sticky sushi rice texture. I’ve swapped avocado for thinly sliced mango for a fruity sweetness, which was a surprisingly good twist! If you’re out of nori, thinly sliced cucumber ribbons can offer a fresh crunch, though you miss that sea flavor. Feel free to experiment with other veggies like finely diced bell peppers or shredded carrots it’s your Sushi Stack, after all!
Serving Suggestions for Your Sushi Stack
This Sushi Stack is a meal in itself, but I love pairing it with a few things to make it a whole experience. A crisp, chilled white wine or a light Japanese beer is just perfect with the fresh flavors. For a non-alcoholic option, a sparkling lime water with a hint of ginger is lovely. As for sides, a simple miso soup is always a winner, or a quick cucumber salad with a sesame dressing. Sometimes, I’ll even make a little edamame with sea salt. And honestly, this dish and a good rom-com on a Friday night? Yes please. It feels fancy without any of the fuss, making it ideal for those moments when you want to treat yourself without leaving the house.
Cultural Backstory of Sushi Stack
While the traditional art of sushi rolling is deeply rooted in Japanese culinary history, the concept of a “Sushi Stack” or “sushi tower” is a more modern, Western-influenced take on classic sushi. It emerged as a way to enjoy the beloved flavors of sushi without the intricate rolling technique, making it more accessible for home cooks like me. My first encounter with a stacked version was at a casual fusion restaurant, and I was immediately captivated by its playful presentation. It felt like a fresh, respectful nod to the original, transforming it into something wonderfully achievable in my own kitchen. It’s a testament to how food traditions evolve, allowing us to connect with global flavors in our own unique ways, embracing the essence of the dish while making it our own.
Honestly, every time I make this Sushi Stack, I’m reminded of how much joy simple, fresh ingredients can bring. It might not be traditional maki, but it’s got all the heart and flavor I crave. Seeing those vibrant layers come together, knowing I made something so delicious and pretty without the usual sushi stress, just makes my day. I really hope you give this a try in your kitchen chaos and find as much happiness in it as I do. Don’t forget to share your own Sushi Stack creations with me!
Frequently Asked Questions About Sushi Stack
- → Can I use brown rice for this Sushi Stack recipe?
You can, but honestly, it changes the texture quite a bit. I tried it once, and it just didn’t have that classic sticky sushi feel. If you do, make sure to season it well!
- → What if I can’t find sushi-grade tuna for my Sushi Stack?
No worries! I’ve had success using smoked salmon, cooked shrimp, or even firm tofu for a vegetarian Sushi Stack. Just make sure whatever you pick is fresh and flavorful.
- → My Sushi Stack keeps falling apart, what am I doing wrong?
Ah, the classic wobbly stack! I’ve been there. Make sure you’re pressing each layer firmly into the mold. Also, a light oiling of the mold helps it slide out smoothly, trust me!
- → How long can I keep leftover Sushi Stack?
Honestly, it’s best fresh. If you must, store the components separately in the fridge for up to a day (raw tuna only if it was super fresh). A fully assembled stack gets soggy and sad, I learned that the hard way.
- → Can I add other vegetables to my Sushi Stack?
Absolutely! I love adding thinly sliced cucumber, shredded carrots, or even some finely diced bell peppers. Experiment with what you have, it’s your stack, make it fun!
Fresh Tuna Sushi Stack: Easy Weeknight Fun
- Prep Time: 25 Minutes
- Cook Time: 20 Minutes
- Total Time: 45 Minutes
- Yield: 4 Servings 1x
- Category: Dessert
Description
Sushi Stack: Get all the sushi flavor you love, no rolling required! This vibrant, easy tuna stack recipe makes fresh, fun dining simple for you.
Ingredients
- Base Ingredients:
- 1.5 cups sushi rice, uncooked
- 2 cups water (for rice)
- 1 lb sushi-grade tuna, cubed
- 2 ripe avocados, diced
- 4–5 sheets nori, torn into small pieces
- Sushi Rice Seasoning:
- 1/4 cup rice vinegar
- 2 tbsp sugar
- 1 tsp salt
- Flavor Boosters & Dressing:
- 2 tbsp soy sauce (plus more for serving)
- 1 tsp sesame oil
- 1/4 cup sriracha mayo (store-bought or homemade)
- 2 green onions, thinly sliced
- Finishing Touches:
- 2 tbsp toasted sesame seeds
- Pickled ginger, for serving
Instructions
- Prepare the Sushi Rice:: First things first, get that sushi rice rinsed! I usually rinse it under cold water until it runs clear, about 3-4 times. This gets rid of excess starch, which means fluffier, less sticky rice. Cook it according to package directions, usually 1 part rice to 1.25 parts water. While it’s cooking, I mix my rice vinegar, sugar, and salt in a small bowl. Once the rice is done and still warm, gently fold in that seasoned vinegar. You want to be gentle here, no smashing! I remember one time I was in a hurry and just stirred it like crazy; the rice ended up mushy, a real tragedy.
- Prep Your Tuna:: Now for the star of the show! Grab your beautiful sushi-grade tuna and cut it into small, uniform cubes, about 1/4 to 1/2 inch. You want bite-sized pieces, not chunks you have to wrestle with. In a bowl, gently toss the tuna with a splash of soy sauce, a tiny bit of sesame oil, and a sprinkle of those toasted sesame seeds. If you like a kick, a tiny dollop of sriracha mayo can go in here too. I once cut my tuna too big, and it made the stacking a bit wobbly, plus it just wasn’t as pleasant to eat. Learn from my oops moment, friends!
- Assemble Your Sushi Stack Layers:: Time to build! Grab a round cookie cutter or a small bowl – this is your stacking mold. Lightly oil the inside of your mold to prevent sticking. I usually use a pastry brush. First, press a layer of seasoned sushi rice firmly into the bottom. Next, add a layer of diced avocado. Then, a layer of your seasoned tuna. I love how the colors pop as you layer them – it’s just so satisfying to watch it come together!
- Add More Flavor and Texture to Your Sushi Stack:: After the tuna, I usually add a sprinkle of those chopped green onions and a few torn pieces of nori. The nori adds that essential sea flavor that just makes it feel like sushi. You can also add thin slices of cucumber or jalapeño here if you’re feeling fancy. I remember trying to put too much nori in one layer once, and it made the stack a bit dry. Balance is key, my dears!
- Repeat and Press:: Repeat the layers: more rice, then avocado, then tuna, green onions, and nori. Make sure to press each layer down gently but firmly with the back of a spoon. This is crucial for keeping your Sushi Stack from falling apart when you unmold it. I’ve had stacks collapse on me before because I didn’t press enough – it was a sad, delicious pile, but still a pile! It’s all part of the kitchen chaos, right?
- Unmold and Garnish Your Sushi Stack:: Once you’ve got your desired height (I usually do 2-3 layers of each), place a plate over the mold and carefully invert it. Give it a gentle tap or two, and the Sushi Stack should slide right out! Garnish with an extra drizzle of sriracha mayo, more toasted sesame seeds, and a side of pickled ginger. It should look vibrant, smell fresh, and honestly, taste like a dream. Seeing that perfectly formed stack always makes me smile after all that layering!


