Description
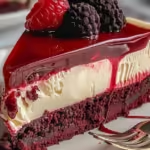
Experience the layers of rich Red Velvet Oreo Cheesecake. My recipe combines tangy cream cheese, chocolatey Oreos, and a hint of cocoa for pure bliss.
Ingredients
Scale
- Crust Essentials:
- 30–35 Oreo cookies, finely crushed
- 6 tablespoons unsalted butter, melted
- Creamy Cheesecake Filling:
- 3 (8-ounce) blocks full-fat cream cheese, softened to room temperature
- 1 ½ cups granulated sugar
- 4 large eggs, room temperature
- ½ cup sour cream, room temperature
- 1 teaspoon vanilla extract
- 1 tablespoon unsweetened cocoa powder
- 1–2 teaspoons red gel food coloring (or more, to desired hue)
- Oreo Swirl & Topping:
- ½ cup extra crushed Oreo cookies (for swirl & topping)
- 1 ½ cups heavy cream, very cold
- ¼ cup powdered sugar
- ½ teaspoon vanilla extract
Instructions
- Crust Chaos & Creation:: First things first, let’s get that crust going. Grab your Oreos and smash ’em up! I usually toss them in my food processor, but if you’re feeling a bit of aggression, a Ziploc bag and a rolling pin work wonders. You want fine crumbs, like sand, but with a few tiny chunks – gives it character, you know? Melt your butter, pour it over the crumbs, and mix until it looks like wet sand. Press it firmly into the bottom of a 9-inch springform pan. I always use the bottom of a glass to get it super packed. Pop it in the freezer for 15 minutes while you get the filling ready. This helps prevent a crumbly crust later, a mistake I’ve made too many times.
- Creamy Dream Filling:: Preheat your oven to 325°F (160°C). In a large bowl, beat your room temperature cream cheese until it’s super smooth and fluffy – no lumps allowed! Add the granulated sugar and beat until it’s well combined. Now, one egg at a time, beat them in, scraping down the sides of the bowl after each addition. This is where I always remind myself not to overmix; just combine. Too much air means cracks later, and nobody wants a cracked cheesecake, right? Stir in the sour cream, vanilla extract, and that little bit of cocoa powder. This mixture should smell so good, like a bakery!
- Red Velvet Hue:: Time for the color! Add your red food coloring to the cheesecake batter. Start with a good amount, maybe 1-2 teaspoons of gel coloring, and mix until you get that rich, vibrant red velvet hue. You might need a little more or less depending on your coloring and how deep you want the red. I once added too little and it was more ‘blush velvet,’ which was pretty, but not what I was aiming for. Keep mixing until it’s evenly colored and looks like a dream. This step always feels like magic to me, seeing that color bloom!
- Oreo Swirl & Bake:: Pour about half of your gorgeous Red Velvet Oreo Cheesecake batter over your chilled Oreo crust. Sprinkle about half of your extra crushed Oreos over the batter. Now, pour the remaining red velvet batter over the top. Take a spoon or a knife and gently swirl the remaining crushed Oreos into the top layer. You don’t want to mix it all in, just create pretty ribbons. Wrap the bottom of your springform pan tightly with heavy-duty aluminum foil to prevent any water bath leaks – a kitchen disaster I’ve experienced! Place the pan in a larger roasting pan.
- Water Bath Wisdom:: Carefully pour hot water into the roasting pan, making sure it comes about halfway up the sides of your springform pan. This water bath is key for an evenly baked, crack-free cheesecake. Trust me, it makes all the difference. Bake for 60-70 minutes, or until the edges are set but the center still has a slight jiggle. Don’t worry, that jiggle means it’s still creamy! I always peek at it around the 50-minute mark, just to check on my baby.
- Cool Down & Chill Out:: Once baked, turn off the oven and leave the Red Velvet Oreo Cheesecake in there with the door slightly ajar for about an hour. This slow cool-down prevents cracks. After an hour, remove it from the water bath, take off the foil, and let it cool completely on a wire rack at room temperature. Once cool, cover it loosely with plastic wrap and chill in the refrigerator for at least 4-6 hours, or even better, overnight! This is the hardest part, waiting, but it’s so worth it for a perfectly set, sliceable cheesecake.