Description
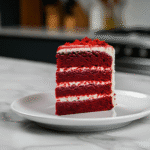
Whip up a delightful Red Velvet Cake with tangy cream cheese frosting. This recipe shares my personal kitchen adventures for a truly special dessert.
Ingredients
Scale
- Cake Batter Essentials:
- 2 ½ cups (300g) all-purpose flour
- 1 ½ cups (300g) granulated sugar
- 1 tbsp unsweetened cocoa powder
- 1 tsp baking soda
- ½ tsp salt
- 2 large eggs, room temperature
- 1 cup (240ml) buttermilk, room temperature
- ½ cup (120ml) vegetable oil
- 1 tsp vanilla extract
- 2 tbsp red gel food coloring
- 1 tsp white vinegar
- For That Signature Frosting:
- 8 oz (226g) cream cheese, softened
- ½ cup (113g) unsalted butter, softened
- 4 cups (480g) powdered sugar, sifted
- 1 tsp vanilla extract
- Pinch of salt
- Finishing Touches:
- Cake crumbs (from leveling) for garnish, optional
Instructions
- Prep Your Pans & Oven:: First things first, get those cake pans ready. I usually grab two 9-inch round pans, grease ’em up good, and then dust ’em with a bit of flour. Honestly, I’ve skipped this step once or twice, and let me tell you, prying a cake out of a pan is not a fun kitchen workout. Preheat your oven to 350°F (175°C) too, don’t be like me and forget! This sets the stage for a beautiful Red Velvet Cake.
- Whisk the Dry Ingredients:: In a big bowl, whisk together your all-purpose flour, granulated sugar, unsweetened cocoa powder, baking soda, and a pinch of salt. This is where the magic starts to happen, getting all those dry bits evenly distributed. I always give it an extra whisk, because clumpy flour is just no fun and can mess with the texture of your Red Velvet Cake. We want smooth sailing!
- Mix the Wet Ingredients:: In another bowl, combine your room temperature eggs, buttermilk, vegetable oil, vanilla extract, and that vibrant red gel food coloring. This is where the Red Velvet Cake gets its signature hue! I’ve experimented with different red food colorings, and honestly, gel works best for that deep, rich color without making the batter too thin. Don’t be shy with the red – make it pop!
- Combine Gently:: Slowly add the wet ingredients to the dry ingredients, mixing on low speed until just combined. Don’t overmix, hon! Overmixing can lead to a tough cake, and we want a tender, fluffy Red Velvet Cake. I usually stop as soon as I see no more streaks of flour. You’ll see that gorgeous red color really start to shine through.
- Add the Vinegar Boost:: Now for the secret ingredient: white vinegar! Stir it in gently. This reacts with the baking soda to give the Red Velvet Cake its signature rise and a little tang. I always wonder how something so simple makes such a difference. Pour the batter evenly into your prepared pans. The batter will be a glorious, deep red, ready for baking!
- Bake to Perfection:: Pop those pans into the preheated oven and bake for about 25-30 minutes, or until a wooden skewer inserted into the center comes out clean. My kitchen smells absolutely divine at this stage – that sweet cocoa and vanilla aroma, oh my! Let them cool in the pans for about 10 minutes before transferring to a wire rack to cool completely. Patience is key for this Red Velvet Cake.
- Whip Up the Cream Cheese Frosting:: While the cakes cool, let’s make that dreamy cream cheese frosting. In a stand mixer, beat softened cream cheese and unsalted butter until light and fluffy. Gradually add powdered sugar, vanilla extract, and a pinch of salt. Beat until smooth and creamy. This is my favorite part, tasting little spoonfuls along the way, oops! This frosting is essential for a classic Red Velvet Cake.
- Assemble Your Masterpiece:: Once the Red Velvet Cake layers are completely cool (this is CRITICAL, don’t rush it!), level them if needed. Spread a generous layer of frosting on the first cake layer, top with the second, and then frost the entire cake. I sometimes sprinkle a few cake crumbs on top for a rustic touch. Step back and admire your beautiful Red Velvet Cake!