
I remember the first crisp autumn day I tried to make something that just screamed fall. Apples were practically tumbling out of my grocery bag. I had this vague idea for apple pie, but, honestly, the whole crust thing? Intimidating. That’s when I stumbled upon the idea of bars. Less fuss, same incredible flavor. My kitchen filled with cinnamon and baked apple smells that day, and even though I nearly burnt the first batch (oops!), these Quick Apple Pie Bars for Fall became my absolute autumn staple. They’re sweet, a little tart, and just feel like a warm hug.
One time, I was so excited to get these Apple Pie Bars for Fall in the oven, I completely forgot to add the sugar to the apple filling. My husband took a bite and his face was a picture! We had a good laugh, and I ended up drizzling a ton of caramel sauce over them. It was a happy accident, but trust me, learn from my “oops” sugar is kinda important for these sweet treats!

Ingredients for Apple Pie Bars for Fall
Crust Essentials for Apple Pie Bars for Fall
- All-Purpose Flour: This is the base, hon! Don’t skimp on measuring, or you’ll end up with a crumbly mess (speaking from experience!).
- Granulated Sugar: Just enough sweetness for that buttery shortbread crust. I once used brown sugar here by mistake, and it was… different. Not bad, but not what we’re going for.
- Cold Unsalted Butter: CRITICAL. Seriously, cold butter is your best friend for a flaky crust. I’ve tried softened butter, and it melts into a greasy disaster. Don’t do it.
- Salt: Just a pinch to balance the sweetness. It’s like the unsung hero of baking, makes everything pop!
Apple Filling Stars for Apple Pie Bars for Fall
- Apples (Granny Smith, Honeycrisp, or a mix): Use firm, slightly tart apples. Granny Smiths are my go-to for that classic apple pie tang. I tried Red Delicious once, and they turned to mush. Never again!
- Brown Sugar (packed): Gives that deep, caramelly sweetness we all crave in Apple Pie Bars for Fall.
- Cinnamon: The scent of autumn! Honestly, I add a little extra because, well, cinnamon.
- Nutmeg: Just a tiny whisper. Too much and it overpowers, but that subtle warmth is everything.
- Lemon Juice: Keeps the apples from browning and adds a bright lift to the filling. I always forget this step, then regret it!
- Cornstarch: This is our thickening agent. Without it, your filling will be watery. I once used flour instead and it was clumpy, so stick with the cornstarch.
Finishing Touches for Apple Pie Bars for Fall
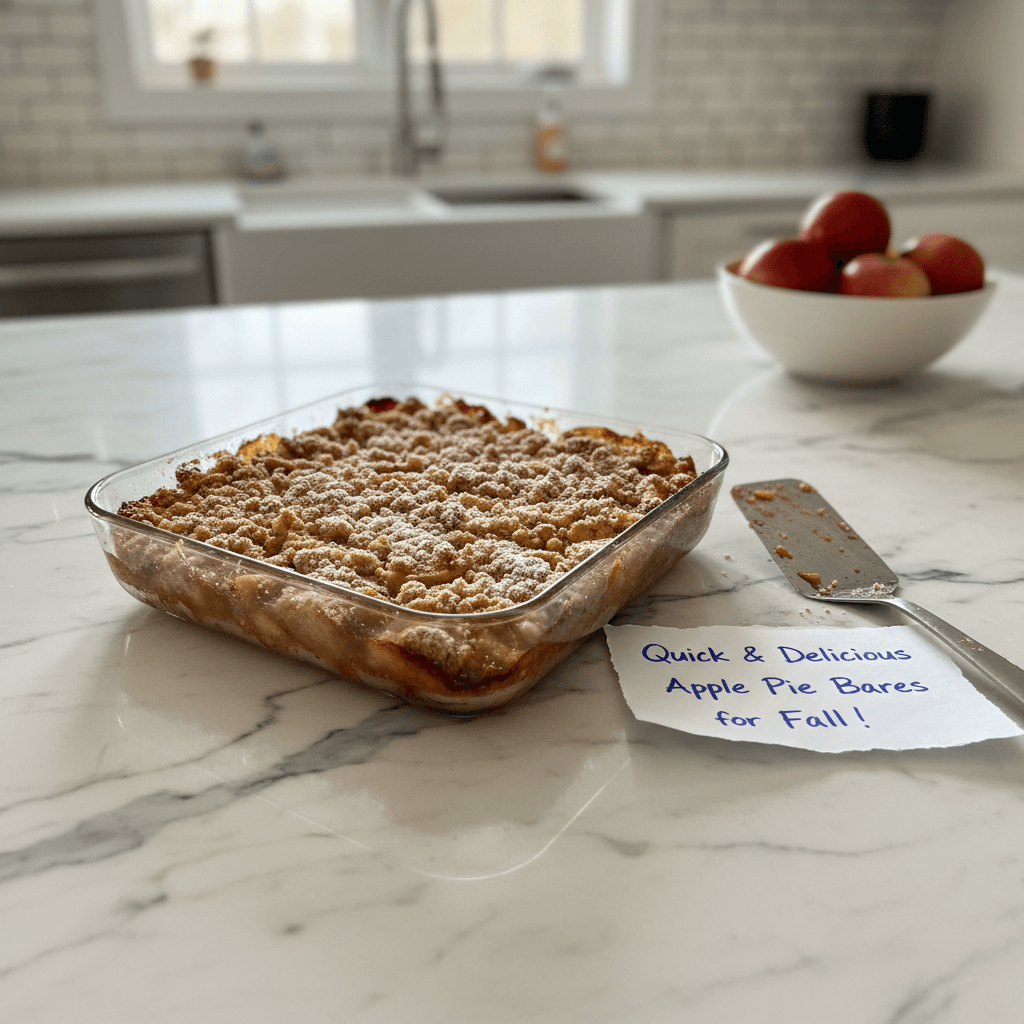
- Powdered Sugar (for dusting): Totally optional, but it makes these Apple Pie Bars for Fall look so pretty and adds a little extra sweet cloud.
Instructions for Apple Pie Bars for Fall
- Prep the Crust Dough:
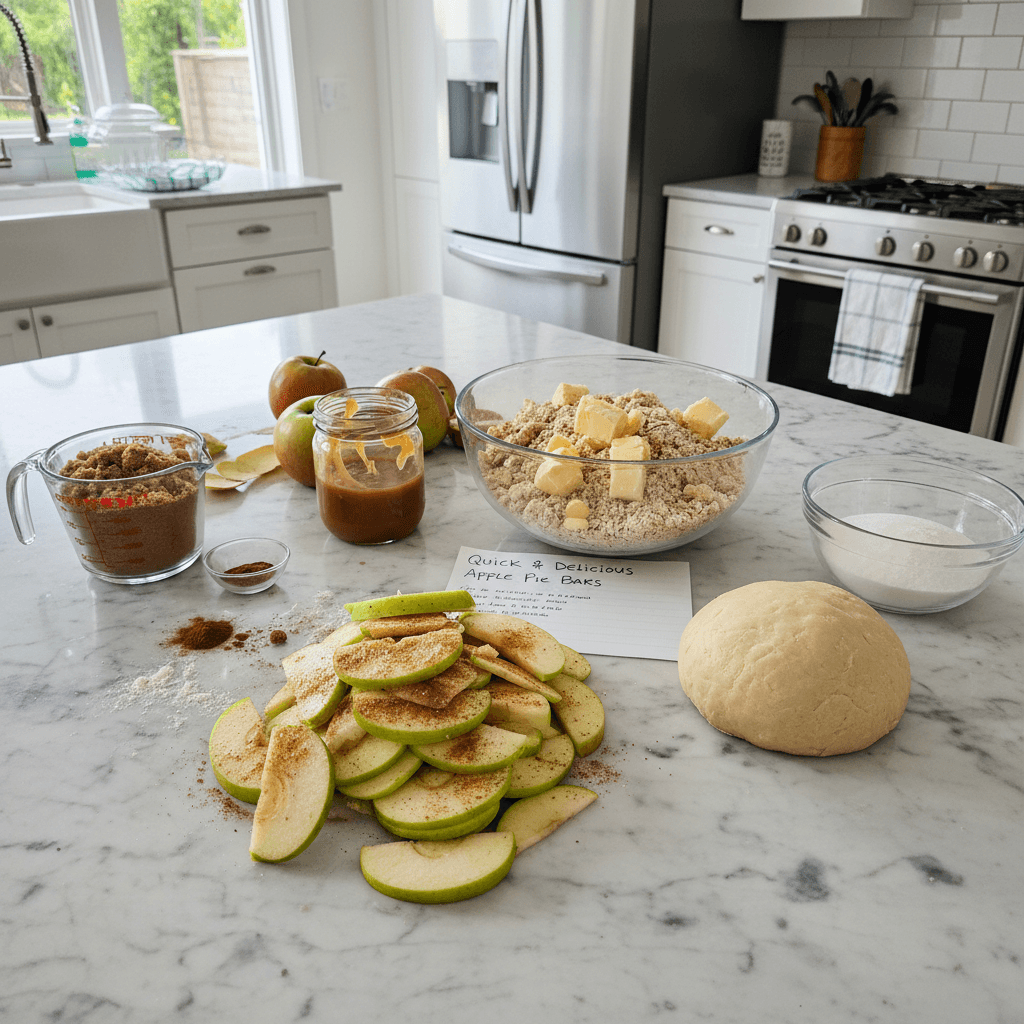
- First things first, we’re making that buttery crust. In a large bowl, whisk together your flour, sugar, and salt. Now, cut your cold butter into small cubes and use a pastry blender or your fingertips to cut it into the flour mixture. You’re looking for coarse crumbs, like wet sand, with some pea-sized pieces of butter still visible. This is where the magic happens for that flaky texture, don’t overmix it! I always get flour everywhere at this stage, it’s just part of the process.
- Press and Bake the Base:
- Now, press about two-thirds of that glorious crumbly mixture evenly into the bottom of your prepared 9×13 inch baking pan. Make sure it’s packed down well. This forms the base of your Apple Pie Bars for Fall. Pop it into a preheated 375°F (190°C) oven and bake for about 15 minutes, or until it’s lightly golden. You’ll smell that amazing buttery shortbread aroma filling your kitchen that’s how you know it’s working!
- Whip Up the Apple Filling:
- While the crust is doing its thing, let’s get those apples ready. Peel, core, and thinly slice your apples. In a big bowl, toss them with brown sugar, cinnamon, nutmeg, lemon juice, and cornstarch. Make sure every apple slice is coated! This is where the kitchen starts to smell like pure autumn. I always taste a piece of apple here, just to make sure the spices are right and maybe sneak a few more!
- Layer the Apples:
- Once your crust is lightly golden, pull it out of the oven. Carefully spread the apple filling evenly over the warm crust. Try to get a nice, even layer so every bar gets a good amount of apple goodness. This step feels so satisfying, seeing all those beautiful spiced apples ready to bake into delicious Apple Pie Bars for Fall. Don’t worry if it looks a little messy, it’s all part of homemade charm!
- Add the Crumb Topping:
- Now for the remaining one-third of your crust mixture. Sprinkle it evenly over the apple filling. Don’t press it down this time, we want those loose, crumbly bits to get nice and crispy. This is my favorite part because it adds that lovely texture contrast to the soft apples. I tend to make extra crumb topping, honestly, because who doesn’t love more crumble?
- Bake Until Golden Perfection:
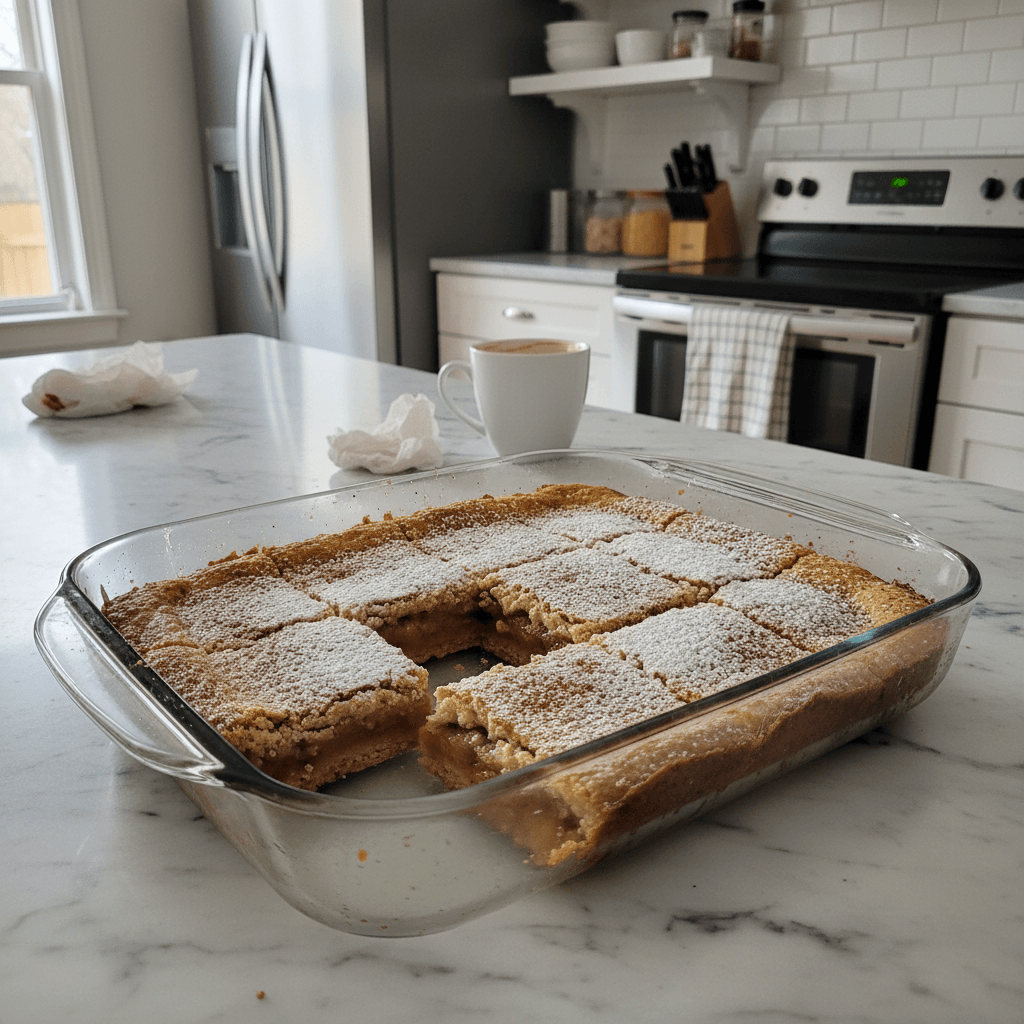
- Return the pan to the oven and bake for another 30-40 minutes, or until the topping is golden brown and the apples are tender and bubbly. You’ll hear the gentle sizzle and see the edges getting beautifully caramelized. Let them cool completely on a wire rack before slicing. I know, waiting is the hardest part, but these Apple Pie Bars for Fall need to set up properly!
The first time I managed to get these Apple Pie Bars for Fall just right, I felt like a baking wizard. My kitchen was a delightful mess of flour and apple peels, but the smell, oh, the smell! It was pure magic. There’s something so grounding about baking with apples in the fall, and these bars just bring all that warmth and comfort right to your table.
Storage Tips for Apple Pie Bars for Fall
These Apple Pie Bars for Fall are actually pretty forgiving when it comes to storage, which is great because sometimes I make a huge batch! Once they’re completely cooled (and I mean completely, or you’ll get condensation and a soggy crust, I speak from experience!), store them in an airtight container at room temperature for up to 2-3 days. If you want them to last longer, pop them in the fridge for up to a week. I once tried freezing them loosely wrapped, and while they were edible, the crust lost a bit of its crispness. Reheating them gently in the oven can sometimes bring back a little of that fresh-baked feel, but avoid the microwave it makes the crust soft and sad.
Ingredient Substitutions for Apple Pie Bars for Fall
Okay, so I’ve experimented a bit with these Apple Pie Bars for Fall. If you don’t have all-purpose flour, a 1:1 gluten-free baking blend can work, though the texture might be a little different, less crumbly, more cakey perhaps. For the apples, really any firm apple that holds its shape well is fine, Braeburn or Fuji are good alternatives to Granny Smith. I once used pears, and it was… interesting, but definitely not apple pie. If you’re out of brown sugar, you can use all granulated sugar, but you’ll miss that deep molasses flavor. And if you’re out of cinnamon, a pumpkin pie spice blend works wonders for that autumnal vibe!
Serving Apple Pie Bars for Fall
Honestly, these Apple Pie Bars for Fall are fantastic on their own, maybe with a light dusting of powdered sugar. But if you want to elevate the experience? A scoop of vanilla bean ice cream melting over a warm bar? Yes, please! Or a dollop of fresh whipped cream, if you’re feeling fancy. I also love them with a hot cup of spiced chai tea on a rainy afternoon, maybe while curled up with a good book. They’re also surprisingly good with a sharp cheddar cheese slice, if you’re into that sweet and savory thing don’t knock it ’til you try it! These bars are perfect for a potluck or just a quiet evening in.
Apple Pie Bars for Fall: Cultural Backstory
Apple pie, in general, has a rich history, often associated with American comfort food, but its roots stretch back to medieval England! The “pie” part used to refer to the crust, which acted more as a cooking vessel and less for eating. But these Apple Pie Bars for Fall? They’re a more modern, accessible take on that classic. For me, they represent that feeling of bringing something traditional into my busy life without all the fuss. It’s about taking those comforting, familiar flavors and making them work for a weeknight dessert or a quick autumn treat, a testament to how food traditions evolve and adapt.
Making these Apple Pie Bars for Fall always brings a smile to my face. From the scent of apples and cinnamon filling my home to that first sweet, tender bite, it just feels like autumn in a pan. They might not be fancy, but they’re real, they’re delicious, and they carry a little piece of my kitchen chaos and love in every square. I hope you give them a try and maybe even make a delightful mess of your own! Share your versions with me!
Frequently Asked Questions about Apple Pie Bars for Fall
- → Can I use other fruits for these Apple Pie Bars for Fall?
I’ve tried peaches and berries, and they work, but the texture and cook time might change a bit. For true “apple pie” vibes, stick with apples. Pears are okay, but they get softer faster, so watch them!
- → My crust isn’t crumbly enough, what went wrong?
Oh, I’ve been there! It usually means your butter wasn’t cold enough or you overmixed it. Cold butter and a light touch are key for that perfect crumbly texture for your Apple Pie Bars for Fall.
- → How do I know when the Apple Pie Bars for Fall are done baking?
Look for a golden-brown topping and listen for a gentle bubbling from the apples underneath. If you gently poke an apple with a knife through the crumble, it should feel tender and delicious.
- → Can I make these Apple Pie Bars for Fall ahead of time?
You bet! They actually taste even better the next day once the flavors have had a chance to meld. Just store them properly as mentioned in the storage tips for your Apple Pie Bars for Fall.
- → What if I don’t have a 9×13 inch pan for these Apple Pie Bars for Fall?
You can use an 8×8 inch pan for thicker bars, but you’ll need to increase the baking time slightly. Keep an eye on them! Or two smaller pans for thinner Apple Pie Bars for Fall, that works too.

Quick Apple Pie Bars for Fall: Sweet Autumn Treats
- Prep Time: 20 Minutes
- Cook Time: 45 Minutes
- Total Time: 65 Minutes
- Yield: 12 Servings 1x
- Category: Breakfast
Description
Whip up easy Apple Pie Bars for Fall! My simple recipe brings warm autumn flavors with a buttery crust and spiced apples. Perfect for a cozy treat!
Ingredients
- Crust Essentials:
- 2 cups (240g) All-Purpose Flour
- 1/2 cup (100g) Granulated Sugar
- 1 cup (226g) Cold Unsalted Butter, cut into small cubes
- 1/4 teaspoon Salt
- Apple Filling Stars:
- 6 medium Apples (about 6 cups sliced, Granny Smith, Honeycrisp, or a mix)
- 1/2 cup (100g) packed Brown Sugar
- 1 tablespoon Ground Cinnamon
- 1/2 teaspoon Ground Nutmeg
- 1 tablespoon Lemon Juice
- 2 tablespoons Cornstarch
- Finishing Touches:
- 2 tablespoons Powdered Sugar (for dusting, optional)
Instructions
- Prep the Crust Dough:: First things first, we’re making that buttery crust. In a large bowl, whisk together your flour, sugar, and salt. Now, cut your cold butter into small cubes and use a pastry blender or your fingertips to cut it into the flour mixture. You’re looking for coarse crumbs, like wet sand, with some pea-sized pieces of butter still visible. This is where the magic happens for that flaky texture, don’t overmix it! I always get flour everywhere at this stage, it’s just part of the process.
- Press and Bake the Base:: Now, press about two-thirds of that glorious crumbly mixture evenly into the bottom of your prepared 9×13 inch baking pan. Make sure it’s packed down well. This forms the base of your Apple Pie Bars for Fall. Pop it into a preheated 375°F (190°C) oven and bake for about 15 minutes, or until it’s lightly golden. You’ll smell that amazing buttery shortbread aroma filling your kitchen—that’s how you know it’s working!
- Whip Up the Apple Filling:: While the crust is doing its thing, let’s get those apples ready. Peel, core, and thinly slice your apples. In a big bowl, toss them with brown sugar, cinnamon, nutmeg, lemon juice, and cornstarch. Make sure every apple slice is coated! This is where the kitchen starts to smell like pure autumn. I always taste a piece of apple here, just to make sure the spices are right – and maybe sneak a few more!
- Layer the Apples:: Once your crust is lightly golden, pull it out of the oven. Carefully spread the apple filling evenly over the warm crust. Try to get a nice, even layer so every bar gets a good amount of apple goodness. This step feels so satisfying, seeing all those beautiful spiced apples ready to bake into delicious Apple Pie Bars for Fall. Don’t worry if it looks a little messy, it’s all part of homemade charm!
- Add the Crumb Topping:: Now for the remaining one-third of your crust mixture. Sprinkle it evenly over the apple filling. Don’t press it down this time; we want those loose, crumbly bits to get nice and crispy. This is my favorite part because it adds that lovely texture contrast to the soft apples. I tend to make extra crumb topping, honestly, because who doesn’t love more crumble?
- Bake Until Golden Perfection:: Return the pan to the oven and bake for another 30-40 minutes, or until the topping is golden brown and the apples are tender and bubbly. You’ll hear the gentle sizzle and see the edges getting beautifully caramelized. Let them cool completely on a wire rack before slicing. I know, waiting is the hardest part, but these Apple Pie Bars for Fall need to set up properly!


