
Oh, the memories! I remember the first time I stumbled upon the idea of dirt cups. It was at a school Halloween party, years ago, and honestly, I was more fascinated by the gummy worms wiggling out of the “dirt” than the actual spooky decorations. My little one, then just a toddler, pointed at them with wide eyes and a giggle, and I knew, just knew, I had to recreate that magic at home. It wasn’t just a dessert, it was an experience, a little garden of edible mischief. The way the crushed Oreos looked like freshly tilled earth, the creamy pudding, and those vibrant worms it just clicked. It’s a simple joy, a comforting nod to childhood, and frankly, a lifesaver for busy Halloween nights when you still want to make something special.
My first attempt at these Oreo Worm Garden Halloween Dirt Cups? Oh, it was a glorious mess! I got a little overzealous with crushing the Oreos in the food processor, and let’s just say my kitchen looked like a chocolate bomb exploded. And the pudding? I tried to rush it, ended up with a few lumps. But you know what? My kiddo didn’t care one bit. She just laughed, grabbed a spoon, and dove right in. It taught me that sometimes, the imperfections are what make it truly special, and honestly, a bit more fun.

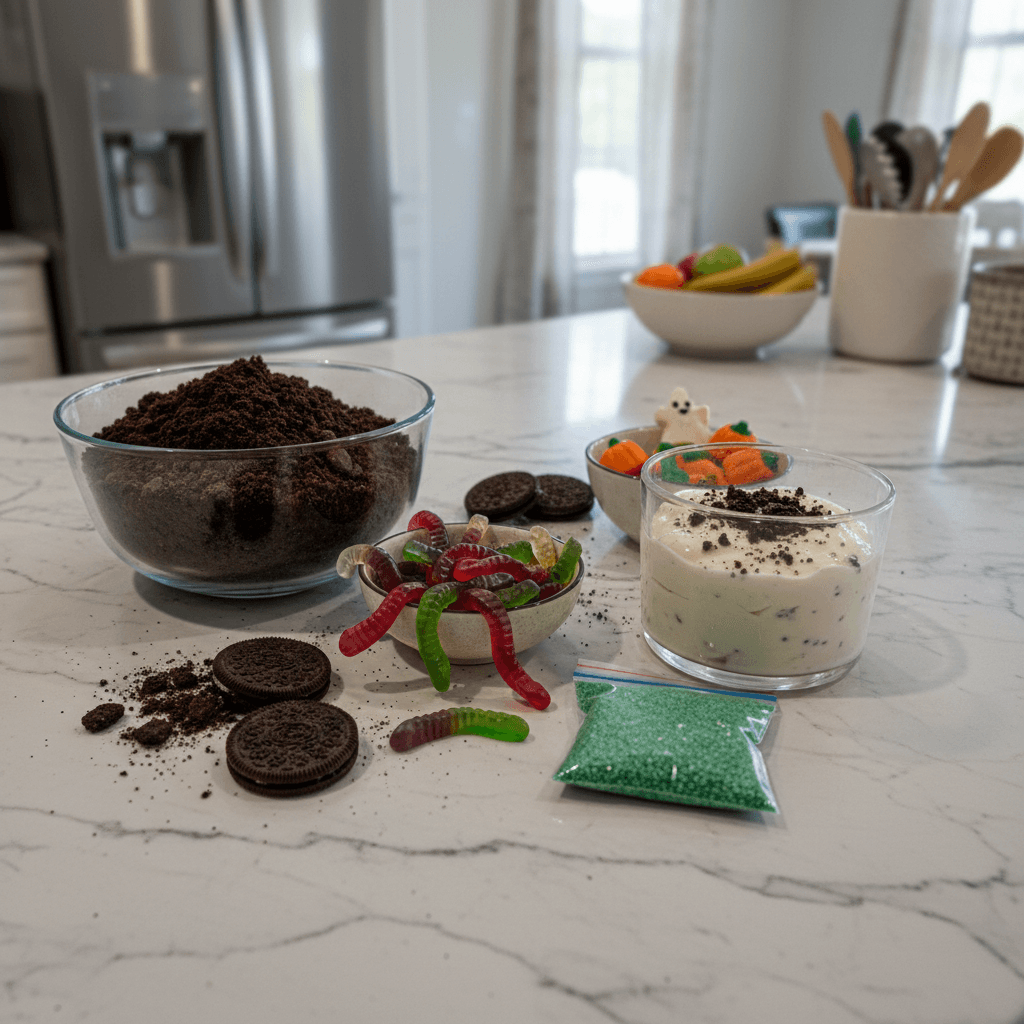
Ingredients for Oreo Worm Garden Halloween Dirt Cups
- Oreo Cookies: These are the star, the “dirt” for our garden. Don’t skimp on these, the classic chocolate flavor is crucial for that authentic look and taste. I usually grab the family-sized pack because, well, snacks.
- Instant Chocolate Pudding Mix: The base of our creamy layers. I’ve tried other flavors, but chocolate just works best with the Oreos. And yes, instant is your friend here I’m all about quick wins, honestly.
Milk: Whole milk, friends, just do it. It makes the pudding extra creamy and rich. I once used skim milk, and it just wasn’t the same, the texture was too thin, a total oops moment.
Cream Cheese (softened): This adds a lovely tang and richness to the pudding mixture. Don’t use cold cream cheese, you’ll end up with lumps, and nobody wants that!
Powdered Sugar: To sweeten our creamy layer. Adjust to your taste, but a little goes a long way with the already sweet pudding and Oreos.
- Whipped Topping (like Cool Whip): This makes the pudding light and airy, giving it that cloud-like texture. Make sure it’s thawed, but still cold, otherwise it’ll just deflate.
- Gummy Worms: The essential “worms” for our garden! I love seeing them peek out. Any brand works, but I always go for the super colorful ones for maximum visual fun.
- Green Food Coloring (optional): Just a few drops to make some of the whipped topping look like grass. It’s an optional touch, but it adds to the whole “garden” vibe, you know?
Instructions for Making Oreo Worm Garden Halloween Dirt Cups
- Crush the Oreos, My Friends:
- Okay, first things first, we need our “dirt.” Grab those Oreo cookies don’t remove the cream filling, it all adds to the magic! Pop them into a food processor and pulse until you’ve got fine crumbs. If you don’t have a food processor, no worries! Just put them in a zip-top bag and smash them with a rolling pin or even a heavy can. Honestly, it’s kind of therapeutic! I usually aim for a mix of fine crumbs and a few slightly larger pieces for texture, like real dirt, ya know? Set about half a cup aside for later, we’ll need it for our finishing touches.
- Whip Up the Cream Cheese Mixture:
- In a large mixing bowl, beat the softened cream cheese and powdered sugar together until it’s super smooth and fluffy. This is where you want to make sure there are no lumps, so really get in there with your mixer! I learned this the hard way once when I didn’t let my cream cheese soften enough, and the lumps were just… not ideal. Scrape down the sides of the bowl to make sure everything gets incorporated. This step is crucial for that delightful creamy layer in our Oreo Worm Garden Halloween Dirt Cups.
- Prepare the Pudding Base:
- Now, in a separate bowl, whisk together the instant chocolate pudding mix and the cold milk. Whisk for about 2 minutes, until it starts to thicken up. Don’t overmix, or it can get a bit grainy, which is a total bummer. Let it sit for a minute or two to really set. You’ll see it transform from liquid to luscious pudding right before your eyes it’s like a mini kitchen magic show! This forms the rich, chocolatey heart of our Oreo Worm Garden Halloween Dirt Cups.
- Combine and Lighten:
- Gently fold the prepared chocolate pudding into your cream cheese mixture. Be gentle here, we want to keep that light and airy texture. Then, fold in about half of your thawed whipped topping. This makes the whole mixture incredibly light and fluffy, almost mousse-like. If you want, you can add a few drops of green food coloring to a small portion of the remaining whipped topping for a “grassy” effect later. I always do this, it just makes the Worm Garden Halloween Dirt Cups look extra special.
- Layering the Delight:
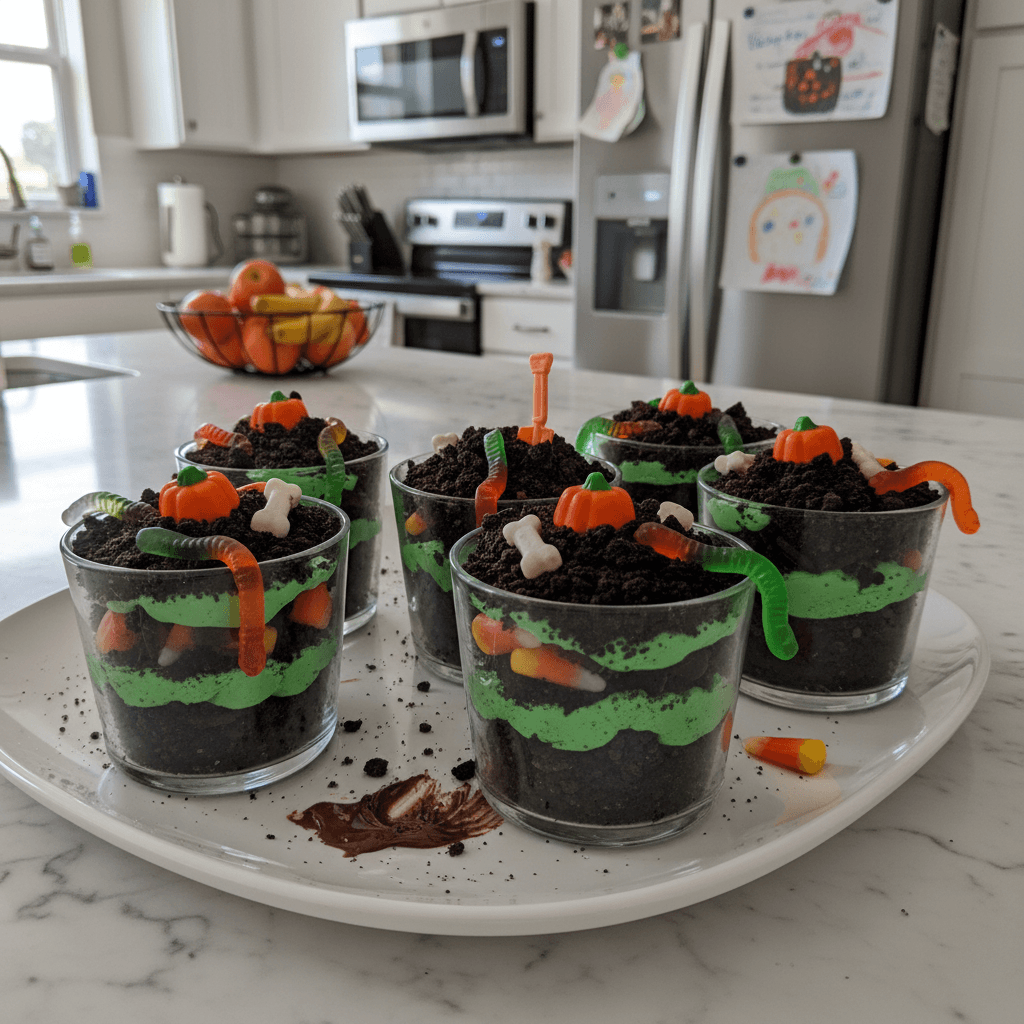
- Now for the fun part assembling your Oreo Worm Garden Halloween Dirt Cups! Grab your serving cups. Start with a layer of crushed Oreos at the bottom, about 1-2 tablespoons. Then, spoon in a generous layer of your creamy pudding mixture. Add a few gummy worms, letting some peek out over the sides of the cup. Repeat these layers, finishing with a final layer of crushed Oreos on top. I usually make 2-3 layers depending on the size of my cups. Don’t be afraid to get a little messy, it’s part of the charm!
- Chill and Garnish Your Oreo Worm Garden Halloween Dirt Cups:
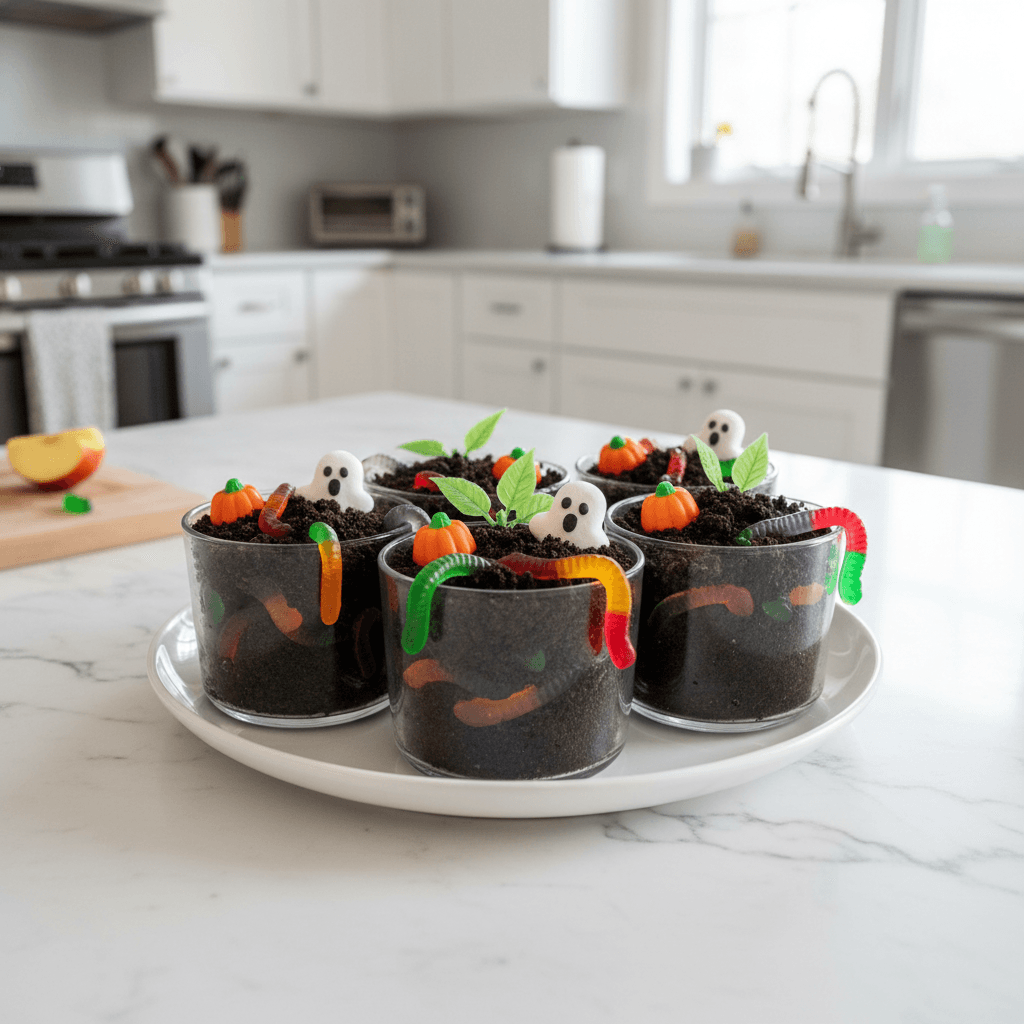
- Once your cups are layered, pop them into the fridge for at least 30 minutes to an hour. This lets the pudding set completely and allows the flavors to meld. Just before serving, take out those gummy worms you saved and arrange them artfully on top, making them look like they’re crawling out of the “dirt.” If you made the green whipped topping, add a dollop or pipe on some “grass.” These Oreo Worm Garden Halloween Dirt Cups are best served chilled, honestly, and are always a hit!
Making these Oreo Worm Garden Halloween Dirt Cups always brings me back to my own childhood, running around with a sugar rush. It’s not just about the recipe, it’s about the laughter, the sticky fingers, and the pure joy on a child’s face. Sometimes, when I’m really feeling sentimental, I’ll even add a little candy pumpkin or a plastic spider. It’s those little touches that make it truly mine, and honestly, a little bit chaotic in the best way possible.
Storing Your Oreo Worm Garden Halloween Dirt Cups
Okay, so storing these delightful Oreo Worm Garden Halloween Dirt Cups is pretty straightforward, but I’ve definitely learned a few things the hard way. You’ll want to keep them covered in the fridge. If you’re using individual cups, plastic wrap over each one works wonders to prevent them from drying out or picking up any weird fridge smells. I once left a batch uncovered overnight, and the Oreos got a bit stale and the pudding developed a slight film not ideal, trust me! They hold up really well for about 2-3 days in the fridge. Beyond that, the Oreos can get a bit soggy, which some people don’t mind, but I prefer them when they still have a bit of texture. If you’re making them ahead for a party, I’d say make them the day before for optimal freshness. Just keep those gummy worms separate until serving if you want them to stay perfectly chewy!
Oreo Worm Garden Halloween Dirt Cups Ingredient Substitutions
I’ve played around with these Oreo Worm Garden Halloween Dirt Cups quite a bit, honestly, and have some substitution stories for you! If you can’t find Oreos, any chocolate sandwich cookie will work, though the flavor might be slightly different I tried a store-brand once, and it worked, kinda, but the classic Oreo crunch is hard to beat. For the pudding, vanilla or white chocolate pudding can be swapped for chocolate, but then you lose that rich “dirt” color, so you might need to add a touch of cocoa powder. If you’re not a fan of cream cheese, you could omit it and just use more whipped topping folded into the pudding, but it won’t be quite as rich. And gummy worms? Feel free to use any gummy candy gummy bears, frogs, or even candy corn for a different Halloween vibe. I once used chocolate rocks for an extra crunchy texture, and that was a fun surprise!
Serving Your Spooky Oreo Worm Garden Halloween Dirt Cups
These Oreo Worm Garden Halloween Dirt Cups are a party in themselves, but I do have some favorite ways to serve them. For a casual family night, a simple spoon is all you need. For Halloween parties, I love serving them in clear plastic cups so everyone can see those fun layers and the worms peeking out. You can also add a small plastic shovel spoon for a super cute touch. For drinks, honestly, a glass of cold milk or even some apple cider pairs perfectly with the sweet chocolatey goodness. If you’re feeling extra festive, try serving them alongside some ghost-shaped sugar cookies or a bowl of popcorn for a movie night. They’re definitely a dessert that brings smiles, and watching kids dig for worms is always a delight!
The Backstory of Oreo Worm Garden Halloween Dirt Cups
While these Oreo Worm Garden Halloween Dirt Cups don’t have a deep, ancient cultural history, they have a rich history in American childhoods, including mine! They really gained popularity in the late 20th century as a fun, no-bake dessert, especially for kids’ parties and potlucks. For me, they connect directly to those carefree days of trick-or-treating and school Halloween carnivals. It’s a dish that embodies pure, unadulterated fun and a touch of playful grossness, which is totally perfect for Halloween, right? It’s a reminder of simpler times, of getting excited over silly things, and of the joy of making something special with your hands. Every time I make them, I feel like I’m passing on a little piece of that happy nostalgia.
And there you have it, friends! My take on the classic Oreo Worm Garden Halloween Dirt Cups. They’re messy, they’re fun, and honestly, they bring a little bit of magic to any day, especially around Halloween. Watching those little faces light up as they dig for worms? Pure gold. So go on, get a little chaotic in the kitchen, embrace the crumbs, and share your own wormy creations with me! I’d love to hear about your kitchen adventures.
Frequently Asked Questions About Oreo Worm Garden Halloween Dirt Cups
- → Can I make these Oreo Worm Garden Halloween Dirt Cups ahead of time?
Absolutely! I often make them the day before a party. Just keep them covered in the fridge. The Oreos might get a little softer, but honestly, that’s part of their charm for many. Don’t add the gummy worms until just before serving though!
- → What if I don’t have a food processor for the Oreos?
No problem at all! I’ve used a zip-top bag and a rolling pin plenty of times. It’s a bit more effort, but it works perfectly. Just make sure the bag is sealed tight, or you’ll have chocolate crumbs everywhere, trust me on that oops moment!
- → My pudding isn’t thickening, what did I do wrong?
Ah, a common kitchen moment! Usually, it’s because the milk wasn’t cold enough or you didn’t whisk long enough. Try whisking for another minute or two, then let it sit for a full 5 minutes. If it’s still too thin, pop it in the fridge for a bit, sometimes a good chill helps!
- → How long do these Oreo Worm Garden Halloween Dirt Cups last in the fridge?
They’re best enjoyed within 2-3 days. After that, the crushed Oreos can start to get a bit soggy, and the pudding might lose some of its fresh texture. I always recommend eating them sooner rather than later, honestly!
- → Can I make a sugar-free version of these Oreo Worm Garden Halloween Dirt Cups?
You can definitely try! Use sugar-free instant pudding mix, sugar-free whipped topping, and an alternative to powdered sugar like a sugar substitute. You’d also need to find sugar-free chocolate cookies and gummy worms, which can be a fun hunt!
Simple Oreo Worm Garden Halloween Dirt Cups for Kids
- Prep Time: 15 Minutes
- Cook Time: 0 Minutes
- Total Time: 15 Minutes
- Yield: 8 Servings 1x
- Category: Lunch
Description
Whip up delightful Oreo Worm Garden Halloween Dirt Cups for kids this spooky season! Easy, fun, and a little messy exactly how I like my Halloween treats.
Ingredients
- Dirt Base Essentials:
- 1 (14.3 oz) package Oreo Cookies
- Creamy Layers:
- 1 (3.9 oz) package instant chocolate pudding mix
- 3 cups cold whole milk
- 8 oz cream cheese, softened
- 1/2 cup powdered sugar
- 1 (8 oz) container whipped topping, thawed
- Wormy Toppings:
- 1 package gummy worms
- Garden Embellishments:
- Green food coloring (optional)
Instructions
- Crush the Oreos, My Friends:: Okay, first things first, we need our “dirt.” Grab those Oreo cookies – don’t remove the cream filling, it all adds to the magic! Pop them into a food processor and pulse until you’ve got fine crumbs. If you don’t have a food processor, no worries! Just put them in a zip-top bag and smash them with a rolling pin or even a heavy can. Honestly, it’s kind of therapeutic! I usually aim for a mix of fine crumbs and a few slightly larger pieces for texture, like real dirt, ya know? Set about half a cup aside for later, we’ll need it for our finishing touches.
- Whip Up the Cream Cheese Mixture:: In a large mixing bowl, beat the softened cream cheese and powdered sugar together until it’s super smooth and fluffy. This is where you want to make sure there are no lumps, so really get in there with your mixer! I learned this the hard way once when I didn’t let my cream cheese soften enough, and the lumps were just… not ideal. Scrape down the sides of the bowl to make sure everything gets incorporated. This step is crucial for that delightful creamy layer in our Oreo Worm Garden Halloween Dirt Cups.
- Prepare the Pudding Base:: Now, in a separate bowl, whisk together the instant chocolate pudding mix and the cold milk. Whisk for about 2 minutes, until it starts to thicken up. Don’t overmix, or it can get a bit grainy, which is a total bummer. Let it sit for a minute or two to really set. You’ll see it transform from liquid to luscious pudding right before your eyes – it’s like a mini kitchen magic show! This forms the rich, chocolatey heart of our Oreo Worm Garden Halloween Dirt Cups.
- Combine and Lighten:: Gently fold the prepared chocolate pudding into your cream cheese mixture. Be gentle here, we want to keep that light and airy texture. Then, fold in about half of your thawed whipped topping. This makes the whole mixture incredibly light and fluffy, almost mousse-like. If you want, you can add a few drops of green food coloring to a small portion of the remaining whipped topping for a “grassy” effect later. I always do this; it just makes the Worm Garden Halloween Dirt Cups look extra special.
- Layering the Delight:: Now for the fun part – assembling your Oreo Worm Garden Halloween Dirt Cups! Grab your serving cups. Start with a layer of crushed Oreos at the bottom, about 1-2 tablespoons. Then, spoon in a generous layer of your creamy pudding mixture. Add a few gummy worms, letting some peek out over the sides of the cup. Repeat these layers, finishing with a final layer of crushed Oreos on top. I usually make 2-3 layers depending on the size of my cups. Don’t be afraid to get a little messy; it’s part of the charm!
- Chill and Garnish Your Oreo Worm Garden Halloween Dirt Cups:: Once your cups are layered, pop them into the fridge for at least 30 minutes to an hour. This lets the pudding set completely and allows the flavors to meld. Just before serving, take out those gummy worms you saved and arrange them artfully on top, making them look like they’re crawling out of the “dirt.” If you made the green whipped topping, add a dollop or pipe on some “grass.” These Oreo Worm Garden Halloween Dirt Cups are best served chilled, honestly, and are always a hit!


