Description
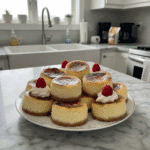
Mini Crème Brûlée Cheesecakes offer a decadent twist on classic dessert. Get my easy recipe for these creamy, crunchy treats, perfect for any occasion.
Ingredients
Scale
- Crust Essentials:
- 1 ½ cups (170g) graham cracker crumbs (about 10–12 full sheets)
- ¼ cup (50g) granulated sugar
- 6 tablespoons (85g) unsalted butter, melted
- Creamy Cheesecake Filling:
- 2 (8-ounce) blocks full-fat cream cheese, softened to room temperature
- ½ cup (100g) granulated sugar
- 2 large eggs, room temperature
- ¼ cup (60ml) heavy cream
- 1 teaspoon vanilla extract
- ½ teaspoon fresh lemon zest (optional)
- Brûlée Topping & Garnish:
- ½ cup (100g) granulated sugar, for torching
- Fresh berries, for garnish (optional)
Instructions
- Prep the Crust: First things first, let’s get those muffin tins ready! Line a 12-cup muffin tin with paper liners. Then, in a medium bowl, combine your graham cracker crumbs, a tablespoon of sugar, and that glorious melted butter. Mix it all up until it looks like wet sand. Now, scoop about a tablespoon of the mixture into the bottom of each liner and press it down firmly. I use the bottom of a shot glass for this, it works wonders! Pop that into the fridge while you get the filling ready. This pre-chilling helps prevent a soggy crust, a mistake I made way too many times.
- Mix the Creamy Filling: In a large bowl, using an electric mixer, beat your softened cream cheese and sugar together until it’s super smooth and creamy, no lumps allowed! This is where you want to scrape down the sides of the bowl a few times. Next, add your room temperature eggs, one at a time, mixing just until combined after each. Don’t overmix here, or your mini crème brûlée cheesecakes might crack during baking, and we don’t want sad cracks! Stir in the heavy cream, vanilla extract, and that optional lemon zest. The batter should look silky and beautiful.
- Bake ‘Em Gently: Pour your cheesecake filling evenly over the chilled crusts in the muffin tin. Now, here’s a tip I learned the hard way: place your muffin tin into a larger roasting pan. Carefully pour hot water into the roasting pan, coming about halfway up the sides of the muffin tin. This water bath creates a steamy environment, which helps the mini crème brûlée cheesecakes bake evenly and prevents cracking. Bake in a preheated oven at 325°F (160°C) for about 20-25 minutes, or until the edges are set but the centers still have a slight wobble. They’ll firm up as they cool, trust me!
- The All-Important Chill: Once baked, carefully remove the muffin tin from the water bath and let the cheesecakes cool completely on a wire rack. This usually takes about an hour. After they’ve cooled to room temperature, transfer the entire muffin tin to the refrigerator and let those beauties chill for at least 4 hours, or even better, overnight. Honestly, this chilling time is crucial! It allows the flavors to meld and the cheesecakes to firm up properly. If you skip this, they won’t hold their shape, and that’s just a tragic outcome for your mini crème brûlée cheesecakes.
- Sugar Top Magic: When you’re ready to serve, carefully remove the mini crème brûlée cheesecakes from their liners. Place them on a heatproof surface or individual serving plates. Sprinkle about 1-2 teaspoons of granulated sugar evenly over the top of each cheesecake. You want a thin, even layer that completely covers the surface. Don’t go too thick, or it’ll be hard to get that perfect brûlée. I usually give the plate a little shake to distribute the sugar evenly. This step is where the anticipation builds, you can practically smell the caramel before it even happens!
- Torch to Perfection: Now for the fun part – the torching! Using a kitchen torch, carefully heat the sugar on top of each cheesecake in a circular motion until it melts and turns into a beautiful, amber-colored, crackly crust. Be patient and keep the flame moving to avoid burning. I’ve definitely burnt a few in my time, leading to a bitter taste – oops! Once torched, let the sugar cool for a minute or two; it will harden into that signature brittle layer. Serve your gorgeous mini crème brûlée cheesecakes immediately with fresh berries, if you like. That satisfying *crack* when you tap it is the best sound!