

Oh, hon, let me tell you about Kielbasa and Rice. This dish isn’t fancy, not even a little bit, but it’s got a special spot in my heart. I first stumbled upon a version of it back in my college days you know, when ‘dinner’ often meant instant noodles or whatever sad things were left in the back of the fridge. One snowy night, desperate for something substantial, I threw together some leftover kielbasa, a bit of onion, and rice. I didn’t expect much, honestly. But the smell! That smoky, savory aroma filling my tiny apartment was just… magic. It felt like a hug in a bowl, a real comfort when I was far from home. This isn’t just a recipe, it’s a memory, a warm embrace, and my go-to when life gets a bit too much.
I remember one time, I was so focused on trying to multi-task (classic me, right?), I accidentally used brown rice instead of white. The cook time was totally off, and the kielbasa ended up a little too browned, almost crispy. My husband still teases me about it, but honestly, it taught me to pay attention to details. Or at least, to read the rice package! It was still edible, though, because, well, kielbasa and rice is pretty forgiving.

Hearty Kielbasa and Rice Ingredients
- Smoked Kielbasa: The star! That savory, smoky punch is what makes this dish sing. Don’t skimp here, a good quality kielbasa makes all the difference. I once tried a turkey kielbasa, and it was… fine, but it lacked that rich, satisfying flavor, you know?
- White Rice: Long-grain or medium-grain works best here. I’m talking regular old white rice, not the fancy stuff. I tried brown rice once, and it changed the whole texture. Not in a bad way, just different, and required more liquid and patience.
- Chicken Broth: Adds so much more depth than just water. It really infuses that lovely flavor into the rice. Low sodium is my preference, so I can control the salt myself.
- Yellow Onion: The foundation of so many good things! It softens and sweetens, bringing a lovely balance to the savory sausage. Don’t rush this step, letting it get translucent really builds flavor.
- Garlic: More is more, in my book! Freshly minced, please. Those jarred bits are okay in a pinch, but the aroma and punginess of fresh garlic? Unbeatable. I swear I measure this with my heart, not a spoon.
- Bell Pepper: I usually go for green or red, whatever’s hanging out in my fridge. It adds a pop of color and a nice, subtle sweetness and crunch. I’ve used orange too, and it’s equally lovely.
- Olive Oil: Just a splash to get things going. Any neutral oil works, but I like the subtle fruity note of olive oil.
- Smoked Paprika: This is my secret weapon for really enhancing that smoky kielbasa flavor. It adds warmth and a beautiful reddish hue. I once forgot it, and the dish felt… incomplete.
- Dried Thyme: Earthy and aromatic, it pairs wonderfully with both the sausage and the vegetables. A little goes a long way, but it’s essential for that classic, comforting profile.
- Salt & Black Pepper: Season to taste, always! I usually go lighter on the salt initially because the broth and kielbasa already bring some. You can always add more, but you can’t take it away, right?
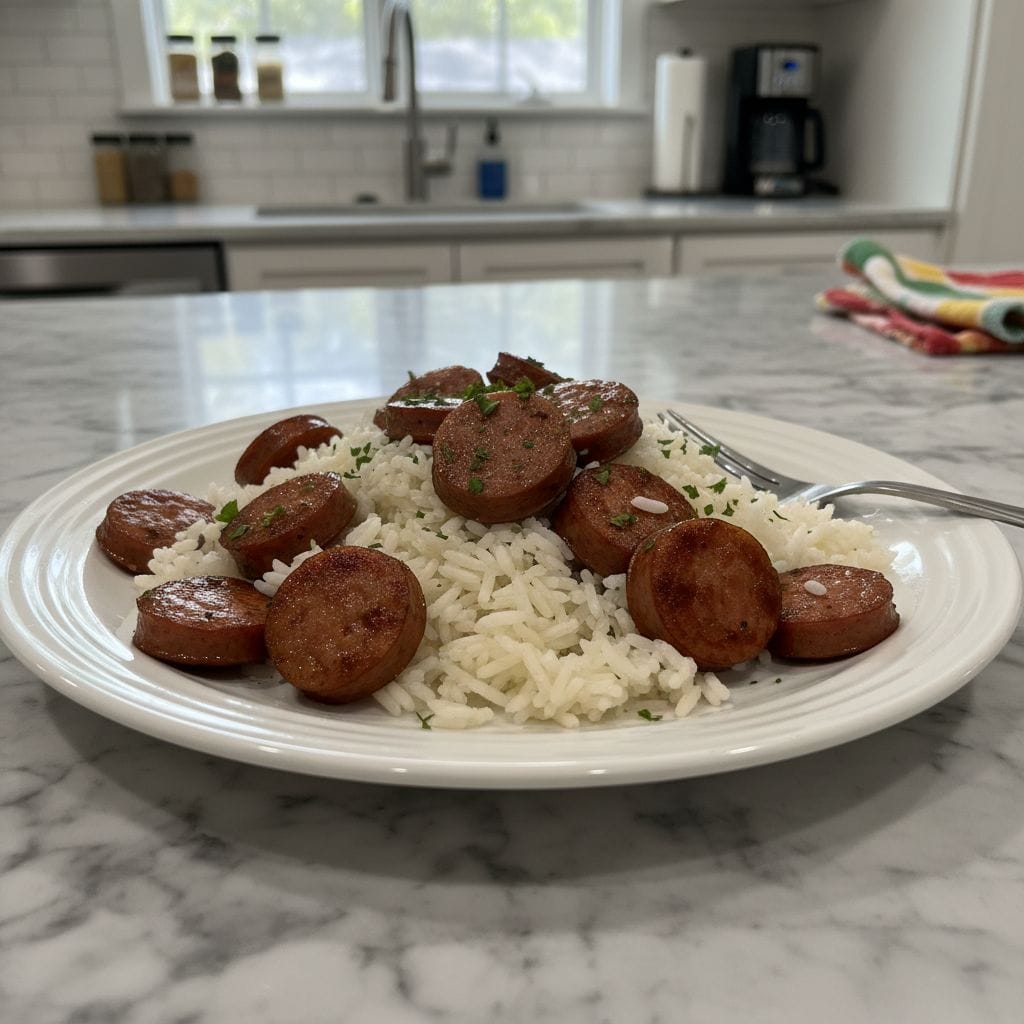
- Fresh Parsley: A sprinkle at the end for freshness and a pop of green. It brightens everything up and makes it look pretty, even if you just ate it out of the pan like I sometimes do.
Cooking Kielbasa and Rice: My Way
- Brown the Kielbasa:
- First things first, grab that glorious kielbasa and slice it into nice, thick rounds about half an inch, I’d say. Heat a little olive oil in a large skillet or Dutch oven over medium-high heat. Once it’s shimmering, toss in those kielbasa slices. Let them sizzle and get beautifully browned and slightly crispy on both sides. This step is crucial, hon! It releases all that amazing smoky flavor and creates those little bits of goodness at the bottom of the pan that we’ll scrape up later. Don’t crowd the pan, or they’ll steam instead of brown. I’ve made that mistake more times than I care to admit, and it’s just not the same.
- Sauté the Aromatics:
- Once your kielbasa is looking golden, remove it from the pan and set it aside. Don’t clean the pan, though! We want all those delicious browned bits. Add a bit more olive oil if needed, then toss in your chopped yellow onion and bell pepper. Let them soften, stirring occasionally, for about 5-7 minutes. You want them tender and fragrant. This is where your kitchen starts to smell absolutely heavenly, I swear. I often stand over the stove, taking deep breaths, just enjoying the aroma. Honestly, this part is almost as good as eating it!
- Build the Flavor Base:
- Now for the garlic! Add your minced garlic to the softened veggies and stir it in for just about 60 seconds, until it’s fragrant. Don’t let it burn, though burnt garlic is a sad, bitter thing, and we don’t want that! Then, stir in the smoked paprika and dried thyme. Let them cook for another minute, letting those spices bloom and release their magic. The color will deepen, and the aroma will shift to something wonderfully earthy and warm. This is the heart of your flavor, so give it some love.
- Add Rice and Broth:
- Pour in your uncooked white rice and stir it around with the veggies and spices for a minute or two. This helps toast the rice slightly and get it coated in all that lovely flavor. Then, carefully pour in the chicken broth. Give everything a good stir, making sure to scrape up any browned bits from the bottom of the pan that’s pure flavor right there! Bring it to a gentle simmer, just a few bubbles, nothing crazy.
- Simmer to Perfection:
- Once simmering, reduce the heat to low, cover the skillet tightly with a lid, and let it cook for about 15-20 minutes. Resist the urge to peek! Seriously, don’t lift that lid. The steam is doing all the work, cooking the rice perfectly. This is where patience pays off. I’ve peeked too early, and the rice ended up a bit crunchy. Learned my lesson there, eventually. You want that rice to absorb all that liquid and become beautifully tender.
- Combine and Finish:
- After 15-20 minutes, turn off the heat and let it sit, still covered, for another 5 minutes. This steaming step is key for fluffy rice. Then, gently fluff the rice with a fork. Stir your browned kielbasa back into the rice mixture. Taste and adjust seasonings maybe a little more salt, a grind of fresh black pepper. Garnish generously with fresh parsley. It makes it look fancy, even if you’re just eating it straight from the pan in your PJs. Which, let’s be real, is probably how I’ll enjoy my next bowl of Kielbasa and Rice.
There was this one time I almost burnt the garlic because I got distracted by a squirrel outside my window typical! But even with that little mishap, the dish still came together. That’s the beauty of this Kielbasa and Rice, it’s forgiving. It’s the kind of meal that doesn’t demand perfection, just a little love and a warm belly at the end of a long day.
Storing Your Kielbasa and Rice
This Kielbasa and Rice holds up pretty well, honestly, which is great for meal prep! Once it’s completely cooled, transfer it to an airtight container. It’ll keep in the fridge for 3-4 days. I’ve definitely made a big batch on a Sunday and enjoyed it for lunch all week. Reheating is easy: a quick zap in the microwave usually does the trick, but sometimes I add a splash of extra chicken broth if it seems a bit dry, just to bring back that moisture. I once tried freezing a portion, and while it was okay, the texture of the rice was a little softer when thawed. Still edible, but not quite as good as fresh or refrigerated leftovers. So, stick to the fridge for the best experience!
Kielbasa and Rice Ingredient Swaps
Okay, so you’re out of something? Happens to the best of us! For the kielbasa, you could try another smoked sausage like Andouille for a spicier kick, or even chicken apple sausage if you want something lighter I tried that once, and it worked, kinda, but the flavor profile shifted quite a bit. For the bell pepper, honestly, any color works, or you could swap it for chopped carrots or even some frozen peas stirred in at the end. I’ve used frozen mixed veggies in a pinch, and it’s totally fine! If you don’t have chicken broth, vegetable broth is a decent swap, though it might make the flavor slightly less rich. No fresh parsley? Dried works, just use less, or skip it entirely it’s mostly for visual appeal and a fresh finish anyway.
Serving Suggestions
This Kielbasa and Rice is a complete meal on its own, but sometimes you want a little something extra, right? I love serving it with a simple green salad dressed with a tangy vinaigrette that brightness really cuts through the richness of the sausage. A side of crusty bread for soaking up any extra sauce is always a win in my book. And for drinks? A crisp, dry white wine or a cold pilsner beer pairs beautifully. Honestly, for a cozy night in, a big bowl of this and a good book or a cheesy rom-com? Yes, please. It’s the kind of meal that just makes you want to slow down and enjoy.
Cultural Backstory
While this particular version of Kielbasa and Rice is a modern, home-cook creation, it draws inspiration from the hearty, comforting dishes found across Eastern European cuisine, where smoked sausages like kielbasa are staples. Kielbasa itself, meaning ‘sausage’ in Polish, has roots going back centuries, often made with pork, beef, or a mix, and smoked for preservation and flavor. Pairing it with grains like rice or potatoes is a common way to stretch a meal and make it filling. For me, it reminds me of the simple, honest food my grandma used to make, not necessarily this exact dish, but the spirit of using humble ingredients to create something truly satisfying and nourishing. It’s food that tells a story of warmth and tradition, even if my version has taken a few detours along the way.
And there you have it, my friends! This Kielbasa and Rice dish might be simple, but it carries so much warmth and flavor. Every time I make it, I’m transported back to those early days, learning to cook for myself, making mistakes, and finding comfort in the kitchen. It’s a testament to how humble ingredients can create something truly special. I hope it brings as much joy and easy comfort to your table as it does to mine. Don’t forget to share your own kitchen adventures with me!
Frequently Asked Questions
- → Can I use different kinds of rice for Kielbasa and Rice?
I’ve tried different kinds! White long-grain is my usual. Brown rice works, but it needs more liquid and cooking time, so adjust accordingly. Arborio would be too creamy, not what we’re going for here, trust me.
- → What if I don’t have smoked paprika for Kielbasa and Rice?
You can skip it, but honestly, it makes a big difference! Regular paprika won’t give you the same smoky depth. A tiny dash of liquid smoke could work as a last resort, but use it sparingly, like, a drop! I once overdid it, oops.
- → How do I prevent the rice from sticking to the bottom of the pan?
Oh, I’ve been there! Make sure you’re using a good quality non-stick skillet or a well-seasoned cast iron. And resist the urge to stir once it’s covered and simmering. That’s usually when it gets sticky for me, a real kitchen disaster!
- → Question about storage or leftovers?
This Kielbasa and Rice keeps well for 3-4 days in the fridge in an airtight container. I microwaved it once without adding a splash of broth, and it was a bit dry so don’t do that lol. A little moisture helps!.
- → Can I add more vegetables to this Kielbasa and Rice recipe?
Absolutely! I often throw in chopped zucchini or spinach during the last few minutes of cooking. Just keep in mind that more veggies might mean you need a tiny splash more broth, but don’t overdo it, I’ve made soupy rice before!

Smoky Kielbasa and Rice: Weeknight Comfort
- Prep Time: 15 Minutes
- Cook Time: 30 Minutes
- Total Time: 45 Minutes
- Yield: 4 Servings 1x
- Category: Lunch
Description
Kielbasa and Rice: Your new go-to for a quick, comforting meal! Savory sausage and tender rice make this easy skillet dinner a family favorite.
Ingredients
- Main Players:
- 1 lb (450g) smoked kielbasa, sliced into ½-inch rounds
- 1 ½ cups (300g) long-grain white rice, uncooked
- 3 cups (720ml) chicken broth (low sodium preferred)
- Veggies & Aromatics:
- 1 tbsp olive oil
- 1 large yellow onion, chopped
- 1 bell pepper (any color), chopped
- 3 cloves garlic, minced
- Flavor Foundation:
- 1 tsp smoked paprika
- ½ tsp dried thyme
- Salt and freshly ground black pepper, to taste
- Finishing Touches:
- ¼ cup fresh parsley, chopped (for garnish)
Instructions
- Brown the Kielbasa:: First things first, grab that glorious kielbasa and slice it into nice, thick rounds – about half an inch, I’d say. Heat a little olive oil in a large skillet or Dutch oven over medium-high heat. Once it’s shimmering, toss in those kielbasa slices. Let them sizzle and get beautifully browned and slightly crispy on both sides. This step is crucial, hon! It releases all that amazing smoky flavor and creates those little bits of goodness at the bottom of the pan that we’ll scrape up later. Don’t crowd the pan, or they’ll steam instead of brown. I’ve made that mistake more times than I care to admit, and it’s just not the same.
- Sauté the Aromatics:: Once your kielbasa is looking golden, remove it from the pan and set it aside. Don’t clean the pan, though! We want all those delicious browned bits. Add a bit more olive oil if needed, then toss in your chopped yellow onion and bell pepper. Let them soften, stirring occasionally, for about 5-7 minutes. You want them tender and fragrant. This is where your kitchen starts to smell absolutely heavenly, I swear. I often stand over the stove, taking deep breaths, just enjoying the aroma. Honestly, this part is almost as good as eating it!
- Build the Flavor Base:: Now for the garlic! Add your minced garlic to the softened veggies and stir it in for just about 60 seconds, until it’s fragrant. Don’t let it burn, though – burnt garlic is a sad, bitter thing, and we don’t want that! Then, stir in the smoked paprika and dried thyme. Let them cook for another minute, letting those spices bloom and release their magic. The color will deepen, and the aroma will shift to something wonderfully earthy and warm. This is the heart of your flavor, so give it some love.
- Add Rice and Broth:: Pour in your uncooked white rice and stir it around with the veggies and spices for a minute or two. This helps toast the rice slightly and get it coated in all that lovely flavor. Then, carefully pour in the chicken broth. Give everything a good stir, making sure to scrape up any browned bits from the bottom of the pan – that’s pure flavor right there! Bring it to a gentle simmer, just a few bubbles, nothing crazy.
- Simmer to Perfection:: Once simmering, reduce the heat to low, cover the skillet tightly with a lid, and let it cook for about 15-20 minutes. Resist the urge to peek! Seriously, don’t lift that lid. The steam is doing all the work, cooking the rice perfectly. This is where patience pays off. I’ve peeked too early, and the rice ended up a bit crunchy. Learned my lesson there, eventually. You want that rice to absorb all that liquid and become beautifully tender.
- Combine and Finish:: After 15-20 minutes, turn off the heat and let it sit, still covered, for another 5 minutes. This steaming step is key for fluffy rice. Then, gently fluff the rice with a fork. Stir your browned kielbasa back into the rice mixture. Taste and adjust seasonings – maybe a little more salt, a grind of fresh black pepper. Garnish generously with fresh parsley. It makes it look fancy, even if you’re just eating it straight from the pan in your PJs. Which, let’s be real, is probably how I’ll enjoy my next bowl of Kielbasa and Rice.


