Description
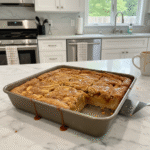
Salted Caramel Apple Bars: My irresistible recipe combines tart apples, a buttery crust, and dreamy homemade caramel. Perfect for fall!
Ingredients
Scale
- Crust Components:
- 2 ½ cups all-purpose flour
- ½ teaspoon salt
- ½ cup granulated sugar
- 1 cup (2 sticks) unsalted butter, cold and diced
- Apple Filling:
- 6–7 medium Granny Smith apples, peeled, cored, and sliced
- ½ cup packed light brown sugar
- 1 tablespoon ground cinnamon
- 1 teaspoon vanilla extract
- 1 tablespoon cornstarch
- Salted Caramel Drizzle:
- 1 cup granulated sugar
- 6 tablespoons unsalted butter
- ½ cup heavy cream
- ½ teaspoon sea salt, plus more for sprinkling
- ½ teaspoon vanilla extract
- Finishing Touches:
- Extra flaky sea salt for sprinkling (optional)
Instructions
- Crust Chaos:: First up, the crust! In a large bowl, whisk together the flour, a pinch of salt, and a bit of granulated sugar. Now, cut in your *cold* unsalted butter. I use a pastry blender, but honestly, your fingertips work too – just work quickly so the butter doesn’t get too warm. You’re looking for pea-sized crumbs. This is where I often get impatient, but trust me, those little bits of butter are what make the crust flaky. Once it looks right, press about two-thirds of it into a parchment-lined 9×13 inch baking pan. Pop that into the fridge while we tackle the apples!
- Apple Prep & Mix-Up:: Alright, time for the apples! Peel, core, and slice those Granny Smiths. I like mine about a quarter-inch thick – not too thin, not too thick. In a big bowl, toss them with the brown sugar, cinnamon, a splash of vanilla, and a tablespoon of cornstarch. The cornstarch is super important here; it’s going to prevent your Salted Caramel Apple Bars from having a watery filling. Give it a good mix, making sure every apple slice is coated. This is where the kitchen starts smelling amazing, and I might ‘accidentally’ eat an apple slice or two. Oops!
- Assembly and Bake:: Grab your chilled crust from the fridge. Pour that fragrant apple mixture evenly over the crust. Now, take the remaining one-third of your crust crumbs and sprinkle them over the apples. Don’t press them down too hard; we want a nice crumbly topping. Slide that pan into a preheated oven at 375°F (190°C) and let it bake for about 40-50 minutes. You’re looking for the apples to be tender and the topping to be golden brown. My oven runs hot, so I usually check around 35 minutes. Don’t be afraid to adjust!
- Crafting the Caramel:: While your Salted Caramel Apple Bars are baking, let’s make that glorious salted caramel. In a heavy-bottomed saucepan, melt some granulated sugar over medium heat. This step requires patience, like I learned the hard way. Don’t stir it too much! Just let it melt and turn a deep amber color. Once it’s a rich amber, carefully whisk in the heavy cream. It’ll bubble up like crazy, so be careful! Keep whisking until it’s smooth. Take it off the heat and stir in a generous pinch of sea salt and another splash of vanilla. This is where the magic happens, transforming it into truly irresistible salted caramel.
- Cooling and Drizzling:: Once the bars are out of the oven, let them cool in the pan on a wire rack for at least 30 minutes. This is critical! If you try to cut them too soon, they’ll be a gooey mess. Trust me, I’ve made that mistake more times than I care to admit. While they’re cooling, your caramel will thicken slightly. Once the bars are mostly cooled, drizzle that amazing salted caramel all over the top. Don’t be shy! I usually do a few passes to get it everywhere.
- The Grand Finale:: For the ultimate Salted Caramel Apple Bars experience, let them cool completely before slicing. I know, I know, it’s torture! But letting them set up properly means clean slices and a perfectly gooey, not runny, caramel. A final sprinkle of flaky sea salt right before serving really makes those caramel notes pop. They should look like a golden, apple-filled masterpiece, smelling of autumn and pure happiness. Slice ’em up and enjoy!