
You know that feeling when the air gets crisp, and suddenly your kitchen just smells like cinnamon and apples? That’s how these Rustic Salted Caramel Apple Bars came into my life, honestly. I remember stumbling upon a recipe for apple bars years ago, and while it was good, it felt… incomplete. Like it was missing that little zing. So, one blustery afternoon, with a mountain of apples from the farmer’s market and a sudden craving for something truly special, I just went for it. I wanted something that felt like a hug but also had a little edge, you know? These bars became that thing. They’re comforting, yes, but the salted caramel? Oh, that’s where the magic lives. It just elevates everything, making them feel both familiar and utterly delightful.
I once tried to rush the caramel for these Salted Caramel Apple Bars, thinking “Oh, it’ll be fine!” Nope. It seized up like a scared cat, and I ended up with a rock-hard lump instead of a silky drizzle. Lesson learned: caramel demands patience, hon. I stood there, stirring, watching it transform, and even though it felt like ages, the result was so worth it. My kitchen looked like a flour bomb went off, and I had caramel sticky-tack on my shirt, but hey, that’s just part of the baking adventure, right?

Salted Caramel Apple Bars: Ingredients
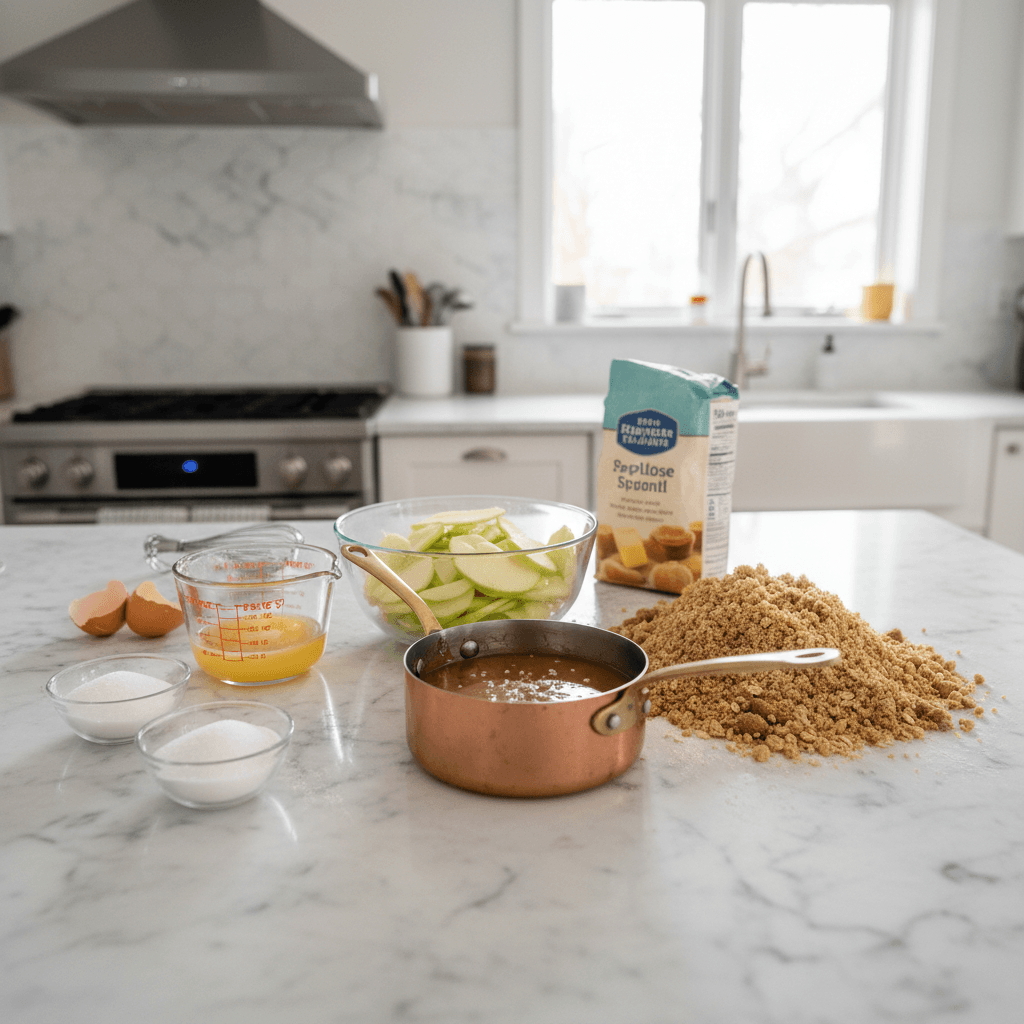
- All-Purpose Flour: This is our base, the backbone of our crust. Don’t skimp on measuring, or you’ll end up with a crust that’s either too tough or too crumbly. I once eyeballed it and had crumbly disaster!
- Unsalted Butter: Use cold, diced butter for the crust. It helps create those flaky layers. I tried melted butter once (oops!), and it made the crust dense and sad. Stick with cold, it’s worth it.
- Granulated Sugar: For both the crust and the filling. It balances the tartness of the apples. Don’t use brown sugar in the crust unless you want a chewier texture, it changes the whole vibe.
- Brown Sugar: This is for the apple filling and the caramel. Its molasses notes add depth. I swear by light brown sugar here, dark can sometimes overpower the apples.
- Granny Smith Apples: The star of the show! Their tartness is essential to cut through the sweet caramel. Honestly, don’t use a super sweet apple like Fuji unless you want a sugar overload.
- Heavy Cream: For that luscious, silky salted caramel. Don’t even think about using half-and-half or milk, it just won’t give you the same rich texture. I’ve been there, regretted that!
- Vanilla Extract: A splash of warmth for both the apple filling and the caramel. I always add a little extra, it just makes everything smell and taste so much better.
- Ground Cinnamon: The quintessential fall spice for our apple filling. Freshly ground is nice, but honestly, any good quality cinnamon will do the trick.
- Cornstarch: Our secret weapon for a thick, bubbly apple filling. It prevents the bars from becoming a watery mess. I once forgot it, and the bars were a soggy disappointment.
- Sea Salt: Crucial for the “salted” in Salted Caramel Apple Bars! A good flaky sea salt sprinkled on top just takes them from great to chef’s kiss.
Instructions for Salted Caramel Apple Bars
- Crust Chaos:
- First up, the crust! In a large bowl, whisk together the flour, a pinch of salt, and a bit of granulated sugar. Now, cut in your cold unsalted butter. I use a pastry blender, but honestly, your fingertips work too just work quickly so the butter doesn’t get too warm. You’re looking for pea-sized crumbs. This is where I often get impatient, but trust me, those little bits of butter are what make the crust flaky. Once it looks right, press about two-thirds of it into a parchment-lined 9×13 inch baking pan. Pop that into the fridge while we tackle the apples!
- Apple Prep & Mix-Up:
- Alright, time for the apples! Peel, core, and slice those Granny Smiths. I like mine about a quarter-inch thick not too thin, not too thick. In a big bowl, toss them with the brown sugar, cinnamon, a splash of vanilla, and a tablespoon of cornstarch. The cornstarch is super important here, it’s going to prevent your Salted Caramel Apple Bars from having a watery filling. Give it a good mix, making sure every apple slice is coated. This is where the kitchen starts smelling amazing, and I might ‘accidentally’ eat an apple slice or two. Oops!
- Assembly and Bake:
- Grab your chilled crust from the fridge. Pour that fragrant apple mixture evenly over the crust. Now, take the remaining one-third of your crust crumbs and sprinkle them over the apples. Don’t press them down too hard, we want a nice crumbly topping. Slide that pan into a preheated oven at 375°F (190°C) and let it bake for about 40-50 minutes. You’re looking for the apples to be tender and the topping to be golden brown. My oven runs hot, so I usually check around 35 minutes. Don’t be afraid to adjust!
- Crafting the Caramel:
- While your Salted Caramel Apple Bars are baking, let’s make that glorious salted caramel. In a heavy-bottomed saucepan, melt some granulated sugar over medium heat. This step requires patience, like I learned the hard way. Don’t stir it too much! Just let it melt and turn a deep amber color. Once it’s a rich amber, carefully whisk in the heavy cream. It’ll bubble up like crazy, so be careful! Keep whisking until it’s smooth. Take it off the heat and stir in a generous pinch of sea salt and another splash of vanilla. This is where the magic happens, transforming it into truly irresistible salted caramel.
- Cooling and Drizzling:
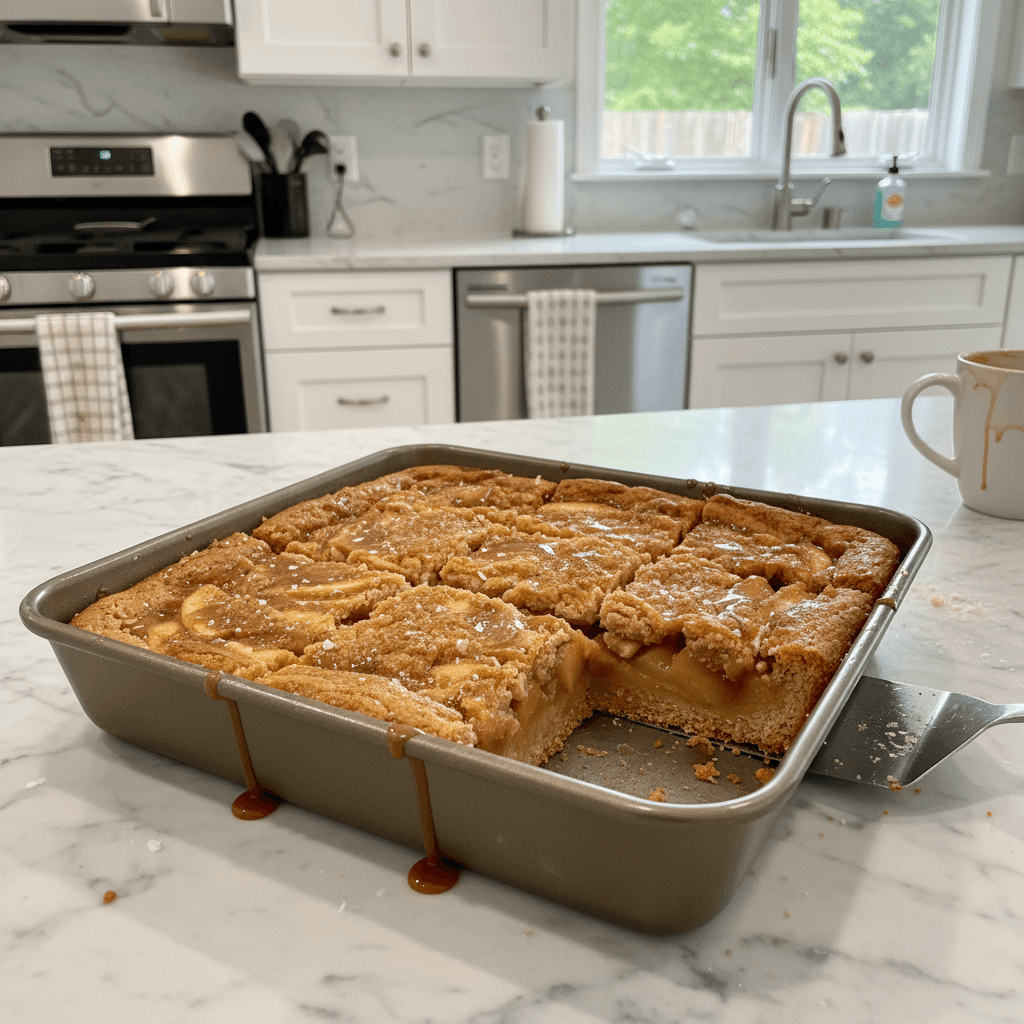
- Once the bars are out of the oven, let them cool in the pan on a wire rack for at least 30 minutes. This is critical! If you try to cut them too soon, they’ll be a gooey mess. Trust me, I’ve made that mistake more times than I care to admit. While they’re cooling, your caramel will thicken slightly. Once the bars are mostly cooled, drizzle that amazing salted caramel all over the top. Don’t be shy! I usually do a few passes to get it everywhere.
- The Grand Finale:
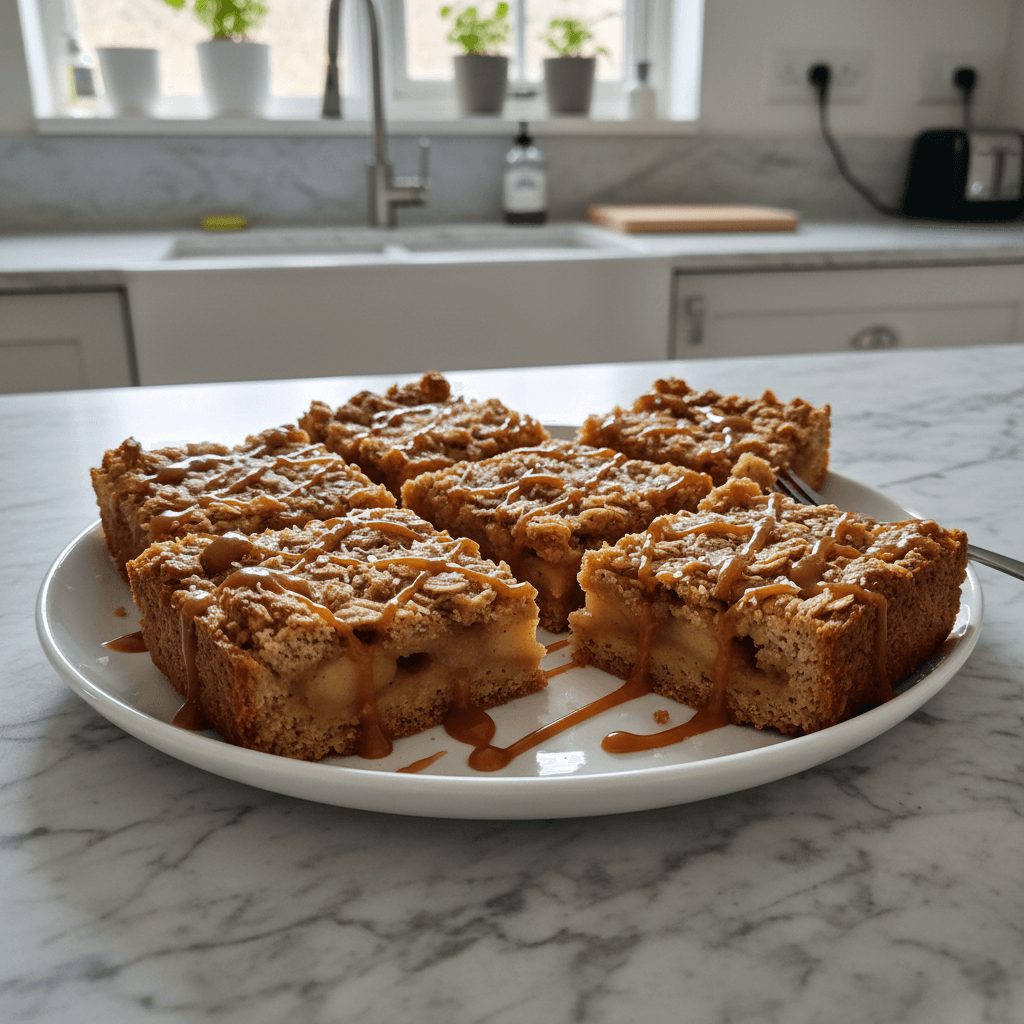
- For the ultimate Salted Caramel Apple Bars experience, let them cool completely before slicing. I know, I know, it’s torture! But letting them set up properly means clean slices and a perfectly gooey, not runny, caramel. A final sprinkle of flaky sea salt right before serving really makes those caramel notes pop. They should look like a golden, apple-filled masterpiece, smelling of autumn and pure happiness. Slice ’em up and enjoy!
I remember the first time these Salted Caramel Apple Bars came out just right. My partner walked into the kitchen, sniffed the air, and his eyes just lit up. The kitchen was still a bit of a disaster zone, with flour dust and apple peels everywhere, but the smell, oh, the smell! It was pure fall bliss. That’s the feeling I chase every time I bake them that warm, fuzzy, “everything’s gonna be alright” feeling.
Salted Caramel Apple Bars: Storage Tips
Okay, so you’ve got leftover Salted Caramel Apple Bars (if that’s even a thing!). Store them in an airtight container at room temperature for up to 2-3 days. If you want them to last longer, pop them in the fridge for up to a week. Here’s a pro-tip I learned the hard way: if you reheat them in the microwave, the caramel can get a little too liquidy and sometimes separate so don’t do that lol. I prefer to let them come to room temperature or warm them gently in a low oven for about 10-15 minutes. It keeps that lovely texture. They freeze surprisingly well too! Wrap individual bars tightly in plastic wrap, then foil, and they’ll keep for up to 3 months. Just thaw at room temperature when you’re ready for a treat.
Salted Caramel Apple Bars: Ingredient Substitutions
I’ve played around with these Salted Caramel Apple Bars quite a bit, so I’ve got some honest substitution experiments for you. For the apples, while Granny Smiths are my top pick for their tartness, you could try a mix of Honeycrisp and Braeburn if you like a sweeter bar. I tried using only Gala once, and it was just a bit too sweet for my liking, so balance is key! If you’re out of brown sugar for the filling, a mix of granulated sugar and a tiny bit of molasses works in a pinch, but the flavor won’t be quite as rich. For the caramel, you really need heavy cream for the right texture, but if you’re feeling adventurous and want a dairy-free version, full-fat canned coconut cream can work, but it will add a distinct coconut flavor. I tried it once, and it was… interesting, but not quite the classic taste.
Serving Salted Caramel Apple Bars
These Salted Caramel Apple Bars are fantastic on their own, but they really shine with a little something extra. My absolute favorite pairing is a scoop of really good vanilla bean ice cream that melts into the warm apples and caramel honestly, it’s pure bliss. A dollop of lightly sweetened whipped cream is also delightful. For drinks, a hot mug of spiced cider or a creamy latte just screams fall. If you’re serving them for a more grown-up occasion, a small glass of a nutty tawny port or even a crisp hard cider complements the flavors beautifully. I love serving them after a hearty fall dinner, maybe with a good rom-com playing in the background. Pure comfort, pure joy.
Cultural Backstory
Apple bars, in their various forms, have been a staple in American baking for ages, especially as a way to use up the bounty of fall apple harvests. They’re a cousin to the classic apple pie, but with a more casual, shareable vibe. The addition of salted caramel, though, that’s a more modern twist that gained popularity in recent decades. It brings that sophisticated sweet-and-salty balance that we all seem to crave now. For me, these Salted Caramel Apple Bars evoke memories of my grandma’s kitchen, though her version was simpler, without the caramel. I added the salted caramel because it reminded me of a fancy candy I tried once, and I just knew that salty edge would elevate those homey apple flavors to something truly special, making them my own little piece of fall tradition.
So there you have it, my beloved Salted Caramel Apple Bars. They might be a little messy to make, and you might get sticky, but the end result is so worth it. Every bite is like a crisp autumn day, wrapped in a warm, buttery hug with that perfect salty-sweet kick. I hope they bring as much joy and comfort to your kitchen as they do to mine. Don’t forget to share your own kitchen adventures with these!
Frequently Asked Questions
- → Can I use other apples for these Salted Caramel Apple Bars?
You totally can, but stick to firm, tart varieties like Honeycrisp or Braeburn. Softer apples can turn to mush, and super sweet ones might make the bars too sugary, which I learned the hard way with a batch of Red Delicious. Balance is key!
- → What if my caramel seizes up?
Oh, the dreaded seized caramel! It happens to the best of us. Usually, it means the sugar crystallized. You can try adding a tablespoon or two of hot water and gently reheating, stirring constantly, but sometimes it’s just a lost cause, unfortunately. Don’t beat yourself up!
- → How do I know when the Salted Caramel Apple Bars are baked through?
Look for a golden-brown crust and topping, and the apples should feel tender when pierced with a knife. The filling will be bubbly too. If it’s still wobbly in the middle, give it another 5-10 minutes. My oven always needs a little extra time!
- → Can I make the crust ahead of time?
Absolutely! You can prepare the crust and press it into the pan, then cover it tightly and refrigerate for up to 2 days. It’s a lifesaver for busy days, and honestly, sometimes the chilling helps the flakiness. Just remember to bring it out a bit before filling.
- → What if I don’t have cornstarch for the apple filling?
No cornstarch? No problem! You can use an equal amount of all-purpose flour instead, or even tapioca starch for a slightly clearer filling. I’ve tried flour, and it works, but sometimes it can leave a tiny bit of a cloudy look. Still tastes great though!
Rustic Salted Caramel Apple Bars for Fall
- Prep Time: 30 Minutes
- Cook Time: 50 Minutes
- Total Time: 80 Minutes
- Yield: 12 Servings 1x
- Category: Dessert
Description
Salted Caramel Apple Bars: My irresistible recipe combines tart apples, a buttery crust, and dreamy homemade caramel. Perfect for fall!
Ingredients
- Crust Components:
- 2 ½ cups all-purpose flour
- ½ teaspoon salt
- ½ cup granulated sugar
- 1 cup (2 sticks) unsalted butter, cold and diced
- Apple Filling:
- 6–7 medium Granny Smith apples, peeled, cored, and sliced
- ½ cup packed light brown sugar
- 1 tablespoon ground cinnamon
- 1 teaspoon vanilla extract
- 1 tablespoon cornstarch
- Salted Caramel Drizzle:
- 1 cup granulated sugar
- 6 tablespoons unsalted butter
- ½ cup heavy cream
- ½ teaspoon sea salt, plus more for sprinkling
- ½ teaspoon vanilla extract
- Finishing Touches:
- Extra flaky sea salt for sprinkling (optional)
Instructions
- Crust Chaos:: First up, the crust! In a large bowl, whisk together the flour, a pinch of salt, and a bit of granulated sugar. Now, cut in your *cold* unsalted butter. I use a pastry blender, but honestly, your fingertips work too – just work quickly so the butter doesn’t get too warm. You’re looking for pea-sized crumbs. This is where I often get impatient, but trust me, those little bits of butter are what make the crust flaky. Once it looks right, press about two-thirds of it into a parchment-lined 9×13 inch baking pan. Pop that into the fridge while we tackle the apples!
- Apple Prep & Mix-Up:: Alright, time for the apples! Peel, core, and slice those Granny Smiths. I like mine about a quarter-inch thick – not too thin, not too thick. In a big bowl, toss them with the brown sugar, cinnamon, a splash of vanilla, and a tablespoon of cornstarch. The cornstarch is super important here; it’s going to prevent your Salted Caramel Apple Bars from having a watery filling. Give it a good mix, making sure every apple slice is coated. This is where the kitchen starts smelling amazing, and I might ‘accidentally’ eat an apple slice or two. Oops!
- Assembly and Bake:: Grab your chilled crust from the fridge. Pour that fragrant apple mixture evenly over the crust. Now, take the remaining one-third of your crust crumbs and sprinkle them over the apples. Don’t press them down too hard; we want a nice crumbly topping. Slide that pan into a preheated oven at 375°F (190°C) and let it bake for about 40-50 minutes. You’re looking for the apples to be tender and the topping to be golden brown. My oven runs hot, so I usually check around 35 minutes. Don’t be afraid to adjust!
- Crafting the Caramel:: While your Salted Caramel Apple Bars are baking, let’s make that glorious salted caramel. In a heavy-bottomed saucepan, melt some granulated sugar over medium heat. This step requires patience, like I learned the hard way. Don’t stir it too much! Just let it melt and turn a deep amber color. Once it’s a rich amber, carefully whisk in the heavy cream. It’ll bubble up like crazy, so be careful! Keep whisking until it’s smooth. Take it off the heat and stir in a generous pinch of sea salt and another splash of vanilla. This is where the magic happens, transforming it into truly irresistible salted caramel.
- Cooling and Drizzling:: Once the bars are out of the oven, let them cool in the pan on a wire rack for at least 30 minutes. This is critical! If you try to cut them too soon, they’ll be a gooey mess. Trust me, I’ve made that mistake more times than I care to admit. While they’re cooling, your caramel will thicken slightly. Once the bars are mostly cooled, drizzle that amazing salted caramel all over the top. Don’t be shy! I usually do a few passes to get it everywhere.
- The Grand Finale:: For the ultimate Salted Caramel Apple Bars experience, let them cool completely before slicing. I know, I know, it’s torture! But letting them set up properly means clean slices and a perfectly gooey, not runny, caramel. A final sprinkle of flaky sea salt right before serving really makes those caramel notes pop. They should look like a golden, apple-filled masterpiece, smelling of autumn and pure happiness. Slice ’em up and enjoy!


