Description
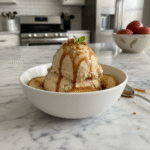
Homemade Apple Cider Ice Cream: Craft your own creamy, tangy fall treat! This easy recipe brings the crisp taste of autumn to every scoop.
Ingredients
Scale
- Base Ingredients:
- 2 cups heavy cream
- 1 cup whole milk
- 2 cups apple cider (reduced to 1 cup)
- 3/4 cup granulated sugar (divided)
- 4 large egg yolks
- Flavor Boosters:
- 1 teaspoon ground cinnamon
- 1/4 teaspoon ground nutmeg (freshly grated if possible)
- 1 teaspoon vanilla extract
- Pinch of salt
- Optional Extras:
- 1–2 tablespoons bourbon or apple brandy (added to cooled custard)
- 1/4 cup finely diced caramelized apples (swirled in during churning)
- Garnish & Toppings:
- Caramel drizzle
- Candied pecans
- Whipped cream
- Cinnamon sticks
Instructions
- Reduce the Cider:: First things first, grab your apple cider and pour it into a saucepan. You want to bring this to a simmer over medium heat and let it bubble away gently until it’s reduced by about half, maybe even two-thirds. This step, honestly, is where all that intense apple flavor comes from. It’ll take a good 20-30 minutes, and your kitchen will start smelling absolutely divine, like a fall festival in a pot. Keep an eye on it, stir it occasionally so it doesn’t scorch, and definitely don’t walk away like I did that one time with the squirrel—it gets sticky fast!
- Make the Custard Base:: While your cider is reducing, get another saucepan and whisk together the heavy cream, whole milk, about half of your sugar, cinnamon, nutmeg, and that little pinch of salt. Bring it to a gentle simmer over medium heat, just until you see tiny bubbles around the edges. Meanwhile, in a separate bowl, whisk your egg yolks with the remaining sugar until they’re pale and creamy. Now for the crucial part: temper those yolks! Slowly, and I mean slowly, drizzle about a cup of the hot cream mixture into the egg yolks, whisking constantly. This warms the yolks without scrambling them. I used to rush this, and oops, scrambled eggs for dessert! Don’t do that.
- Combine and Thicken:: Once tempered, pour the egg yolk mixture back into the saucepan with the rest of the cream. Stir constantly over medium-low heat, using a wooden spoon or a heat-proof spatula, until the mixture thickens enough to coat the back of the spoon. This usually takes about 5-8 minutes. You’re looking for a custard consistency, not a pudding. The smell, oh, it’s just so rich and sweet! Don’t let it boil, or your custard might curdle. If you see it getting too hot, pull it off the heat for a moment. This is where patience pays off!
- Chill Out:: Remove the custard from the heat and stir in your vanilla extract and the now-reduced apple cider. Give it a good whisk to combine everything beautifully. Now, this is important: you need to chill this mixture thoroughly. Pour it into a clean bowl, cover it with plastic wrap directly on the surface (this prevents a skin from forming), and pop it in the fridge for at least 4 hours, or even better, overnight. I’ve tried to rush this step, thinking “it’s cold enough,” and it just doesn’t churn as well. Seriously, don’t rush the chill, it makes all the difference for a smooth apple cider ice cream.
- Churn, Baby, Churn:: Once your base is completely chilled, it’s time for the fun part! Get your ice cream maker ready according to its manufacturer’s instructions. Pour the cold ice cream base into the frozen bowl of your machine and churn it for about 20-25 minutes, or until it reaches the consistency of soft-serve ice cream. It’s so exciting to watch it transform! My machine sometimes makes a funny noise if the base isn’t cold enough, so I always double-check. Don’t be afraid to experiment with churning times; some machines are faster than others.
- Firm Up and Enjoy:: Transfer your freshly churned apple cider ice cream into an airtight container. If you like it soft, you can eat it right away. But for a firmer, scoopable consistency, cover it and freeze it for another 2-4 hours. This waiting period is the hardest part, honestly! When it’s ready, it should look wonderfully creamy, smell like a dream, and taste like pure autumn happiness in a spoon. A little sprinkle of extra cinnamon or a drizzle of caramel makes it even better!