

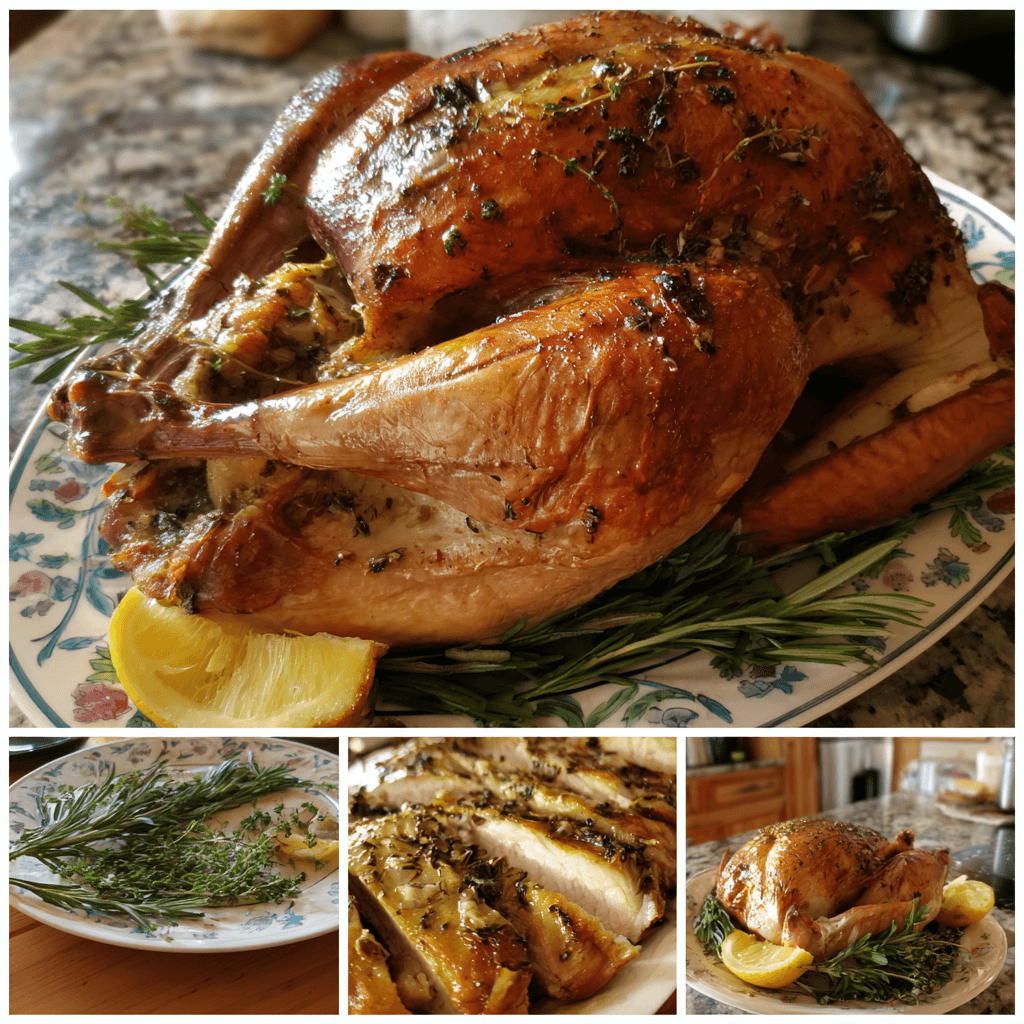
I will never forget the first turkey I ever tried to make. I was 22, hosting my first “grown-up” Friendsgiving, and I was determined to impress everyone. I bought the biggest bird I could find, which barely fit in my tiny apartment oven. To be real, I had no idea what I was doing. I think I just… put it in the oven? No butter, no herbs, just a wing and a prayer. The result was a dry, sad-looking thing that my friends politely choked down. It was a disaster. But from that kitchen catastrophe, a mission was born: to perfect the roasted turkey. This recipe is the result of years of trial, error, and one very memorable incident involving a turkey baster and the ceiling. This herb butter method is my absolute go-to. It blankets the meat in so much flavor and moisture, creating that golden, crispy skin everyone fights over. The smell of the rosemary, thyme, and sage mingling with the roasting turkey is, for me, the official scent of the holidays. It’s more than just a recipe; it’s the centerpiece of our chaotic, wonderful family gatherings, and honestly, seeing everyone’s face when I bring it to the table makes all the effort worth it.
The first time I successfully used this herb butter trick, I got a little too excited. I was slathering it under the skin and, oops, I ripped a giant hole right over the breast. I totally panicked, but I just sort of… folded the skin back over and hoped for the best. You know what? It still turned out delicious. A little lopsided, maybe, but a good lesson that it doesn’t have to be perfect to be wonderful.

Ingredients
- Whole Turkey: The star! Make sure it’s fully thawed. I once tried to rush it and ended up with a bird that was cooked on the outside and an icicle on the inside. Not my finest moment. A 12-14 pounder is perfect for a good-sized crowd.
- Unsalted Butter: It has to be softened, otherwise you’ll be fighting it the whole way. Don’t use margarine. Just don’t. The flavor of real butter is what makes this so rich and decadent. I always leave mine on the counter for a few hours before I start.
- Fresh Herbs (Rosemary, Thyme, Sage): Fresh is so much better than dried here. The oils in the fresh leaves release so much more fragrance and flavor into the butter. It smells like a holiday dream while you’re chopping them up. If you must use dried, use about a third of the amount.
- Garlic: Because is anything ever complete without a ton of garlic? I use a whole head: half minced into the butter, and the other half sliced and tossed into the roasting pan. No such thing as too much.
- Onion, Carrots, Celery: These are the foundation. They create a natural roasting rack that lifts the bird and flavors the drippings that will become your liquid-gold gravy. Don’t even bother peeling the carrots. Just give everything a rough chop.
Instructions
- Step 1: Prep the Bird
- First things first, let’s get that turkey ready for its spa day. Take your bird out of the fridge—and please, for the love of all that is holy, make sure it’s fully thawed! I learned that the hard way one Thanksgiving. Oops. Give it a good rinse, inside and out, then pat it incredibly dry with paper towels. Like, bone dry. This is the secret to crispy skin, I swear. Don’t skip this! Remove the neck and giblets from the cavity. I save mine for gravy, but you do you. Season the cavity generously with salt and pepper.
- Step 2: Make the Magical Herb Butter
- Now for the magic paste: the herb butter. In a bowl, mash up your softened butter with the chopped fresh rosemary, thyme, sage, and minced garlic. Honestly, the smell alone is worth it. It’s pure holiday comfort. Add a good amount of salt and freshly ground black pepper. Mix it all together until it’s a beautiful, fragrant, green-flecked concoction. I always use my hands for this part because it feels right, but a spoon works too. Just make sure everything is really well combined. This butter is what makes the turkey sing.
- Step 3: Butter Up the Turkey
- Okay, this is the slightly weird but totally necessary part. Gently, very gently, slide your fingers between the turkey skin and the breast meat to separate them, creating little pockets. Be careful not to tear the skin! Now, take generous scoops of that glorious herb butter and massage it all over the meat under the skin. Get it everywhere! Then, rub the remaining butter all over the outside of the turkey. Every leg, every wing, every nook and cranny. This ensures a juicy inside and a golden, crispy outside. It’s a bit messy, but so worth it.
- Step 4: Prep the Roasting Pan
- Let’s build a cozy bed for our turkey to roast on. Roughly chop your onion, carrots, and celery—no need to be fancy here, they’re just for flavor. Scatter them across the bottom of your roasting pan. This little veggie rack not only adds amazing flavor to the pan drippings for your gravy, but it also improves the turkey slightly, allowing air to circulate for more even cooking. I sometimes throw in a head of garlic, sliced in half, for extra goodness. Pour in a cup or two of chicken broth to keep things moist.
- Step 5: Roast to Perfection
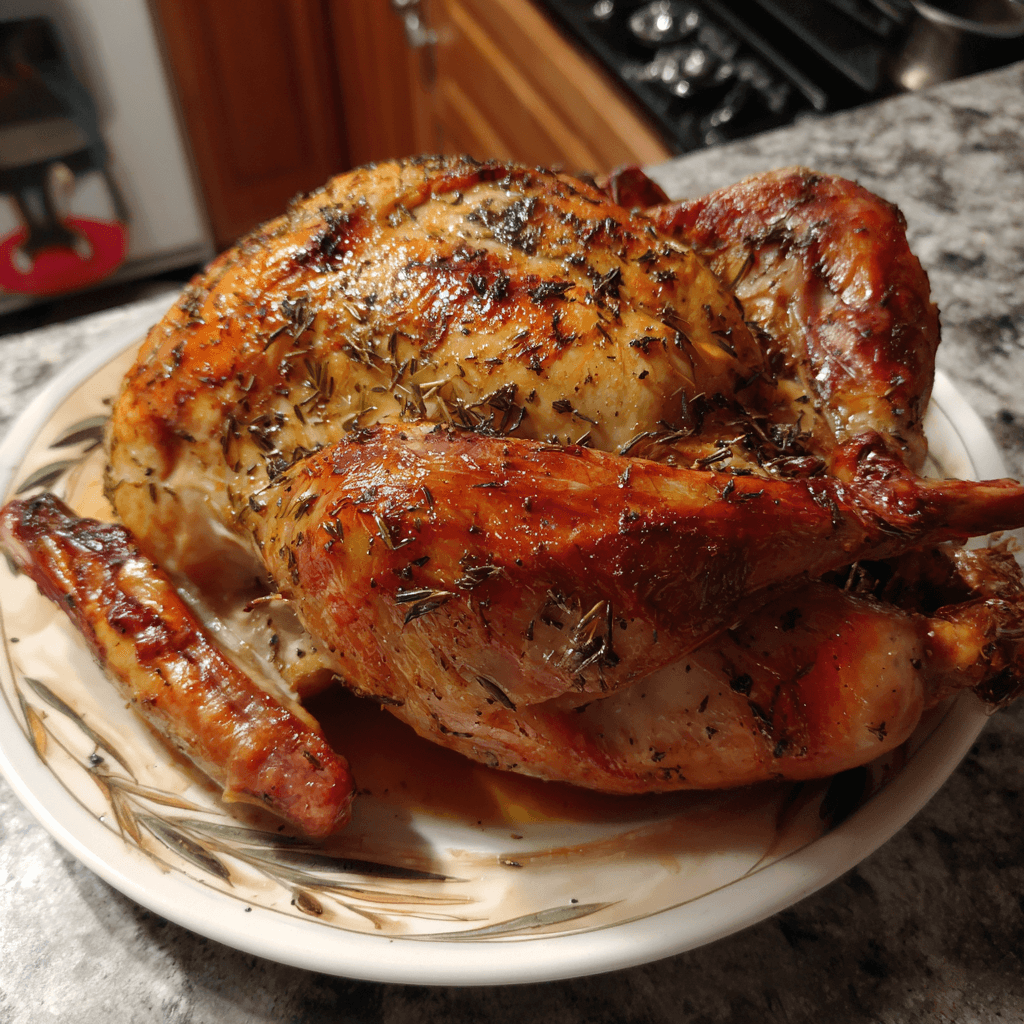
- Place your beautifully buttered turkey on top of the veggies in the pan. It’s time for the oven! Roast it at 325°F (165°C). The general rule is about 13-15 minutes per pound, but honestly, every oven is a diva. I start checking with a meat thermometer after about 2 hours. You’re looking for 165°F in the thickest part of the thigh, avoiding the bone. If the skin starts getting too brown before it’s cooked through, just loosely tent it with some aluminum foil. Don’t stress, just watch it.
- Step 6: Rest and Carve
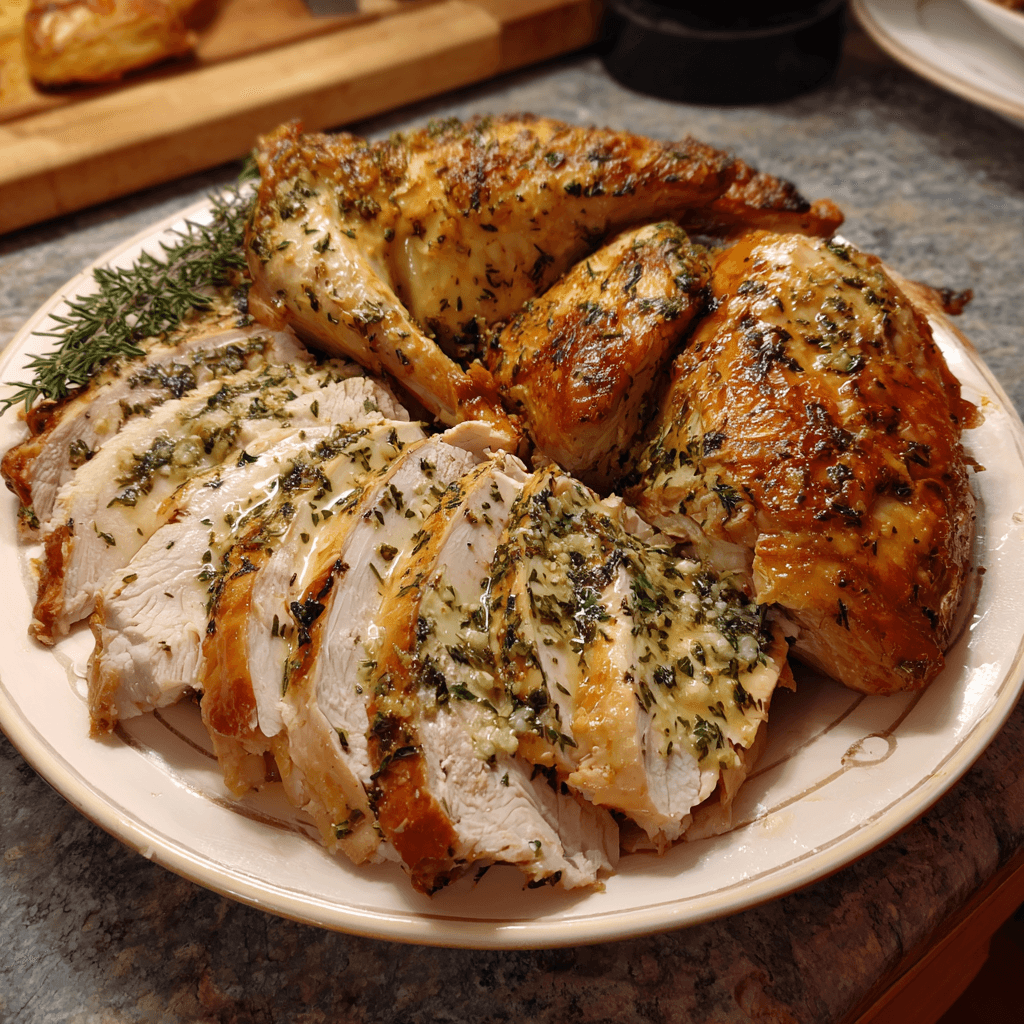
- This is the hardest part: the waiting. Once your turkey hits that magic temperature, pull it from the oven. Carefully transfer it to a large cutting board. Now, leave it alone! Let it rest for at least 20-30 minutes before you even think about carving. This lets all those delicious juices redistribute back into the meat instead of running all over your cutting board. It’s torture, I know, but it is the absolute key to a juicy bird. Use this time to make your gravy with those amazing pan drippings. Then, carve and serve!
Every time I make this, I’m transported back to that first successful turkey. The pride I felt! It wasn’t just food; it was proof that I could create something special, something that brought people together. Now, even when the kitchen is a total mess and I’ve misplaced the twine for the legs (again), I just smile. The chaos is part of the charm, right? It’s all part of the story we’re cooking up.
Storage Tips
Okay, let’s talk leftovers, the best part! Once everything has cooled down, carve all the meat off the bones. I store it in an airtight container in the fridge for up to 4 days. Pro tip: add a little splash of chicken broth to the container to keep the meat from drying out when you reheat it. Speaking of reheating, the microwave can make it rubbery. I prefer to warm it up gently in a skillet with a lid or in a low-temperature oven. And whatever you do, DO NOT throw away the carcass! That’s the base for the most amazing turkey soup you’ll ever have. Just toss it in a pot with veggies, cover with water, and simmer away.
Ingredient Substitutions
I’m a big fan of using what you’ve got. If you don’t have fresh herbs, dried will work in a pinch. Just use about 1 teaspoon of dried for every 1 tablespoon of fresh. The flavor won’t be quite as punchy, but it’s better than nothing! No chicken broth for the pan? Water or even a dry white wine works beautifully. For the butter, if you need a dairy-free option, I’ve used a high-quality vegan butter block before and it worked surprisingly well. The browning wasn’t quite as deep, but the flavor was still great. You can also play with the herbs—add some fresh parsley or a little bit of orange zest to the butter for a different vibe.
Serving Suggestions
This turkey is the star, but every star needs a supporting cast. My go-to is always a mountain of creamy mashed potatoes to soak up the gravy. A slightly tart cranberry sauce is non-negotiable for cutting through the richness. I also love something green, like roasted Brussels sprouts with bacon or simple green beans with almonds. For drinks, a nice Pinot Noir or a crisp Sauvignon Blanc is perfect. But honestly? This turkey with a side of stretchy pants and a good post-dinner nap is the ultimate combination. It’s a whole mood. The meal isn’t over until you’re too full to move.
Cultural Backstory
For so many of us in America, a big roasted turkey is synonymous with Thanksgiving. It’s this iconic centerpiece that anchors the whole meal. But for me, it’s become more than just a holiday dish. I learned to make it from watching my grandma, who never used a recipe for anything. She cooked by feel, by smell, by memory. This recipe is my attempt to capture some of that magic. It’s my way of connecting with those memories and creating new ones with my own family. It represents warmth, abundance, and the beautiful, messy business of gathering the people you love around one table.
So there you have it. My little turkey saga. I hope this recipe finds a place at your table and brings as much joy (and as few disasters) to your kitchen as it has to mine. It’s a little bit of work, sure, but the payoff is huge. Go make some memories! And please, tell me how it turns out for you. I love hearing your stories.
Frequently Asked Questions
- → Is it really necessary to get butter under the skin?
Oh, 100% yes! It feels a little weird, I know, but it’s the absolute best way to get a super moist breast. The butter melts and basically bastes the meat from the inside as it cooks. Trust me on this one; it’s a total great addition.
- → My turkey is still a little frozen! What do I do?
Don’t panic! I’ve been there. The safest way is to submerge it in its packaging in a sink full of cold water. Change the water every 30 minutes. It’s a bit of a process, but it’s much safer than leaving it on the counter.
- → How do I know when the turkey is really done?
A meat thermometer is your best friend. The pop-up timers are notoriously unreliable. You want to check the thickest part of the thigh (without touching bone), and it should read 165°F (74°C). Pull it out of the oven then, as it will continue to cook a bit while it rests.
- → Can I prep this ahead of time?
You can definitely make the herb butter a day or two in advance and keep it in the fridge. I wouldn’t recommend fully buttering the bird until the day of, as you want the skin to be as dry as possible right before it goes into the oven for maximum crispiness.
- → What if I don’t have a roasting pan with a rack?
No problem at all! The bed of chopped onions, carrots, and celery you put in the bottom of the pan acts as a natural, edible rack. It lifts the bird up just enough and adds so much flavor to the drippings for your gravy. It’s my favorite little trick.
My Favorite Herb Butter Roasted Turkey Recipe
- Prep Time: 30 Minutes
- Cook Time: 180 Minutes
- Total Time: 210 Minutes
- Yield: 10-12 Servings 1x
- Category: Mediterranean Diet Recipes
Description
My foolproof Herb Butter Roasted Turkey recipe! It’s juicy, flavorful, and surprisingly simple. Learn my secrets (and my mistakes!) for the perfect holiday bird.
Ingredients
- The Star of the Show:
- 1 (12 to 14-pound) whole turkey, giblets and neck removed
- 2 tablespoons kosher salt
- 1 tablespoon black pepper
- The Magical Herb Butter:
- 1 cup (2 sticks) unsalted butter, softened
- 1/4 cup chopped fresh sage
- 3 tablespoons chopped fresh thyme
- 2 tablespoons chopped fresh rosemary
- 8 cloves garlic, minced
- Aromatics for the Pan:
- 2 large yellow onions, quartered
- 4 carrots, roughly chopped
- 4 celery stalks, roughly chopped
- 2 cups low-sodium chicken broth
Instructions
- Prep the Bird: First things first, let’s get that turkey ready for its spa day. Take your bird out of the fridge—and please, for the love of all that is holy, make sure it’s fully thawed! I learned that the hard way one Thanksgiving. Oops. Give it a good rinse, inside and out, then pat it incredibly dry with paper towels. Like, bone dry. This is the secret to crispy skin, I swear. Don’t skip this! Remove the neck and giblets from the cavity. I save mine for gravy, but you do you. Season the cavity generously with salt and pepper.
- Make the Magical Herb Butter: Now for the magic paste: the herb butter. In a bowl, mash up your softened butter with the chopped fresh rosemary, thyme, sage, and minced garlic. Honestly, the smell alone is worth it. It’s pure holiday comfort. Add a good amount of salt and freshly ground black pepper. Mix it all together until it’s a beautiful, fragrant, green-flecked concoction. I always use my hands for this part because it feels right, but a spoon works too. Just make sure everything is really well combined. This butter is what makes the turkey sing.
- Butter Up the Turkey: Okay, this is the slightly weird but totally necessary part. Gently, very gently, slide your fingers between the turkey skin and the breast meat to separate them, creating little pockets. Be careful not to tear the skin! Now, take generous scoops of that glorious herb butter and massage it all over the meat under the skin. Get it everywhere! Then, rub the remaining butter all over the outside of the turkey. Every leg, every wing, every nook and cranny. This ensures a juicy inside and a golden, crispy outside. It’s a bit messy, but so worth it.
- Prep the Roasting Pan: Let’s build a cozy bed for our turkey to roast on. Roughly chop your onion, carrots, and celery—no need to be fancy here, they’re just for flavor. Scatter them across the bottom of your roasting pan. This little veggie rack not only adds amazing flavor to the pan drippings for your gravy, but it also elevates the turkey slightly, allowing air to circulate for more even cooking. I sometimes throw in a head of garlic, sliced in half, for extra goodness. Pour in a cup or two of chicken broth to keep things moist.
- Roast to Perfection: Place your beautifully buttered turkey on top of the veggies in the pan. It’s time for the oven! Roast it at 325°F (165°C). The general rule is about 13-15 minutes per pound, but honestly, every oven is a diva. I start checking with a meat thermometer after about 2 hours. You’re looking for 165°F in the thickest part of the thigh, avoiding the bone. If the skin starts getting too brown before it’s cooked through, just loosely tent it with some aluminum foil. Don’t stress, just watch it.
- Rest and Carve: This is the hardest part: the waiting. Once your turkey hits that magic temperature, pull it from the oven. Carefully transfer it to a large cutting board. Now, leave it alone! Let it rest for at least 20-30 minutes before you even think about carving. This lets all those delicious juices redistribute back into the meat instead of running all over your cutting board. It’s torture, I know, but it is the absolute key to a juicy bird. Use this time to make your gravy with those amazing pan drippings. Then, carve and serve!


