
Honestly, I remember a time when my little one would eye anything green like it was the enemy. Breakfast was a battleground, not a blissful start to the day. One Saturday morning, feeling a bit desperate and staring at a mountain of garden zucchini, I thought, “What if… waffles?” The idea of sneaking veggies into something so beloved felt a little rebellious, a little genius. The smell of cinnamon and vanilla wafting from the waffle iron, masking the subtle earthy scent of zucchini, was pure relief. That first bite, crispy edges, fluffy middle, and not a single complaint that’s when these waffles became a staple. It’s a dish that brings peace to my kitchen.
I still laugh thinking about the first time I made these. I grated so much zucchini, I swear my arm nearly fell off. Then, in my haste, I added it all to the batter without squeezing any liquid out. The first waffle was, well, more of a zucchini pancake soup. A delicious soup, mind you, but not a waffle. Live and learn, right? Now, I always remember that crucial squeeze!

Ingredients for Your Zucchini Waffles
- All-Purpose Flour: This is our base, giving our waffles that familiar fluff. I’ve tried whole wheat, and it works, but for that classic crisp-fluffy balance, plain old AP is my jam. Just make sure it’s fresh, nobody wants stale flour waffles!
- Baking Powder & Baking Soda: The dynamic duo for lift! Baking powder gets things started, and soda reacts with the buttermilk for extra oomph. Don’t skimp, or you’ll have flat, sad discs, not glorious waffles.
Cinnamon & Nutmeg: These spices are the magic disguise for the zucchini. Honestly, a generous pinch of each makes all the difference. Freshly grated nutmeg? Oh, honey, do it. It’s worth the tiny effort for that warm, cozy aroma.
Granulated Sugar: Just a touch for sweetness, balancing the savory zucchini. You can play with this, sometimes I cut it back if I know we’re going heavy on maple syrup. I once forgot it entirely, and my kids looked at me like I’d betrayed them.
Salt: Don’t skip the salt! It brings out all the other flavors. I always add a good pinch, it makes everything taste brighter and more balanced. It’s like the unsung hero of the waffle batter.
- Large Egg: Binds everything together and adds richness. I always use a large egg, straight from the fridge. It helps create that lovely structure that holds up to the zucchini.
- Buttermilk: This is key for tenderness and that slight tang. If you don’t have buttermilk, you can make your own with milk and a splash of lemon juice or vinegar. I tried regular milk once, and the waffles were just… fine. Buttermilk makes them sing.
- Melted Butter: For flavor and a tender crumb. Unsalted, always. You can use oil, but butter just gives it that classic, indulgent waffle taste. I always melt it gently so it doesn’t cook the egg.
- Vanilla Extract: A splash of vanilla rounds out the flavors beautifully. I always reach for the good stuff, the pure vanilla. It makes such a difference in the overall aroma and taste.
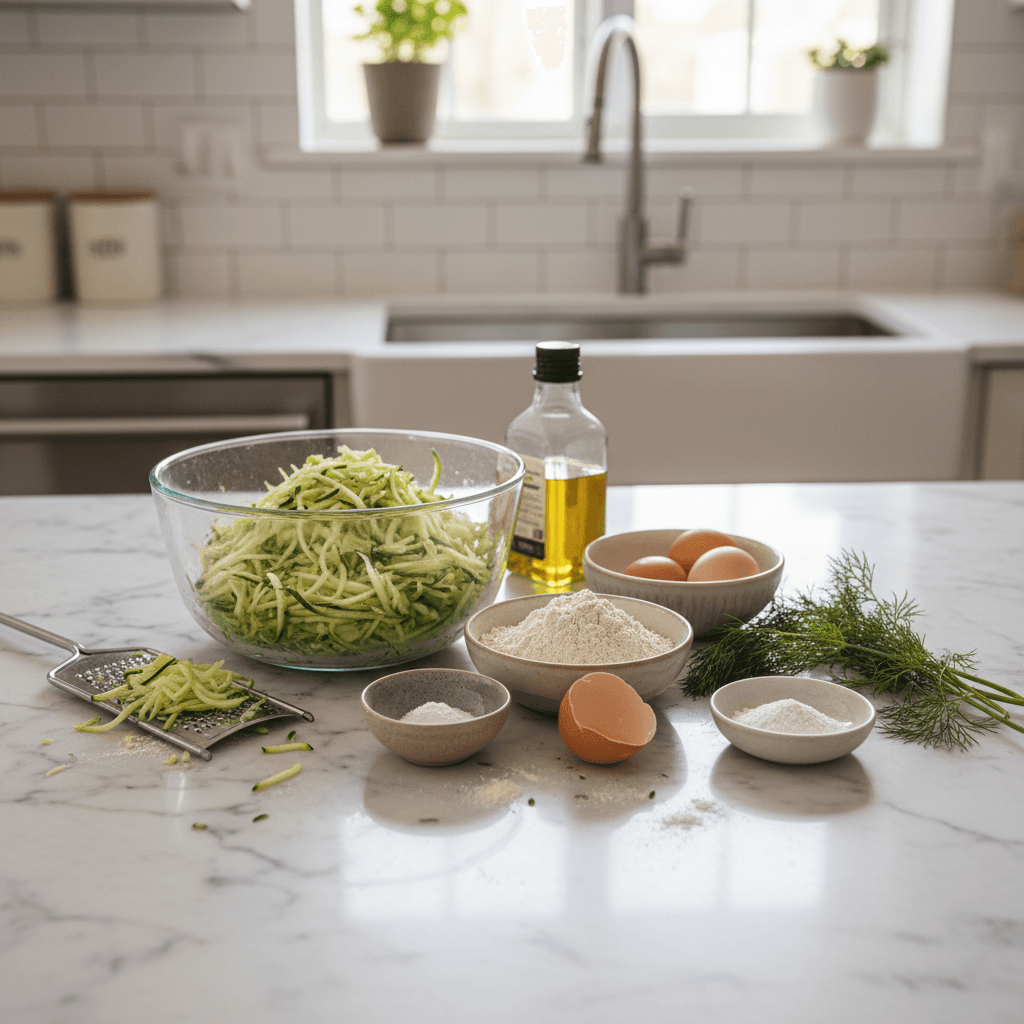
- Grated Zucchini: The star of our waffles! Make sure to squeeze out as much liquid as you possibly can. I swear, this step is non-negotiable. Otherwise, you’ll have soggy waffles, and nobody wants that.
Instructions for Crispy Zucchini Waffles
- Mix the Dry Stuff:
- Okay, first things first, grab a big bowl. We’re talking a mixing bowl that can handle some serious action. Toss in your flour, baking powder, baking soda, that lovely cinnamon and nutmeg, sugar, and salt. Give it a good whisk, really get in there! You want everything combined so you don’t get a random pocket of salt or cinnamon later. I always feel like this step is the quiet beginning of something delicious, smelling all those spices just waking up.
- Whisk the Wet Ingredients:
- In another, slightly smaller bowl because who needs more dishes, honestly? crack that egg. Give it a quick whisk, then pour in the buttermilk, melted butter, and vanilla extract. Whisk it all up until it’s nice and smooth. This is where the magic starts to happen, the liquids coming together. Make sure your butter isn’t too hot, or you’ll scramble the egg, and trust me, I’ve been there. Not a fun oops moment.
- Combine Gently:
- Now for the big moment! Pour your wet ingredients into the dry ingredients. Stir gently with a spoon or spatula until just combined. And I mean just! Lumps are your friends here, overmixing is the enemy of fluffy waffles. The batter will look a bit shaggy, that’s totally fine. You don’t want to activate all that gluten too much, or your waffles will be tough. My kitchen always smells so good at this point!
- Add the Zucchini:
- Time for our secret ingredient! Fold in that grated zucchini, remember, the one you squeezed the living daylights out of. Mix it in until it’s evenly distributed. Don’t overdo it here either, just enough to get those green flecks speckled throughout. It feels so good knowing you’re sneaking in some goodness. This is where I always pat myself on the back for being a clever home cook.
- Heat and Grease Your Waffle Iron:
- While your batter rests for a minute, preheat your waffle iron. Get it nice and hot! And don’t forget to lightly grease it, even if it’s non-stick. I use a little cooking spray or a brush with some melted butter. This step is crucial for getting those gloriously crispy edges on your waffles. I once forgot this, and spent ten minutes scraping bits of waffle off the iron. Learn from my chaos!
- Cook Your Waffles:
- Pour about ½ to ¾ cup of batter onto the hot waffle iron, depending on its size. Close the lid and cook according to your waffle iron’s instructions, usually until golden brown and steaming stops. The smell of fresh waffles is just heavenly, a true sign of breakfast success. They should be crispy on the outside and wonderfully tender inside. Pull them out, and get ready for a delicious morning!
There’s something so satisfying about pulling a perfectly golden waffle from the iron. That little puff of steam, the crisp edges… it’s a small victory. One time, I was trying to photograph them for this blog, and my toddler, bless her heart, snuck in and took a huge bite out of the stack before I even got a good shot. Can’t blame her, honestly. These waffles are just too tempting.
Healthy Zucchini Waffles Storage Tips
Okay, so you made a big batch of these amazing zucchini waffles, and now you have leftovers a truly smart move! Let them cool completely on a wire rack first, stacking them while warm makes them soggy, and we worked too hard for that crispness. Once cool, you can store them in an airtight container in the fridge for up to 3-4 days. I’ve found they reheat best in a toaster or toaster oven, which brings back some of that lovely crispness. I microwaved them once, and they were edible, sure, but a bit rubbery. So, don’t do that if you want the best experience lol. For longer storage, freeze them individually on a baking sheet, then transfer to a freezer-safe bag. They’ll keep for up to 2 months and pop right into the toaster from frozen for a quick breakfast!
Ingredient Substitutions for Zucchini Waffles
I’ve experimented a bit in my kitchen, as one does, and have some honest thoughts on swaps for these waffles. For the flour, you can totally use half whole wheat flour and half all-purpose for a bit more fiber, I tried it once, and it worked, kinda the texture was a bit denser, but still tasty. Almond flour? Not so much, it changes the structure too much. If you don’t have buttermilk, just add a tablespoon of lemon juice or white vinegar to regular milk and let it sit for 5 minutes before using. It works wonders! For the butter, coconut oil or another neutral oil works fine, but you do lose a little of that rich butter flavor. And if you’re out of zucchini (gasp!), grated carrots can work in a pinch for a slightly different, sweeter flavor profile. It’s all about what you have and what you’re in the mood for!
Serving Your Healthy Zucchini Waffles
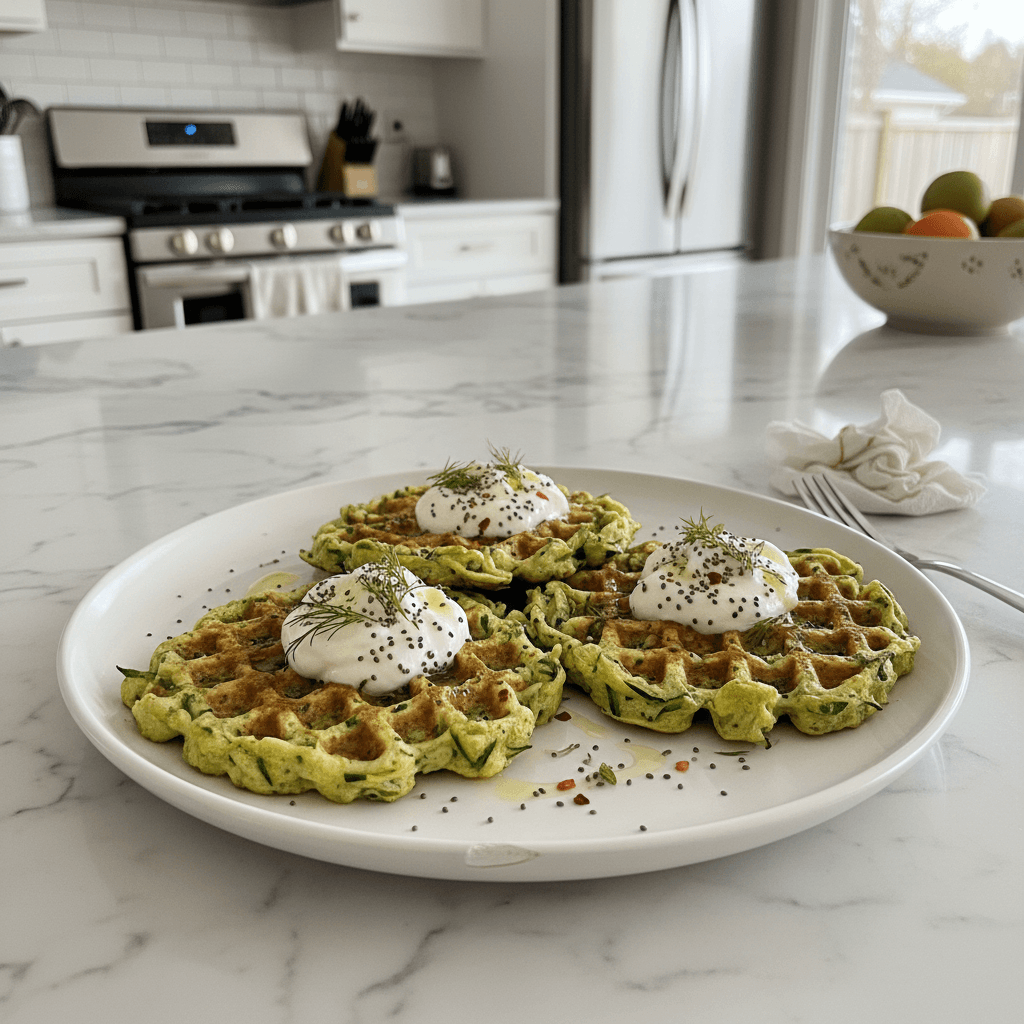
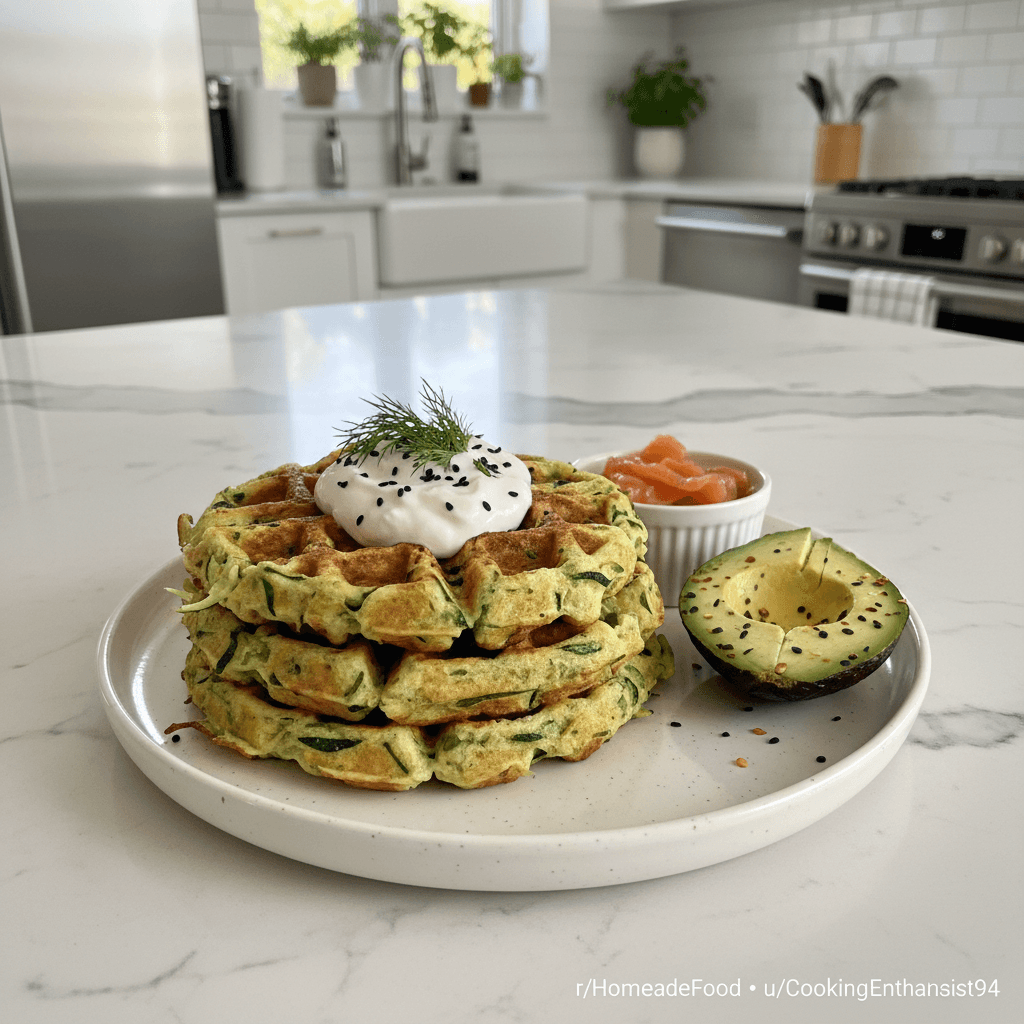
Oh, the possibilities! These waffles are a blank canvas for deliciousness. My absolute favorite way to serve them is with a generous drizzle of real maple syrup none of that corn syrup stuff, please! A dollop of Greek yogurt or a spoonful of whipped cream adds a lovely creamy contrast. Fresh berries are a must, strawberries, blueberries, or raspberries just brighten everything up. Sometimes I even go savory with a fried egg and a sprinkle of hot sauce. Honestly, a stack of these, a good cup of coffee, and a quiet morning with a book? That’s my idea of pure bliss. They’re also fantastic alongside some crispy bacon or sausage for a more substantial brunch spread. Don’t be shy about experimenting!
Cultural Backstory of Waffles (and My Zucchini Twist)
Waffles, in their many forms, have a long and storied history, tracing back to ancient Greece with their flat cakes cooked between hot metal plates. The modern waffle, with its distinctive grid pattern, really took off in medieval Europe. For me, waffles always bring back memories of Sunday mornings at my grandma’s house. She made them from scratch, and the smell was just heavenly. My zucchini waffles are my little twist on that tradition, a way to bring a bit of extra goodness to a beloved classic. It’s a testament to how food evolves, taking on new life in different kitchens. It’s not a deep cultural dive, but it’s my personal nod to a comforting heritage, made a little bit healthier for my family’s everyday enjoyment.
So, there you have it, my secret weapon for a wholesome, happy breakfast. These waffles have saved many a morning in my house, proving that sometimes, the best way to get those veggies in is to hide them in plain sight. They’re warm, comforting, and just plain delicious. I hope you give them a whirl and make them your own. Let me know how your batch turns out!
Frequently Asked Questions about Healthy Zucchini Waffles
- → Can I make these waffles ahead of time?
Absolutely! I often make a big batch on Sunday. Cook them fully, let them cool, and then store them in the fridge or freezer. Reheat them in a toaster for a quick, crispy breakfast during the week!
- → What if I don’t have buttermilk for my Zucchini Waffles?
No worries! You can make a quick substitute. Just add 1 tablespoon of white vinegar or lemon juice to a measuring cup, then fill the rest with regular milk to equal 1 cup. Let it sit for 5 minutes, and it’s good to go!
- → Why do my Zucchini Waffles turn out soggy?
The most common culprit is too much moisture from the zucchini. You really need to squeeze out as much liquid as possible after grating. Also, don’t overmix the batter, and make sure your waffle iron is hot enough!
- → How long do cooked Zucchini Waffles last?
In an airtight container in the fridge, they’ll stay good for about 3-4 days. If you freeze them properly, they can last up to 2 months. Just remember to reheat them in a toaster for the best texture!
- → Can I add other vegetables to these waffles?
I haven’t tried many others in waffles, but finely grated carrots could work for a slightly sweeter profile. Just be mindful of moisture content. Stick to the zucchini for the classic version first, then get adventurous!

Crispy Healthy Zucchini Waffles: A Sneaky Veggie Treat
- Prep Time: 15 Minutes
- Cook Time: 20 Minutes
- Total Time: 35 Minutes
- Yield: 4 Servings 1x
- Category: Dinner
Description
Whip up these delightful Healthy Zucchini Waffles! Sneak in veggies for a wholesome breakfast. Crispy on the outside, fluffy inside, they’re pure morning magic.
Ingredients
- Dry Base & Lift:
- 1 ½ cups all-purpose flour
- 1 tbsp baking powder
- ½ tsp baking soda
- ½ tsp salt
- Sweeteners & Spices:
- ¼ cup granulated sugar
- 1 tsp ground cinnamon
- ¼ tsp ground nutmeg
- Wet Essentials:
- 1 large egg
- 1 cup buttermilk
- 1 tsp vanilla extract
- The Star & Richness:
- ¼ cup unsalted butter, melted
- 1 cup grated zucchini (about 1 medium zucchini), squeezed dry
Instructions
- Mix the Dry Stuff:: Okay, first things first, grab a big bowl. We’re talking a mixing bowl that can handle some serious action. Toss in your flour, baking powder, baking soda, that lovely cinnamon and nutmeg, sugar, and salt. Give it a good whisk, really get in there! You want everything combined so you don’t get a random pocket of salt or cinnamon later. I always feel like this step is the quiet beginning of something delicious, smelling all those spices just waking up.
- Whisk the Wet Ingredients:: In another, slightly smaller bowl – because who needs more dishes, honestly? – crack that egg. Give it a quick whisk, then pour in the buttermilk, melted butter, and vanilla extract. Whisk it all up until it’s nice and smooth. This is where the magic starts to happen, the liquids coming together. Make sure your butter isn’t too hot, or you’ll scramble the egg, and trust me, I’ve been there. Not a fun oops moment.
- Combine Gently:: Now for the big moment! Pour your wet ingredients into the dry ingredients. Stir gently with a spoon or spatula until *just* combined. And I mean just! Lumps are your friends here; overmixing is the enemy of fluffy waffles. The batter will look a bit shaggy, that’s totally fine. You don’t want to activate all that gluten too much, or your waffles will be tough. My kitchen always smells so good at this point!
- Add the Zucchini:: Time for our secret ingredient! Fold in that grated zucchini, remember, the one you squeezed the living daylights out of. Mix it in until it’s evenly distributed. Don’t overdo it here either; just enough to get those green flecks speckled throughout. It feels so good knowing you’re sneaking in some goodness. This is where I always pat myself on the back for being a clever home cook.
- Heat and Grease Your Waffle Iron:: While your batter rests for a minute, preheat your waffle iron. Get it nice and hot! And don’t forget to lightly grease it, even if it’s non-stick. I use a little cooking spray or a brush with some melted butter. This step is crucial for getting those gloriously crispy edges on your waffles. I once forgot this, and spent ten minutes scraping bits of waffle off the iron. Learn from my chaos!
- Cook Your Waffles:: Pour about ½ to ¾ cup of batter onto the hot waffle iron, depending on its size. Close the lid and cook according to your waffle iron’s instructions, usually until golden brown and steaming stops. The smell of fresh waffles is just heavenly, a true sign of breakfast success. They should be crispy on the outside and wonderfully tender inside. Pull them out, and get ready for a delicious morning!


