Description
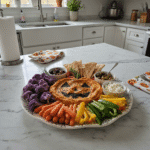
Create a vibrant Harvest Hummus Board with colorful Halloween veggies. This easy, festive veggie tray is perfect for any fall gathering!
Ingredients
Scale
- Base Hummus Ingredients:
- 1 (15-ounce) can chickpeas, drained and rinsed
- 1/4 cup tahini
- 1/4 cup fresh lemon juice
- 2–3 cloves garlic, minced
- 2 tablespoons extra virgin olive oil
- 2–4 tablespoons ice water
- 1/2 teaspoon salt, or to taste
- Flavor Boosters:
- 1/2 teaspoon smoked paprika
- 1/4 teaspoon ground cumin
- Pinch of cayenne pepper (optional)
- Vibrant Veggies & Dippers:
- 2 carrots, peeled and sliced into sticks
- 1 cucumber, sliced
- 1 orange bell pepper, sliced
- 1 yellow bell pepper, sliced
- 1/2 cup radishes, thinly sliced
- 1 cup broccoli florets
- 1 cup snap peas
- Pita bread, cut into wedges
- Assorted crackers
- Finishing Touches:
- Fresh parsley, chopped, for garnish
- 1/4 cup pomegranate arils, for garnish
- Extra drizzle of olive oil
Instructions
- Prep the Chickpeas:: Okay, first things first, drain and rinse those canned chickpeas really well. I usually put them in a colander and give them a good rinse under cold water until no more foam appears. Some folks even peel the skins for super smooth hummus, but honestly, I rarely bother unless I’m feeling extra ambitious. Just make sure they’re nice and clean before they go into the food processor.
- Blend the Hummus Base:: Into your food processor, toss the rinsed chickpeas, tahini, fresh lemon juice, and garlic cloves. Give it a good whir for about a minute. It’ll look a bit thick and pasty at first, and you might think, “Mama Tessa, what have I done?” Don’t worry, this is normal! Keep scraping down the sides of the bowl to make sure everything gets nicely incorporated. This is where the magic starts to happen.
- Adjust Consistency with Ice Water:: Now for the creamy goodness! With the food processor running, slowly drizzle in the ice water, a tablespoon at a time. You’ll see the hummus start to transform, becoming much lighter and silkier. I usually add about 2-4 tablespoons, but you might need a little more or less depending on your chickpeas. Keep blending until it’s super smooth and luscious; it should smell absolutely divine by now!
- Season and Taste:: Time to make it sing! Add your olive oil, smoked paprika, cumin, and a good pinch of salt. Blend again to mix everything in. Then, for the most important part: taste it! Does it need more lemon? More salt? Another tiny pinch of paprika? This is your Harvest Hummus Board, so make it perfect for *you*. I always adjust a little here, a little there, until it’s just right.
- Assemble Your Harvest Hummus Board:: Once your hummus is tasting fantastic, spread it onto a large platter or board, creating a nice, swirly base. Now for the fun part: arranging all those colorful veggies and dippers around it. I like to group similar colors together or create little pathways of veggies. Don’t be afraid to get creative; it’s supposed to be a feast for the eyes as much as the tummy! I always make sure there’s a good mix of crunchy and soft dippers.
- Garnish and Serve:: Almost done! Drizzle a little more olive oil over the hummus, then sprinkle with fresh parsley and those jewel-like pomegranate arils. These finishing touches really make your Harvest Hummus Board pop! Serve it up right away and watch everyone gather ’round. Honestly, there’s nothing quite like seeing happy faces digging into something you made with love.