
I still remember the first time I made these Graveyard Chocolate Pudding Dirt Cups. It was for my nephew’s first Halloween party, and honestly, I was trying to impress my sister-in-law. I pictured myself, apron on, effortlessly whipping up something adorable. Instead, I had chocolate pudding splatters on the ceiling and crushed Oreos everywhere. But when those little cups came out, topped with cookie “dirt” and gummy worms peeking out like they’d just crawled from the grave, everyone gasped! It just brought so much joy, and that’s why these dirt cups are so special to me. They’re deliciously messy fun.
One year, I got a little too ambitious with the decorations for my Graveyard Chocolate Pudding Dirt Cups. I tried to make tiny tombstone cookies from scratch, but they ended up looking more like lumpy, sad potato chips. My husband, bless his heart, asked if they were supposed to be ancient ruins. We just laughed and stuck some Milano cookies in instead. Sometimes, simple is just better, you know?

Ingredients for Graveyard Chocolate Pudding Dirt Cups
- Whole Milk: Don’t even think about skim milk here, hon. We need that full-fat creaminess for a truly rich chocolate pudding. I’ve tried 2% in a pinch, and it works, kinda, but it’s just not the same decadent hug.
- Instant Chocolate Pudding Mix: Yeah, I use instant. To be real, who has time to babysit stovetop pudding when you’re trying to corral little monsters? Jell-O brand is my go-to, it sets up perfectly every single time.
Whipped Topping (like Cool Whip): This makes the pudding lighter, almost mousse-like. I accidentally used heavy cream once, and it was a bit too dense. The whipped topping just gives it that fluffy, airy texture that’s so good.
Oreo Cookies (or similar chocolate sandwich cookies): The “dirt,” obviously! I crush them in a food processor, but honestly, a Ziploc bag and a rolling pin works just as well and it’s a great way to get out some aggression. Just don’t over-crush them into fine powder, you want some little bits for texture.
Gummy Worms: Essential for the “creepy crawly” effect! I always grab a mix of colors, it makes the Graveyard Chocolate Pudding Dirt Cups look more playful.
- Milano Cookies or Pirouette Cookies: These are my go-to for tombstones. I once used graham crackers, and they got soggy way too fast. Milano cookies hold up beautifully and look so elegant, even if they’re meant to be spooky.
Making Graveyard Chocolate Pudding Dirt Cups
- Crush Your “Dirt”:
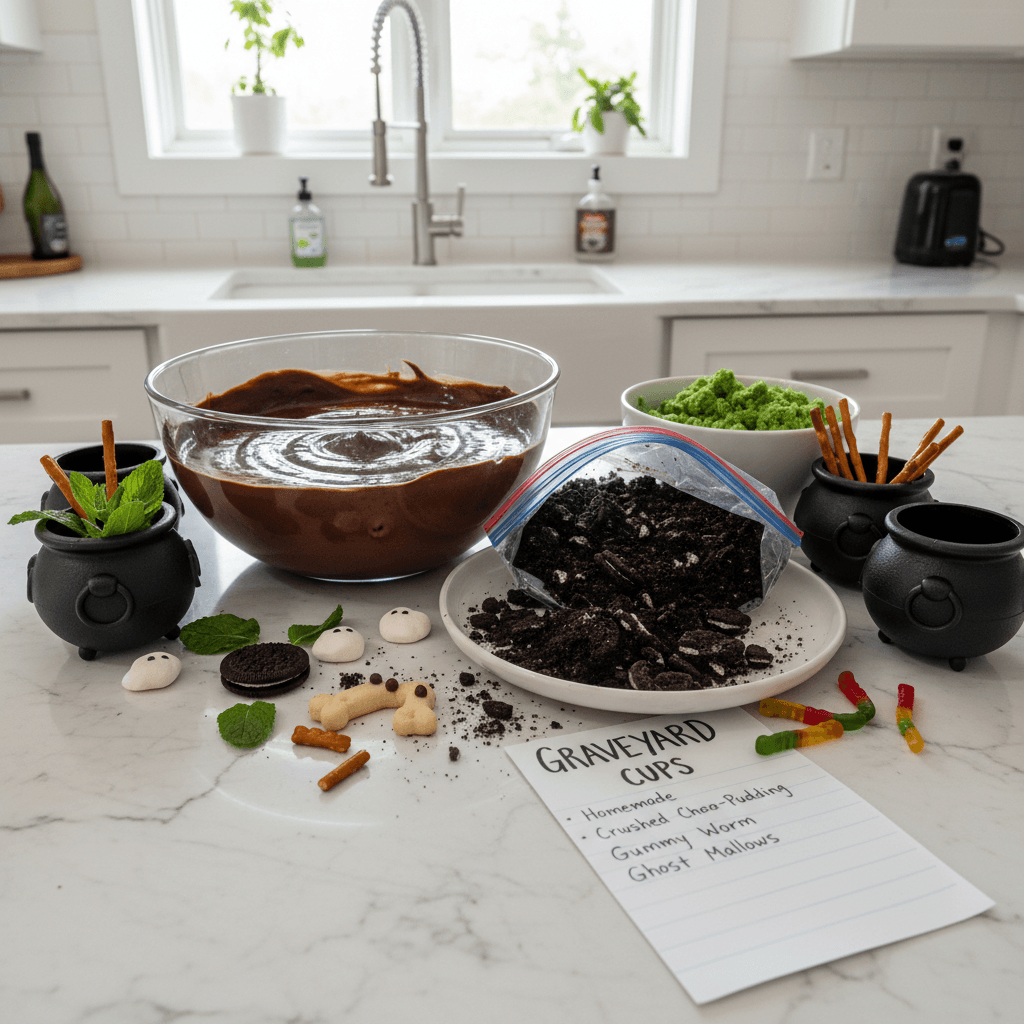
- First things first, we need our dirt! Grab those Oreo cookies and either toss them into a food processor for a quick blitz or, my preferred method, put them in a sturdy Ziploc bag and bash them with a rolling pin. You want them crushed pretty fine, but with a few little chunks still in there for texture. It should look like fresh, dark soil, ready for some spooky inhabitants. Set these aside, resist the urge to snack all of them.
- Whip Up the Pudding Base:
- Okay, time for the chocolate magic! In a big mixing bowl, combine your cold milk and instant chocolate pudding mix. Whisk it vigorously for about 2 minutes until it starts to thicken up. This is where I always get impatient and stop too soon, so keep whisking! You’ll feel it getting denser. Let it sit for a few minutes, maybe 5, to really firm up. Don’t worry if it seems a bit too firm, we’re about to lighten it.
- Fold in the Fluff:
- Once your pudding is good and thick, gently fold in the whipped topping. This is key for that lovely, light, almost mousse-like texture that makes these Graveyard Chocolate Pudding Dirt Cups so irresistible. Use a spatula and fold it in until it’s just combined, no streaks. Don’t overmix, or you’ll lose all that wonderful airiness. It should look like a pale, fluffy chocolate cloud.
- Layer the Graveyard:
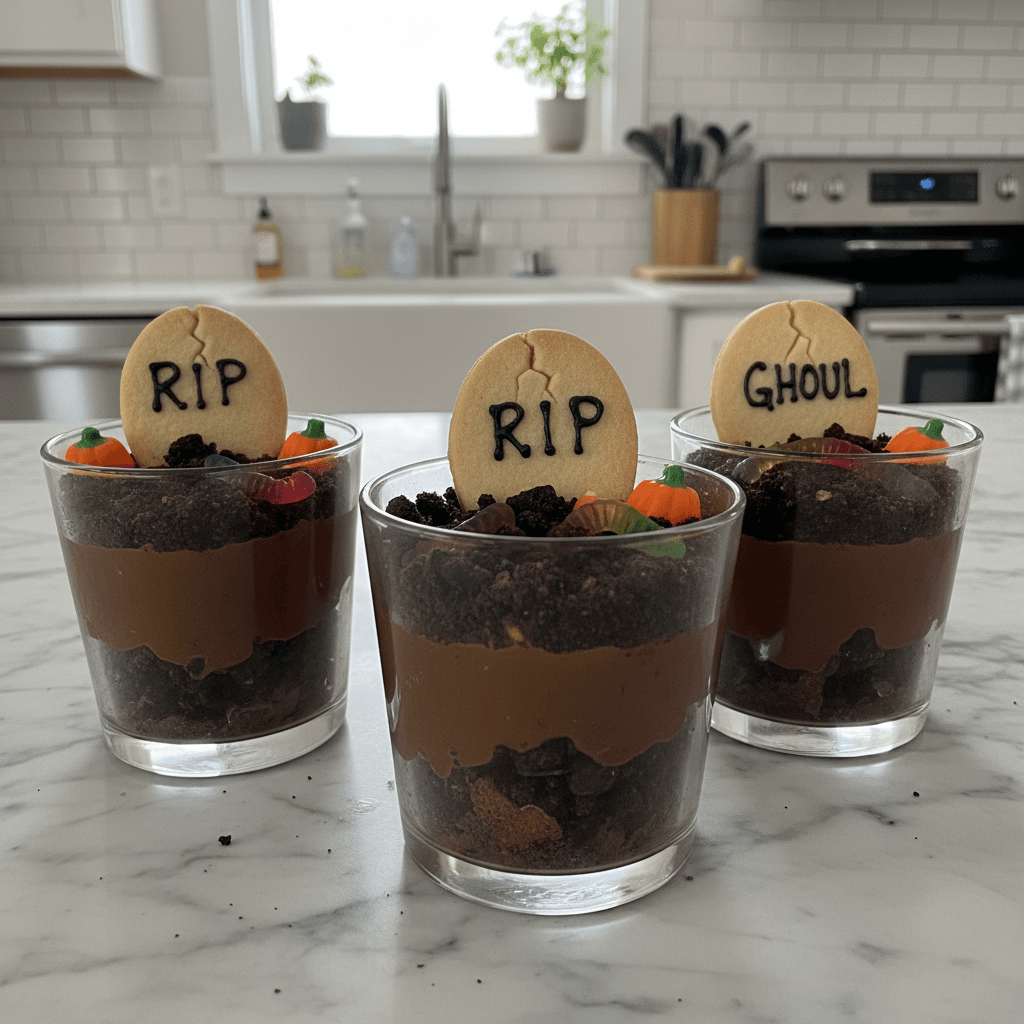
- Now for the fun part: assembly! Grab your individual serving cups or a clear trifle dish. Start with a layer of your crushed Oreo “dirt” at the bottom maybe a tablespoon or two. Next, spoon in a generous layer of your chocolate pudding mixture. I usually aim for about an inch thick. This is where you can get a little messy, it adds to the charm, honestly!
- Build Your Layers:
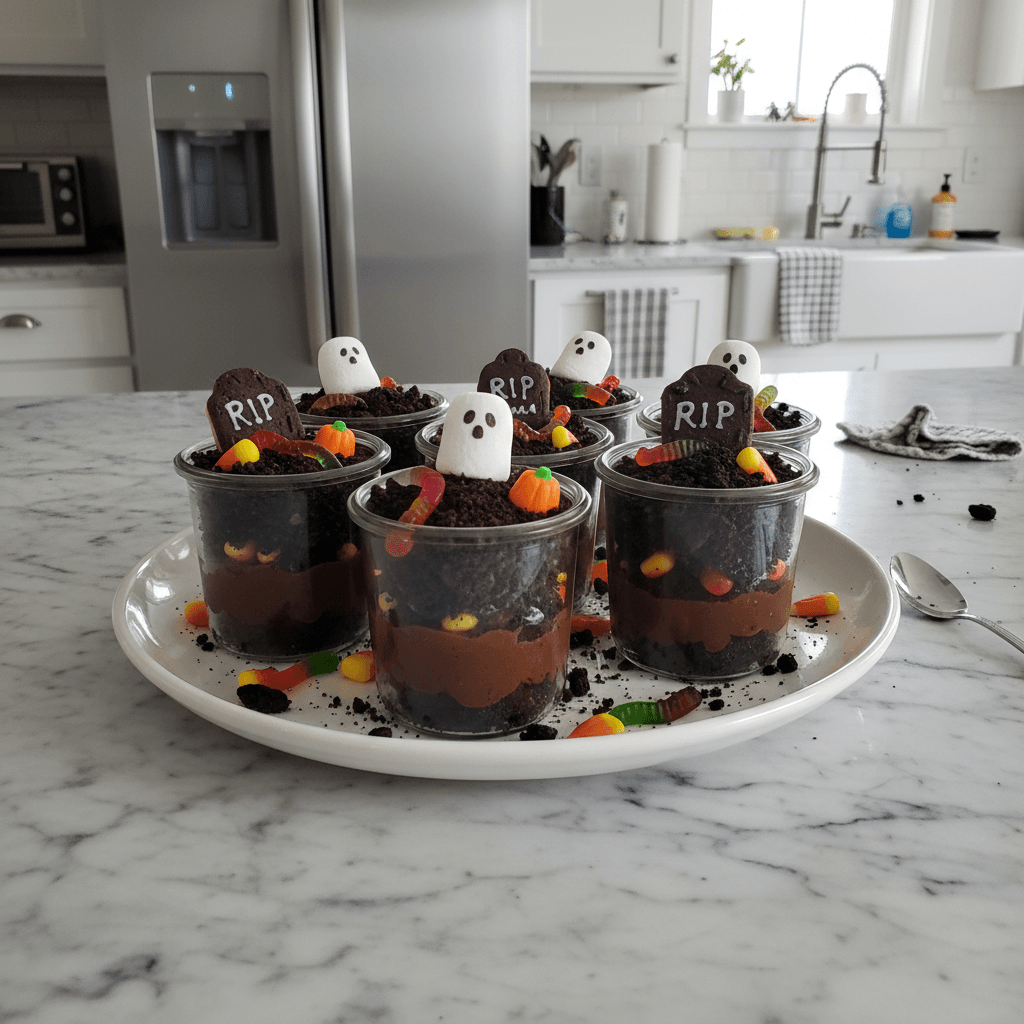
- Continue layering your Graveyard Chocolate Pudding Dirt Cups. Add another sprinkle of crushed Oreos over the pudding, then another layer of pudding. Repeat this until your cups are nearly full, ending with a nice, thick layer of Oreo “dirt” on top. This final layer is crucial for making it look like a freshly dug grave site, ready for its spooky inhabitants.
- Decorate Your Spooky Scene:
- Time to bring your graveyard to life! Stick a Milano cookie (or your chosen “tombstone”) upright into the top layer of Oreo dirt in each cup. Then, artfully arrange a few gummy worms so they look like they’re crawling out of the dirt. You can even write “RIP” on the tombstones with an edible marker if you’re feeling fancy. Chill these beauties for at least 30 minutes before serving to let everything set and get nice and cold.
I remember one time I was rushing to make these Graveyard Chocolate Pudding Dirt Cups and didn’t let the pudding chill enough before adding the gummy worms. The worms literally sank into the still-liquid pudding, looking less like creepy crawlies and more like… well, let’s just say it wasn’t pretty. Had to fish them out and start over with fresh ones after a proper chill! Lesson learned: patience is key, even for spooky treats.
Graveyard Chocolate Pudding Dirt Cups: Storage Tips
So, these Graveyard Chocolate Pudding Dirt Cups actually store pretty well, which is a win! If you have leftovers (a rare occurrence in my house, honestly), just cover them tightly with plastic wrap and pop them in the fridge. They’ll keep happily for about 3-4 days. Now, a word of caution: if you’ve used any crumbly cookies for your tombstones, they might get a little soft after a day or two. The gummy worms, though, they usually hold up fine. I tried freezing them once, thinking I was clever, but the pudding texture got all weird and watery when it thawed. So, fridge only for these beauties, please! Best eaten fresh, but leftovers are still a delicious, albeit slightly softer, treat.
Customizing Your Spooky Dirt Cups
Alright, let’s talk swaps for your Graveyard Chocolate Pudding Dirt Cups! If you’re not a fan of Oreos, any chocolate sandwich cookie works wonders. I’ve even tried shortbread cookies crushed up with a bit of cocoa powder mixed in, and it worked, kinda, but the texture wasn’t quite the same. For the pudding, you can totally use sugar-free mix if you’re watching your sugar intake, it sets up just fine. And if you’re out of Cool Whip, a homemade whipped cream folded in will work, but it’s a bit heavier and doesn’t last as long. For the tombstones, graham crackers are a classic, but like I said, they can get soggy. Wafer cookies or even small chocolate bars cut into rectangles could work too. Get creative!
Serving Your Graveyard Chocolate Pudding Dirt Cups
These Graveyard Chocolate Pudding Dirt Cups are such a fun, standalone treat, but they really shine at a Halloween party! I love setting them out on a spooky-themed table with some dry ice for a foggy effect makes them extra dramatic. For drinks, a simple witches’ brew punch (green juice with ginger ale and gummy eyeballs!) goes perfectly. Honestly, they’re just as good curled up on the couch watching a scary movie with a cozy blanket. They remind me of childhood sleepovers, full of giggles and sugar rushes. They’re a dessert that’s meant to be shared, to make memories, and maybe even cause a little delightful mess.
The Fun Backstory of Dirt Cups
The idea of “dirt cups” or “dirt pudding” isn’t tied to some ancient culinary tradition, but it definitely taps into a universal childhood joy. It’s an American classic, a playful dessert that became popular in the late 20th century, especially for kids’ parties. For me, these Graveyard Chocolate Pudding Dirt Cups really symbolize the spirit of Halloween a little bit spooky, a whole lot of fun, and deliciously sweet. My grandma used to make a similar version with vanilla pudding and crushed Nilla wafers, but when I discovered the chocolate and Oreo combo, it just felt right for Halloween. It’s a simple concept that brings big smiles, and that’s a tradition worth keeping, I think.
Making these Graveyard Chocolate Pudding Dirt Cups always brings me back to those chaotic, joyful Halloween parties. They might be simple, but the smiles they create? Priceless. I love how something so easy can feel so special and festive. So go on, whip up a batch, get a little messy, and share some spooky sweetness. And hey, if you have your own graveyard dirt cup adventures, I’d love to hear about them!
Frequently Asked Questions about Graveyard Chocolate Pudding Dirt Cups
- → How long do Graveyard Chocolate Pudding Dirt Cups last in the fridge?
Honestly, if they even make it to the fridge! But seriously, covered tightly, these Graveyard Chocolate Pudding Dirt Cups are good for about 3-4 days. The cookies might soften a bit, but the pudding stays yummy.
- → Can I make these Graveyard Chocolate Pudding Dirt Cups ahead of time?
Absolutely! You can assemble them a day in advance. Just hold off on adding the gummy worms and tombstone cookies until right before serving so they don’t get soggy. I learned that from an “oops” moment!
- → What if I don’t have instant pudding mix for my Graveyard Chocolate Pudding Dirt Cups?
You can use stovetop pudding, but make sure it’s completely cooled before you fold in the whipped topping. The instant mix is just so much faster when you’re in a Halloween rush, trust me on that one.
- → Can I use different cookies for the “dirt” in my Graveyard Chocolate Pudding Dirt Cups?
Yep! Any chocolate sandwich cookie works great. I’ve even seen people use brownies crumbled up, which sounds pretty decadent, though I haven’t tried that myself yet. Experiment away!
- → Any ideas for making my Graveyard Chocolate Pudding Dirt Cups extra spooky?
Oh, for sure! You could add candy corn “teeth,” mini candy pumpkins, or even a sprinkle of green coconut flakes (tinted with food coloring) for “grass.” Get creative with your spooky scene!

Spooky Graveyard Chocolate Pudding Dirt Cups for Halloween
- Prep Time: 15 Minutes
- Cook Time: 0 Minutes
- Total Time: 15 Minutes
- Yield: 8 Servings 1x
- Category: Home
Description
Whip up easy Graveyard Chocolate Pudding Dirt Cups! Layers of rich chocolate, crushed cookies, and spooky gummy worms. A fun Halloween treat for all ages.
Ingredients
- Base Pudding & Crumbs:
- 3 cups cold whole milk
- 2 (3.9 oz) packages instant chocolate pudding mix
- 1 (8 oz) container whipped topping, thawed (like Cool Whip)
- 1 (14.3 oz) package Oreo cookies (or similar chocolate sandwich cookies)
- Fun Graveyard Toppings:
- 1 package gummy worms
- 8–10 Milano cookies or Pirouette cookies (for tombstones)
- Green food coloring (optional, for ‘moss’ or ‘grass’)
Instructions
- Crush Your “Dirt”:: First things first, we need our dirt! Grab those Oreo cookies and either toss them into a food processor for a quick blitz or, my preferred method, put them in a sturdy Ziploc bag and bash them with a rolling pin. You want them crushed pretty fine, but with a few little chunks still in there for texture. It should look like fresh, dark soil, ready for some spooky inhabitants. Set these aside; resist the urge to snack all of them.
- Whip Up the Pudding Base:: Okay, time for the chocolate magic! In a big mixing bowl, combine your cold milk and instant chocolate pudding mix. Whisk it vigorously for about 2 minutes until it starts to thicken up. This is where I always get impatient and stop too soon, so keep whisking! You’ll feel it getting denser. Let it sit for a few minutes, maybe 5, to really firm up. Don’t worry if it seems a bit too firm; we’re about to lighten it.
- Fold in the Fluff:: Once your pudding is good and thick, gently fold in the whipped topping. This is key for that lovely, light, almost mousse-like texture that makes these Graveyard Chocolate Pudding Dirt Cups so irresistible. Use a spatula and fold it in until it’s just combined, no streaks. Don’t overmix, or you’ll lose all that wonderful airiness. It should look like a pale, fluffy chocolate cloud.
- Layer the Graveyard:: Now for the fun part: assembly! Grab your individual serving cups or a clear trifle dish. Start with a layer of your crushed Oreo “dirt” at the bottom – maybe a tablespoon or two. Next, spoon in a generous layer of your chocolate pudding mixture. I usually aim for about an inch thick. This is where you can get a little messy; it adds to the charm, honestly!
- Build Your Layers:: Continue layering your Graveyard Chocolate Pudding Dirt Cups. Add another sprinkle of crushed Oreos over the pudding, then another layer of pudding. Repeat this until your cups are nearly full, ending with a nice, thick layer of Oreo “dirt” on top. This final layer is crucial for making it look like a freshly dug grave site, ready for its spooky inhabitants.
- Decorate Your Spooky Scene:: Time to bring your graveyard to life! Stick a Milano cookie (or your chosen “tombstone”) upright into the top layer of Oreo dirt in each cup. Then, artfully arrange a few gummy worms so they look like they’re crawling out of the dirt. You can even write “RIP” on the tombstones with an edible marker if you’re feeling fancy. Chill these beauties for at least 30 minutes before serving to let everything set and get nice and cold.


