
I remember the first time I tried to bake something truly epic. It was a chilly November, and I wanted to surprise my partner with a dessert that screamed “special occasion” but also “I tried really, really hard.” My kitchen, usually a chaotic but functional space, transformed into a red-splattered war zone. Flour dusted everything, red food coloring seemed to have a mind of its own, and honestly, I questioned my sanity more than once. But that first attempt at a Decadent Red Velvet Cheesecake Layer Cake? It was messy, it was a little lopsided, but it tasted like pure joy. It’s become a tradition, a testament to love and a good dose of kitchen chaos.
My second time making this, I completely forgot to chill the cheesecake layer before assembling. The result? A beautiful, albeit slightly melted, leaning tower of deliciousness. I still served it, telling everyone it was “deconstructed chic.” Everyone laughed, but the taste was still there! This Decadent Red Velvet Cheesecake Layer Cake project always teaches me something new about patience, or lack thereof.

Ingredients for Your Decadent Red Velvet Cheesecake Layer Cake
- All-Purpose Flour: This is the backbone, hon. Don’t skimp on sifting, it makes a world of difference for that light cake texture. I once didn’t, and the cake was a bit dense, oops.
- Granulated Sugar: Sweetness, obviously! But it also helps keep the cake moist. I’ve tried reducing it, and it just doesn’t hit the same.
Unsweetened Cocoa Powder: For that subtle chocolatey depth in the red velvet. I always use Dutch-processed, it just gives a richer, darker color.
Baking Soda & Baking Powder: Our leavening duo! They work together to give that beautiful lift. Make sure yours aren’t expired, or your cake will be flat, I learned that the hard way.
Salt: Just a pinch, but it balances all the sweetness. Seriously, don’t skip it.
- Buttermilk: This is where the magic happens for red velvet’s tang and moisture. If you don’t have it, a quick DIY with milk and lemon juice works… kinda, but real buttermilk is better.
Vegetable Oil: For moisture and tenderness. I prefer oil over butter for red velvet, it just yields a softer crumb.
Large Eggs: Binders and structure builders. Room temperature is key, don’t use cold eggs straight from the fridge!
Red Food Coloring: The star of the show! Gel food coloring gives the best vibrant red without adding too much liquid. I’ve used liquid, and it was more pink than red, honestly.
Vanilla Extract: Enhances all the flavors. I always use pure vanilla, the imitation stuff just doesn’t compare.
White Vinegar: Reacts with the baking soda for that signature red velvet tang and helps with the color. It’s a small amount but so important.
Cream Cheese: The heart of the cheesecake and frosting. Full-fat, brick-style, room temperature. Don’t you dare use the spreadable kind!
Sour Cream: Adds a lovely tang and creaminess to the cheesecake. Full-fat is my preference here too, for richness.
Heavy Cream: For whipping into that fluffy frosting. Make sure it’s super cold for the best results.
Powdered Sugar: For the frosting. Sift it, or you’ll have lumpy frosting, and no one wants that, trust me.
Chocolate Shavings/Sprinkles: For a pretty finish! I love dark chocolate shavings, they add a touch of bitterness that complements the sweet.
Crafting Your Decadent Red Velvet Cheesecake Layer Cake
- Bake the Cheesecake First:
- Okay, so this is where we start. Get that cream cheese, sugar, eggs, sour cream, and vanilla all cozy in a bowl. Beat it just until smooth, but don’t overmix! Overmixing introduces too much air, and you’ll get cracks, which, honestly, I’ve done more times than I care to admit. Pour it into a greased springform pan, then bake it low and slow. It should be mostly set but still have a slight wobble in the center. That wobble means perfect creaminess later, trust me on this one.
- Prepare Red Velvet Cake Layers:
- Next up, the red velvet! Whisk your dry ingredients together flour, cocoa, baking soda, salt. In another bowl, mix the wet stuff: sugar, oil, eggs, buttermilk, red food coloring, vanilla, and that crucial vinegar. Now, gently combine the wet and dry. Don’t beat it to death, just mix until no streaks remain. Overmixing here makes tough cake, and we want soft, tender layers! Divide the batter evenly between two prepared cake pans. I usually eyeball it, which sometimes leads to one slightly taller layer, but hey, that’s homemade charm, right?
- Bake and Cool the Red Velvet:
- Pop those cake pans into the oven! Keep an eye on them, you’re looking for a springy top and a clean toothpick. Once they’re done, let them cool in the pans for a bit, maybe 10-15 minutes. This is where I always get impatient and try to flip them out too soon, leading to a cracked cake. Learn from my mistakes! Then, transfer them to a wire rack to cool completely. Patience is a virtue here, especially if you want a stable cake to stack.
- Whip Up the Cream Cheese Frosting:
- While the cakes are cooling, let’s make that dreamy frosting! Get your room-temperature cream cheese and butter, beat them together until super smooth and fluffy. Add the powdered sugar, a little at a time, along with vanilla and a splash of heavy cream. Beat it until it’s light and spreadable. If it feels too stiff, a tiny bit more cream. Too thin? A little more powdered sugar. It should smell like pure deliciousness at this point, honestly.
- Assemble Your Masterpiece:
- Okay, the fun part! Once everything is completely cool (seriously, COMPLETELY!), place one red velvet cake layer on your serving plate. Carefully slide that chilled cheesecake layer right on top. This is where I hold my breath, hoping it doesn’t crack. Then, add the second red velvet layer. Now, for the frosting! Start with a crumb coat a thin layer all over to catch any loose crumbs. Chill it for 15-20 minutes. This step is a game-changer for a neat finish, trust me.
- Decorate and Chill:
- After the crumb coat is set, apply the final, generous layer of frosting. Smooth it out with an offset spatula or just embrace the rustic look that’s what I usually do! This Decadent Red Velvet Cheesecake Layer Cake always looks stunning with some simple swirls. Garnish with chocolate shavings or sprinkles, or even some fresh berries if you’re feeling fancy. Then, back into the fridge it goes for at least 4 hours, or even better, overnight. This chilling time is non-negotiable for stable slices and happy eaters!
One time, after spending hours on this cake, my cat, Mittens, decided the cooling cake on the counter was a new perch. Luckily, she only left a paw print on the frosting before I shooed her away! That Decadent Red Velvet Cheesecake Layer Cake became “Mittens’ Masterpiece,” and honestly, it was a funny story to tell at the party. It just proves that even with kitchen chaos, the end result is still delicious.
Storing Your Decadent Red Velvet Cheesecake Layer Cake
Okay, so you’ve got leftovers (if you’re lucky!). This cake, because of the cream cheese, needs to live in the fridge. I usually wrap individual slices in plastic wrap, then pop them into an airtight container. I microwaved a slice once, thinking it would soften, and the cheesecake layer got a bit weird and watery so don’t do that lol. It’s best served chilled, straight from the fridge. It holds up beautifully for about 3-4 days in the refrigerator. You can even freeze slices for longer! Just wrap them super tightly in plastic wrap, then foil, and they’ll be good for up to a month. Thaw in the fridge overnight. I always stash a few slices away for a rainy day, it’s a little treat to look forward to!
https://tastetrend.net/wp-content/uploads/2025/12/decadent-red-velvet-cheesecake-layer-cake-recipe-blog-image-1.png
Decadent Red Velvet Cheesecake Layer Cake Ingredient Swaps
Life happens, and sometimes you don’t have exactly what the recipe calls for. For the buttermilk, I’ve tried adding a tablespoon of lemon juice or white vinegar to regular milk and letting it sit for 5 minutes. It works okay in a pinch, but the texture isn’t quite as rich. For the red food coloring, if you’re not into artificial colors, you could try beet powder! I experimented once, and it gave a lovely earthy pinkish-red, not quite the vibrant hue, but still pretty. For the cream cheese, stick to full-fat, lighter versions just don’t set up as well for the cheesecake layer, and the frosting won’t be as dreamy. If you’re out of sour cream for the cheesecake, plain full-fat Greek yogurt can be a decent substitute, but the tang will be slightly different. Don’t be afraid to experiment a little, but know some swaps are better than others, honestly!
Serving Your Decadent Red Velvet Cheesecake Layer Cake
This cake is a showstopper all on its own, but a few little touches can make it even more special. I love serving it with a dollop of freshly whipped cream not too sweet, just a little cloud of lightness. A sprinkle of extra chocolate shavings or some fresh raspberries on the side adds a lovely pop of color and a fresh counterpoint to the richness. Honestly, a slice of this Decadent Red Velvet Cheesecake Layer Cake with a strong cup of coffee or a glass of dry sparkling wine? Pure bliss. It’s perfect for birthdays, holidays, or just when you need a little pick-me-up. I’ve even served it with a scoop of vanilla bean ice cream before, and that was a hit too! Think of it as a canvas for your dessert dreams.
The Story Behind This Decadent Red Velvet Cheesecake Layer Cake
Red velvet cake has such a rich, fascinating history, doesn’t it? It dates back to the Victorian era, where “velvet” cakes were known for their fine, soft crumb. The red color initially came from a reaction between natural cocoa powder and acidic ingredients like buttermilk and vinegar. My grandma used to tell me stories about how her mother would make a red cake, but it was nowhere near as vibrant as today’s versions. The cheesecake layer? That’s my modern twist, a fusion of two classic comfort desserts. I remember the first time I saw a recipe combining them, I was skeptical, but the idea of that tangy cheesecake cutting through the rich red velvet just called to me. It’s a blend of old-school charm and new-school decadence, a recipe that feels like a warm hug from history with a contemporary twist.
Honestly, this Decadent Red Velvet Cheesecake Layer Cake has seen me through so many celebrations, big and small. It’s a labor of love, for sure, but the look on people’s faces when they take that first bite? Totally worth every flour-dusted counter and food-coloring stained finger. It’s more than just a cake, it’s a memory in the making. I hope you give it a whirl and maybe even make a few happy kitchen messes of your own. Share your versions with me!
https://tastetrend.net/wp-content/uploads/2025/12/decadent-red-velvet-cheesecake-layer-cake-recipe-blog-image-2.png
Frequently Asked Questions
- → How do I prevent my Decadent Red Velvet Cheesecake Layer Cake from cracking?
Oh, the dreaded crack! It often happens from overmixing or sudden temperature changes. Beat your cheesecake batter just until smooth, and cool it slowly in the oven with the door ajar after baking. I’ve found this really helps, honestly.
- → Can I make the red velvet cake layers ahead of time?
Absolutely! I often bake the cake layers a day or two in advance. Wrap them tightly in plastic wrap once completely cool and store them at room temperature. They stay beautifully moist, which is a big time-saver for this Decadent Red Velvet Cheesecake Layer Cake.
- → My cream cheese frosting is too runny, what went wrong?
This usually means your cream cheese or butter wasn’t cold enough, or you added too much liquid. If it’s runny, try chilling it for 15-20 minutes, then re-whipping. Sometimes a little extra powdered sugar can save it, I’ve done that plenty of times!
- → How long does this Decadent Red Velvet Cheesecake Layer Cake last in the fridge?
Stored properly in an airtight container, it’ll last a good 3-4 days in the refrigerator. The flavors actually meld even better after a day, so it’s a great make-ahead dessert. I always sneak a slice on day two!
- → Can I use a different kind of food coloring for the red velvet?
You can! Gel food coloring gives the most vibrant color without thinning the batter. Liquid colors can work, but you might need more, and it could make the batter a bit too thin. I’ve heard of natural options like beet powder, but the color will be more muted for your Decadent Red Velvet Cheesecake Layer Cake.
Decadent Red Velvet Cheesecake Layer Cake: A Baker’s Tale
- Prep Time: 60 Minutes
- Cook Time: 60 Minutes
- Total Time: 4 Hours 30 Minutes
- Yield: 12-16 Servings 1x
- Category: Dessert
Description
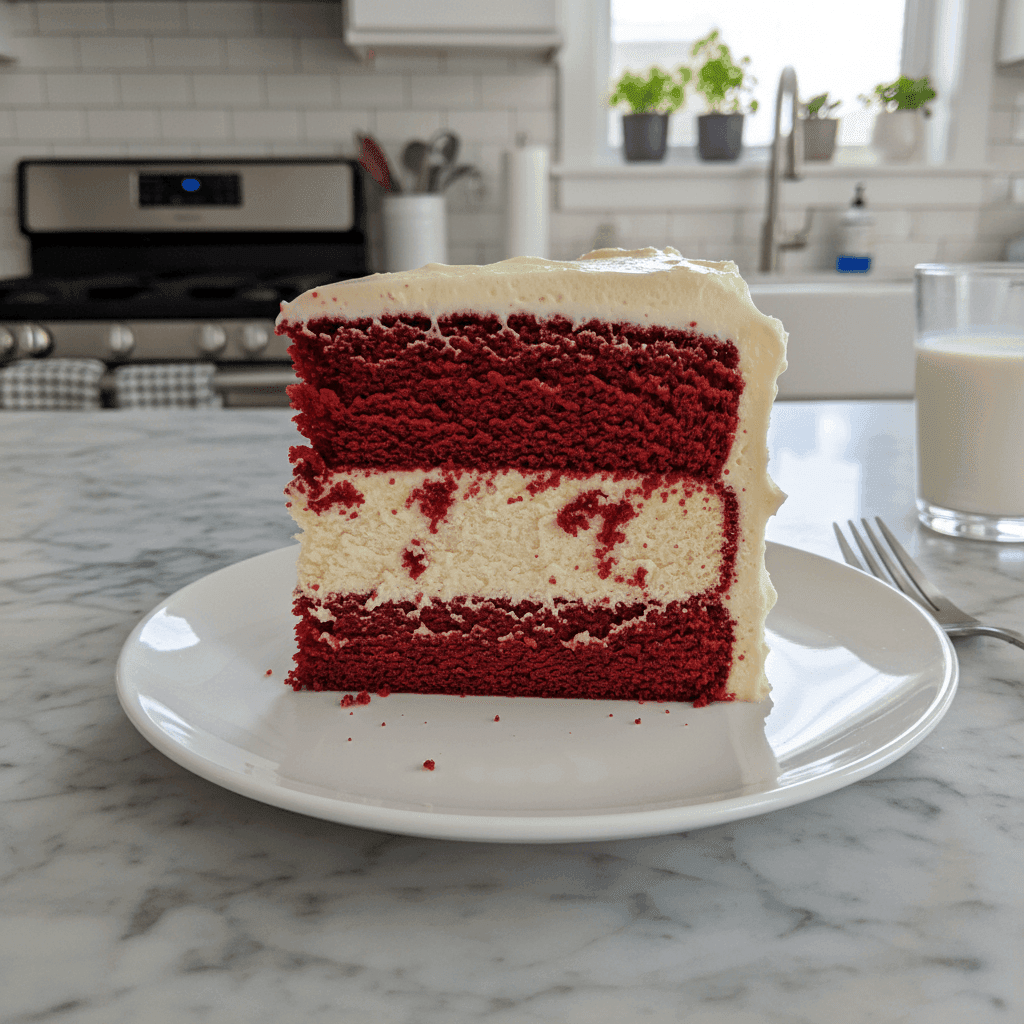
Decadent Red Velvet Cheesecake Layer Cake combines rich red velvet with creamy cheesecake. A showstopper dessert for any celebration.
Ingredients
- Red Velvet Cake Layers:
- 2 ½ cups (300g) all-purpose flour, sifted
- 1 ½ cups (300g) granulated sugar
- 1 tsp baking soda
- 1 tsp baking powder
- 1 tsp salt
- 2 tbsp unsweetened cocoa powder (Dutch-processed preferred)
- 1 cup (240ml) buttermilk, room temperature
- ½ cup (120ml) vegetable oil
- 2 large eggs, room temperature
- 2 tbsp red gel food coloring
- 1 tsp vanilla extract
- 1 tsp white vinegar
- Cheesecake Filling:
- 24 oz (680g) cream cheese, full-fat, softened
- ¾ cup (150g) granulated sugar
- 2 large eggs
- ½ cup (120ml) sour cream, full-fat
- 1 tsp vanilla extract
- Cream Cheese Frosting:
- 16 oz (450g) cream cheese, full-fat, softened
- 1 cup (226g) unsalted butter, softened
- 4–5 cups (480-600g) powdered sugar, sifted
- 2 tsp vanilla extract
- 2–4 tbsp heavy cream (as needed)
- Finishing Touches:
- Chocolate shavings or sprinkles, for garnish
Instructions
- Bake the Cheesecake First:: Okay, so this is where we start. Get that cream cheese, sugar, eggs, sour cream, and vanilla all cozy in a bowl. Beat it just until smooth, but don’t overmix! Overmixing introduces too much air, and you’ll get cracks, which, honestly, I’ve done more times than I care to admit. Pour it into a greased springform pan, then bake it low and slow. It should be mostly set but still have a slight wobble in the center. That wobble means perfect creaminess later, trust me on this one.
- Prepare Red Velvet Cake Layers:: Next up, the red velvet! Whisk your dry ingredients together – flour, cocoa, baking soda, salt. In another bowl, mix the wet stuff: sugar, oil, eggs, buttermilk, red food coloring, vanilla, and that crucial vinegar. Now, gently combine the wet and dry. Don’t beat it to death, just mix until no streaks remain. Overmixing here makes tough cake, and we want soft, tender layers! Divide the batter evenly between two prepared cake pans. I usually eyeball it, which sometimes leads to one slightly taller layer, but hey, that’s homemade charm, right?
- Bake and Cool the Red Velvet:: Pop those cake pans into the oven! Keep an eye on them; you’re looking for a springy top and a clean toothpick. Once they’re done, let them cool in the pans for a bit, maybe 10-15 minutes. This is where I always get impatient and try to flip them out too soon, leading to a cracked cake. Learn from my mistakes! Then, transfer them to a wire rack to cool completely. Patience is a virtue here, especially if you want a stable cake to stack.
- Whip Up the Cream Cheese Frosting:: While the cakes are cooling, let’s make that dreamy frosting! Get your room-temperature cream cheese and butter, beat them together until super smooth and fluffy. Add the powdered sugar, a little at a time, along with vanilla and a splash of heavy cream. Beat it until it’s light and spreadable. If it feels too stiff, a tiny bit more cream. Too thin? A little more powdered sugar. It should smell like pure deliciousness at this point, honestly.
- Assemble Your Masterpiece:: Okay, the fun part! Once everything is completely cool (seriously, COMPLETELY!), place one red velvet cake layer on your serving plate. Carefully slide that chilled cheesecake layer right on top. This is where I hold my breath, hoping it doesn’t crack. Then, add the second red velvet layer. Now, for the frosting! Start with a crumb coat – a thin layer all over to catch any loose crumbs. Chill it for 15-20 minutes. This step is a game-changer for a neat finish, trust me.
- Decorate and Chill:: After the crumb coat is set, apply the final, generous layer of frosting. Smooth it out with an offset spatula or just embrace the rustic look – that’s what I usually do! This Decadent Red Velvet Cheesecake Layer Cake always looks stunning with some simple swirls. Garnish with chocolate shavings or sprinkles, or even some fresh berries if you’re feeling fancy. Then, back into the fridge it goes for at least 4 hours, or even better, overnight. This chilling time is non-negotiable for stable slices and happy eaters!


