
Introduction
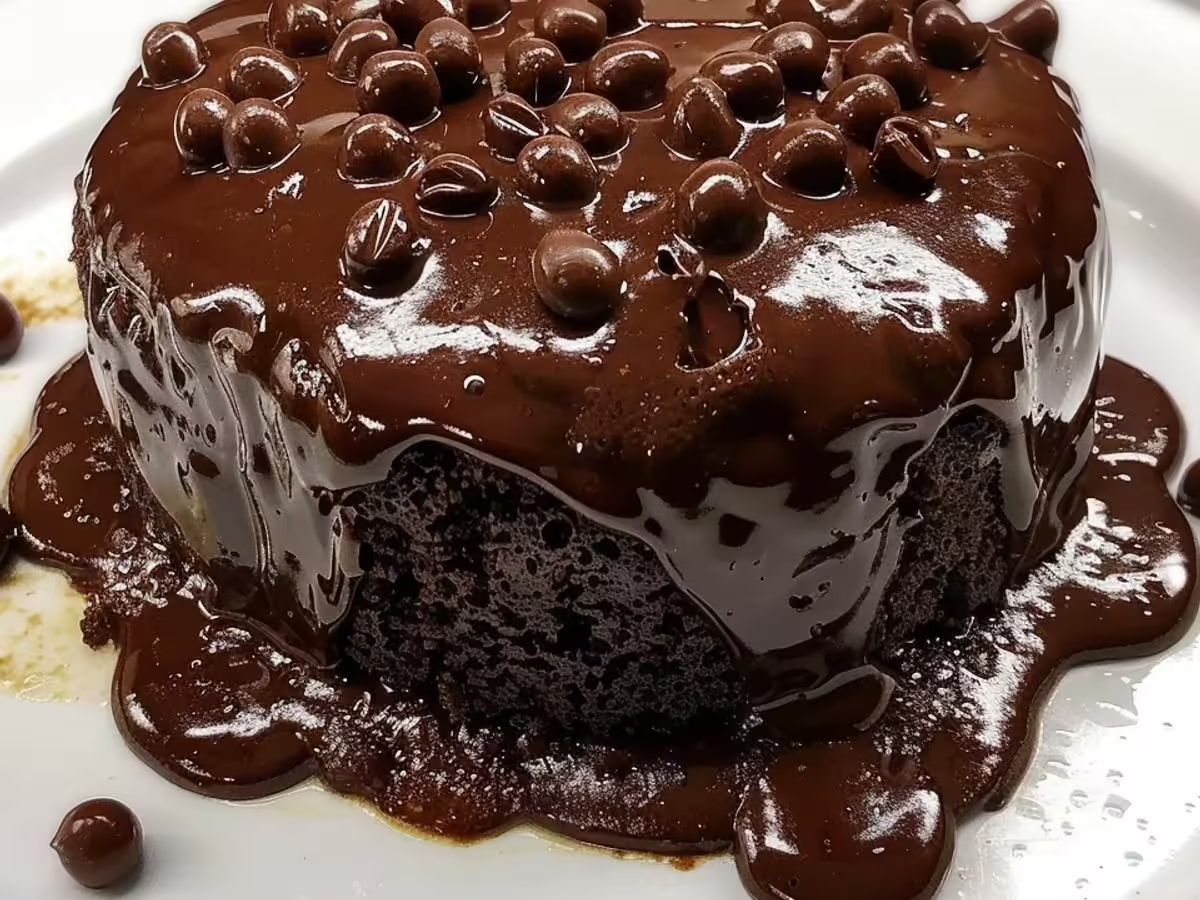
There’s something undeniably magical about the first spoonful of a rich Chocolate Lava Cake. I still remember the first time I savored this enchanting dessert at a cozy bistro, where the molten chocolate flowed like liquid velvet from its center. Whether you’re juggling work calls or soccer practice, this recipe for Chocolate Lava Cake is your new best friend. It’s a nice treat that transforms any ordinary day into a celebration, bringing joy with every bite.
Picture this: you’ve had a long day, and all you want is something warm and indulgent to lift your spirits. Chocolate Lava Cake is the answer. With its rich chocolate exterior giving way to a gooey, molten center, this dessert is an experience to cherish. Plus, it’s surprisingly simple to whip up, making it an ideal choice for both novice bakers and seasoned chefs alike. In mere minutes, you can create a stunning dessert that will impress your family and friends, leaving them asking for seconds.
Ready to dive into this chocolatey enjoyment? Let’s explore why Chocolate Lava Cake deserves a spot on your dessert table, and how you can easily make it at home!
Why You’ll Love Chocolate Lava Cake
Imagine sinking your fork into a warm, rich Chocolate Lava Cake, only to have rich, molten chocolate flow out like a delicious secret. This dessert is like a cozy blanket for your taste buds, wrapping you in warmth and comfort with every bite. Whether you’re juggling work calls or soccer practice, this recipe is your new best friend, delivering a restaurant-quality treat in less than 30 minutes.
No more 6 PM panic – dinner’s ready faster than a microwave meal. Not only does it save time, but it also impresses your guests and family alike. The allure of that gooey center is irresistible, making this Chocolate Lava Cake an instant crowd-pleaser. Plus, it’s surprisingly easy to whip up, allowing you to enjoy in a gourmet dessert without the fuss.
Each forkful offers a heavenly contrast of textures: the slightly crisp exterior giving way to a warm, flowing interior. The dark chocolate flavor is rich yet balanced, satisfying even the most discerning chocolate lovers. Add a scoop of vanilla ice cream or a dollop of whipped cream, and you’ll improve this dessert to a whole new level of indulgence. Trust me, once you try it, Chocolate Lava Cake will become your go-to dessert for any occasion!
Ingredients For Chocolate Lava Cake
When it comes to making the perfect Chocolate Lava Cake, the ingredients you choose can transform this dessert from ordinary to extraordinary. Imagine the rich aroma of melting chocolate filling your kitchen as you gather the essentials. Whether you’re juggling work calls or soccer practice, this recipe is your new best friend. Let’s dive into the ingredients that will help you create this nice treat!
To whip up a luscious Chocolate Lava Cake, you’ll need some key ingredients that come together beautifully. Grab your favorite chocolate – dark or semi-sweet works wonders. This is the star of the show, bringing that deep, indulgent flavor. You’ll also need unsalted butter, which adds richness and helps create that gooey center.
Next, don’t forget the eggs. They provide structure while keeping the cake moist and soft. Sugar sweetens the deal, balancing the bitterness of the chocolate. Finally, a pinch of flour gives the cake just enough stability without compromising the molten core. Here’s a quick list of what you’ll need:
- 4 ounces dark or semi-sweet chocolate
- ½ cup unsalted butter
- 2 large eggs
- 2 large egg yolks
- ⅓ cup granulated sugar
- 2 tablespoons all-purpose flour
- A pinch of salt
If you want to get a little creative with your Chocolate Lava Cake, consider adding a splash of vanilla extract for extra depth. Not a fan of dark chocolate? Milk chocolate can work too – your secret’s safe with me! For a touch of sophistication, a sprinkle of espresso powder can enhance the chocolate flavor dramatically.
Feeling adventurous? Try incorporating a bit of orange zest for a citrus twist that pairs beautifully with chocolate. Whatever you choose, these simple swaps can improve your dessert and make it uniquely yours. Enjoy the process, and remember, the best part of baking is getting to taste along the way!
How To Make Chocolate Lava Cake
Chocolate Lava Cake is a dessert that feels like a warm hug at the end of a long day. I remember the first time I made this indulgent treat; it was a stormy evening, and the rich aroma of melting chocolate filled my kitchen. Whether you’re juggling work calls or soccer practice, this recipe is your new best friend, allowing you to whip up a stunning dessert in no time. The moment you cut into the cake and watch the gooey chocolate flow out, you’ll understand why this is a favorite among dessert lovers.
Washing and Greasing
Start by preheating your oven to 425°F (220°C). Grease your ramekins generously with butter, and dust them with cocoa powder to prevent sticking. This little step ensures your Chocolate Lava Cakes come out flawlessly, ready to showcase their deliciously oozy centers. Meanwhile, grab your mixing bowls and measuring cups; we’re about to create chocolate magic!
Measuring Ingredients
Gather your essential ingredients: high-quality dark chocolate, butter, sugar, eggs, and a pinch of salt. Personally, I like to keep my ingredients organized; I store my sugar and flour in mason jars for easy access. It saves time and keeps the kitchen tidy, allowing you to focus on your Chocolate Lava Cake.
Melting the Chocolate
Next, melt the butter and chocolate together in a heatproof bowl over simmering water, stirring until smooth. The chocolate should melt like it’s dancing in the bowl, transforming into a silky mixture. This step is crucial; using high-quality chocolate makes all the difference in flavor.
Combining Ingredients
Once melted, remove the bowl from heat and whisk in the sugar until well combined. Add the eggs one at a time, mixing thoroughly after each addition. Finally, stir in the flour and salt until just combined. Make sure not to overmix; you want your batter to be light and airy, promising a nice rise in the oven.
Pouring and Baking
Divide the batter evenly among the prepared ramekins, filling each about three-quarters full. Place them on a baking sheet for easy handling. Bake in the preheated oven for 12-14 minutes; the edges should be firm while the centers remain soft. It’s like waiting for a surprise – don’t open the oven too early!
Cooling and Serving
Once baked, allow the cakes to cool for just a minute. Then, carefully invert each ramekin onto a plate. The moment of truth arrives as you lift the ramekin to reveal the luscious, flowing chocolate center. Dust with powdered sugar or serve with vanilla ice cream for an extra touch of decadence. Your Chocolate Lava Cake is now ready to impress!
Expert Tips and Tricks
Perfecting your Chocolate Lava Cake can improve your dessert game to new heights. With a few expert tips, you can ensure that each cake oozes delicious molten chocolate goodness. Whether you’re impressing guests or treating yourself, these tricks will help you achieve that perfect lava flow and texture.
- Choose Quality Chocolate: The chocolate you use makes a significant difference. Opt for high-quality dark chocolate with at least 60% cocoa. This enhances the flavor and richness of your Chocolate Lava Cake.
- Be Mindful of Baking Time: Underbaking is key for that gooey center. Start checking at the minimum baking time, about 12 minutes. A little patience goes a long way in achieving that perfect molten core.
- Grease the Ramekins Well: Use butter and a dusting of cocoa powder to coat the ramekins. This ensures your Chocolate Lava Cake slides out beautifully without sticking.
- Chill the Batter: For an even richer flavor, chill the batter for at least 30 minutes before baking. This allows the chocolate to set slightly, enhancing the overall texture.
- Serve Immediately: Timing is everything! Serve the cakes right out of the oven for that dramatic lava effect. A scoop of vanilla ice cream on the side only sweetens the experience.
- Experiment with Flavors: Try adding a splash of espresso, orange zest, or peppermint extract to the batter. These flavors can improve your Chocolate Lava Cake to gourmet levels.
- Practice Patience: Allow your cakes to cool for just a minute before inverting them. This ensures they hold their shape while still being warm enough for that indulgent center.
By following these expert tips and tricks, your Chocolate Lava Cake will not only impress but also deliver a nice dessert experience that keeps everyone coming back for more!
Equipment Needed
When it comes to making a nice Chocolate Lava Cake, having the right equipment can make all the difference. Imagine the thrill of pulling that warm, gooey center from the oven, and it all starts with the essentials. Whether you’re juggling work calls or soccer practice, this recipe is your new best friend, and it can be mastered with just a handful of tools.
- Ramekins: Small, oven-safe dishes are your best pals here. They hold the batter perfectly, ensuring a beautiful presentation and the ideal lava flow. Choose 6-ounce ramekins for the best results.
- Mixing Bowls: A couple of medium-sized mixing bowls will be handy for combining your ingredients. Choose glass or stainless steel for easy cleanup and durability.
- Whisk: A sturdy whisk makes mixing your batter a breeze. It helps to incorporate air into the mixture, giving your lava cake that light texture.
- Spatula: A silicone spatula is perfect for folding in ingredients and scraping down the sides of your mixing bowl. You want every bit of chocolate goodness to shine!
- Double Boiler or Microwave-Safe Bowl: Melt the chocolate and butter together using a double boiler or a microwave. Both methods work wonderfully, just be cautious not to overheat!
- Oven: You can’t make a Chocolate Lava Cake without an oven! Preheat it to the right temperature to ensure your cakes bake evenly and achieve that molten center.
- Timer: Timing is everything in this recipe. A kitchen timer or your phone will help you keep track of baking time for that perfect lava flow.
- Cooling Rack: Once baked, letting the cakes cool for a minute on a rack ensures they set beautifully without getting soggy.
With these essential tools for your Chocolate Lava Cake, you’re well on your way to impressing friends and family alike. These items are easy to find and will help you create that rich dessert everyone will rave about!
Variations and Substitutions
Chocolate Lava Cake is a beloved dessert, but who says you can’t mix things up? Whether you’re catering to dietary needs or simply want to explore new flavors, there are plenty of creative variations and substitutions to consider. From gluten-free options to exciting flavor twists, these ideas will keep your dessert game strong!
- Gluten-Free Delight: Swap regular flour with a 1:1 gluten-free baking blend. It’s a seamless switch that keeps the cake just as indulgent and gooey.
- Vegan Version: Replace eggs with unsweetened applesauce or a flaxseed mixture (1 tablespoon of flaxseed meal mixed with 2.5 tablespoons of water). Use a dairy-free chocolate, and you’ll have a vegan Chocolate Lava Cake that everyone can enjoy.
- Flavor Infusions: Stir in a splash of espresso or coffee to enhance the chocolate flavor. Alternatively, add a hint of orange zest for a refreshing twist that brightens each bite.
- Nutty Nuance: Incorporate chopped walnuts or hazelnuts into the batter for a nice crunch. They add texture and a rich, nutty flavor that complements the chocolate.
- Alternative Fillings: Instead of the classic chocolate center, try caramel or peanut butter for a different lava experience. Each filling creates a unique taste that surprises and delights.
- Sweetener Swaps: If you want to cut down on sugar, consider using maple syrup or agave nectar. These sweeteners can offer a different depth of flavor while keeping the dessert sweet.
- Serving Suggestions: Top your Chocolate Lava Cake with a scoop of vanilla ice cream or a dollop of whipped cream. Fresh berries add a touch of tartness that beautifully balances the rich chocolate.
With these variations and substitutions, your Chocolate Lava Cake can be tailored to fit any occasion or dietary preference. Get creative and find your perfect version of this beloved dessert!
Serving and Storage Suggestions
When it comes to serving your tasty Chocolate Lava Cake, presentation is key. Imagine gently placing the cake on a beautiful dessert plate, then slicing into it to reveal that luscious, gooey center. Your guests will be swooning before they even take a bite!
- Warm is Best: Serve your Chocolate Lava Cake warm, straight from the oven. This ensures that the molten center is at its ooziest, creating a nice contrast with the cake’s outer layer.
- Accompaniments: Pair your cake with a scoop of vanilla ice cream or a dollop of freshly whipped cream. The cold creaminess beautifully offsets the rich chocolate, creating a combination of flavors.
- Garnishing: A sprinkle of powdered sugar or a drizzle of chocolate sauce adds a touch of elegance. You could even throw on some fresh berries for a pop of color and a hint of tartness that balances the sweetness.
- Storage: Leftover Chocolate Lava Cake? No problem! Store it in an airtight container in the refrigerator for up to three days. To reheat, simply pop it in the microwave for about 10-15 seconds – just enough to warm the center without overcooking it.
- Freezing: You can also freeze individual portions. Wrap each cake tightly in plastic wrap and then place them in a freezer-safe bag. They’ll keep well for about two months. When you’re ready to enjoy, thaw overnight in the fridge and reheat as mentioned above.
- Serving Size: This recipe typically serves four, but feel free to double it for larger gatherings – just remember to adjust your baking time accordingly!
With these serving and storage suggestions, your Chocolate Lava Cake will be the star of any occasion, whether it’s a cozy family dinner or an elegant gathering with friends.
Conclusion
At the end of the day, this Chocolate Lava Cake isn’t just dessert – it’s a nice escape into a world of rich, molten chocolate goodness. Whether you’re celebrating a special occasion or simply treating yourself after a long week, this cake offers an indulgent experience that’s hard to resist. The moment you cut into the warm, soft exterior, and that luscious chocolate flows out like a sweet, velvety river, your worries melt away.
Imagine gathering around the table with friends or family, each person eagerly awaiting their slice. It’s more than just a treat; it’s a shared moment of joy and satisfaction. Plus, the simplicity of making this Chocolate Lava Cake means you can whip it up even on the busiest days. As you savor each bite, you’ll appreciate how a little bit of effort can yield such a spectacular result.
So, whether you’re looking to impress guests or craving a sweet pick-me-up, this recipe is your ticket to dessert enjoyment. Enjoy every gooey bite, and remember: life is too short to skip dessert!
Print
Chocolate Lava Cake: Indulge in a Melting Delight!
Description
A rich and indulgent dessert with a gooey chocolate center that flows out when you cut into it.
Ingredients
- 1/2 cup (115g) unsalted butter
- 1 cup (170g) semi-sweet chocolate chips
- 2 large eggs
- 2 large egg yolks
- 1/4 cup (50g) granulated sugar
- 2 tablespoons all-purpose flour
- 1 teaspoon vanilla extract
- Pinch of salt
Instructions
- Preheat the oven to 425°F (220°C).
- Grease four ramekins with butter and dust with flour.
- In a microwave-safe bowl, melt the butter and chocolate chips together in 30-second intervals, stirring until smooth.
- In another bowl, whisk together the eggs, egg yolks, and sugar until pale and fluffy.
- Stir the melted chocolate mixture into the egg mixture until combined.
- Gently fold in the flour, vanilla extract, and salt until just mixed.
- Pour the batter into the prepared ramekins, filling them about 3/4 full.
- Bake for 12-14 minutes until the edges are firm but the center is soft.
- Let them cool for 1 minute, then carefully invert onto plates.
- Serve immediately, optionally with ice cream or whipped cream.
Notes
- Be careful not to overbake, as the center should remain liquid.
- These can be prepared in advance and refrigerated before baking; just add a couple of extra minutes to the baking time.
- For an extra chocolatey experience, you can add a piece of chocolate in the center before baking.
Nutrition
- Serving Size: 1 cake
- Calories: 350
- Sugar: 25g
- Sodium: 200mg
- Fat: 22g
- Saturated Fat: 13g
- Unsaturated Fat: 8g
- Trans Fat: 0g
- Carbohydrates: 35g
- Fiber: 2g
- Protein: 6g
- Cholesterol: 110mg
Find it online: https://tastetrend.net/chocolate-lava-cake-2/