

Okay, so Halloween night, right? My house is usually a glorious mess of fake cobwebs and way too many candy wrappers. Years ago, I tried making a fancy side for our spooky feast, and honestly, it was a total disaster. Then, I stumbled upon this Cheesy Cauliflower Gratin recipe. It felt like magic! The rich, creamy smell filled the kitchen, pushing away the scent of burnt garlic bread. This dish, with its bubbling cheese and tender cauliflower, became the thing I looked forward to, even more than the trick-or-treaters sometimes. It’s my little bit of cozy amidst the chaos, and I can’t wait for you to try it.
I remember the first time I made this Cheesy Cauliflower Gratin for a crowd. I was so proud, pulled it out of the oven, and promptly dropped the entire gratin dish, sending cheesy goodness everywhere. My dog thought it was the best day of his life, but I was mortified! Luckily, I had a backup in the fridge a lesson learned about always making extra, especially for hungry ghouls. Now, I just laugh, but back then? Pure panic, hon.

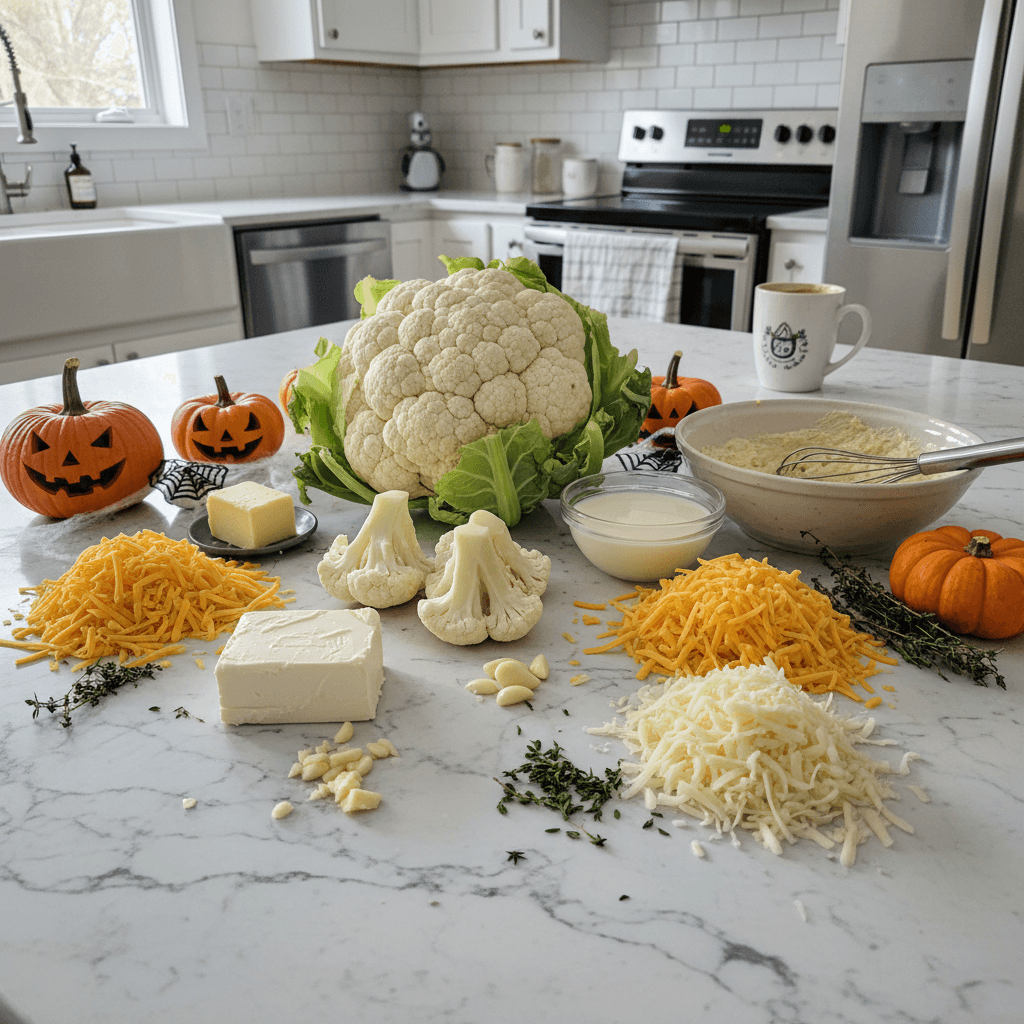
Ingredients
- Cauliflower: You need one large head, trimmed and cut into florets. Don’t go too small, or they’ll get mushy, we want tender, not disintegrated!
- Unsalted Butter: About a quarter cup. Honestly, don’t skimp here, it’s the base for that glorious creamy sauce. I tried margarine once, and it just wasn’t the same… kinda bland, you know?
- All-Purpose Flour: A couple of tablespoons. This is our thickener. Don’t worry about lumps if you whisk constantly, I always get a few, but they disappear.
- Whole Milk: Two cups, warmed slightly. Don’t use skim milk, just don’t. I did once, thinking it would be “lighter,” and the sauce was thin and sad. Full fat for full flavor!
- Gruyere Cheese: One cup, grated. This is the star for that nutty, complex flavor. If you can’t find it, a good sharp cheddar or even Fontina works, but Gruyere is my absolute swear-by.
- Sharp Cheddar Cheese: Half a cup, grated. For that classic, melty, tangy kick. I always prefer block cheese I grate myself, pre-shredded has weird anti-caking stuff.
- Freshly Grated Parmesan: A quarter cup, for the topping. I love a little extra sprinkle right before it goes in the oven, it gets so crispy and golden!
- Garlic: Two cloves, minced. Yes, fresh, always fresh. I tried garlic powder once when I was in a rush, and it just didn’t hit the same. More garlic is never a bad idea, honestly.
- Dijon Mustard: One teaspoon. Sounds weird, right? But trust me, it adds a subtle tang that really brightens the whole Cheesy Cauliflower Gratin. I didn’t expect that, but it works!
- Freshly Grated Nutmeg: A pinch. This is my secret weapon for any cream sauce. It adds a warmth you can’t quite place, but it makes all the difference. Don’t skip it!
- Salt & Freshly Ground Black Pepper: To taste. Don’t be shy with the seasoning, cauliflower needs a little help to shine! I always taste my sauce before adding the cauliflower.
- Panko Breadcrumbs: Half a cup. For that irresistible crispy topping. I love the texture of Panko, but regular breadcrumbs work too if that’s all you have.
Instructions
- Prep the Cauliflower:
- First things first, get that cauliflower ready. Trim off the leaves and the tough core, then break it into bite-sized florets. I always try to keep them roughly the same size so they cook evenly, nobody wants a crunchy piece next to a mushy one, right? Bring a large pot of salted water to a rolling boil this is where I always forget to salt the water, oops! Drop in the florets and blanch them for about 5-7 minutes. You want them tender-crisp, not soft. Drain them well and let them steam dry in a colander for a few minutes. Excess water is the enemy of a creamy gratin, trust me on this.
- Make the Roux:
- Now for the creamy magic! In a large, oven-safe skillet or Dutch oven, melt your unsalted butter over medium heat. Once it’s shimmering, sprinkle in the all-purpose flour. Whisk, whisk, whisk! You want to cook this mixture, called a roux, for about 1-2 minutes until it smells a bit nutty and has a pale golden color. This step is crucial for thickening your sauce and getting rid of that raw flour taste. I once didn’t cook it long enough, and the sauce tasted… well, floury. Learn from my mistakes, hon! Keep whisking until it’s smooth and bubbly.
- Whisk in the Milk and Seasonings:
- Slowly, and I mean slowly, pour in the warmed whole milk while continuously whisking. This prevents lumps. Seriously, don’t dump it all in at once! Keep whisking until the sauce is smooth and starts to thicken, about 5-7 minutes. It should coat the back of a spoon nicely. Now, add your minced garlic, Dijon mustard, a pinch of freshly grated nutmeg, and a good amount of salt and pepper. I always take a little taste here to adjust, you want those flavors to sing! The smell at this stage is divine, honestly, just pure comfort.
- Melt the Cheeses:
- Reduce the heat to low and stir in your grated Gruyere and sharp cheddar cheeses. Keep stirring gently until the cheeses are completely melted and the sauce is wonderfully smooth and glossy. Don’t let it boil vigorously once the cheese is in, or it might get stringy. This is where the Cheesy Cauliflower Gratin really starts to come alive, transforming into that rich, dreamy sauce. I usually can’t resist a little dip of a spoon right here it’s just too good!
- Combine and Transfer:
- Gently fold the blanched cauliflower florets into the cheese sauce, making sure every single floret is coated in that lusciousness. Be careful not to mash them, we want distinct florets, not cauliflower mash. If your skillet isn’t oven-safe, transfer the mixture to a 9×13 inch baking dish. I often use my cast iron skillet for this, makes for fewer dishes, which is always a win in my book! Sometimes I get a little messy here, splattering cheese sauce, but hey, that’s real kitchen life.
- Bake to Golden Perfection:
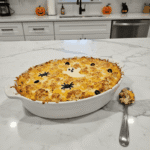
- Now for the grand finale! Sprinkle the top generously with the remaining freshly grated Parmesan cheese and the Panko breadcrumbs. This is what gives us that irresistible golden, crispy crust. Pop your Cheesy Cauliflower Gratin into a preheated oven at 375°F (190°C) and bake for 20-25 minutes, or until it’s bubbly around the edges and the topping is beautifully golden brown. The smell? Oh my goodness, it’s going to fill your whole house with cheesy, savory goodness! Let it rest for a few minutes before serving, if you can resist.
Honestly, this Cheesy Cauliflower Gratin reminds me of those little moments of kitchen triumph. Like the time I finally mastered making a roux without a single lump a small victory, but a victory nonetheless! It’s the kind of dish that gets oohs and aahs, even from the most skeptical eaters. There’s something so comforting about pulling that bubbly, golden dish from the oven, especially when the house smells faintly of pumpkin spice and spooky magic. It just feels right, you know?
Cheesy Cauliflower Gratin: Storage Tips
Honestly, I used to just toss leftovers in a container and hope for the best. Big mistake! This Cheesy Cauliflower Gratin needs a bit of love even after it’s baked. I’ve found that letting it cool completely before transferring to an airtight container helps keep the sauce from getting watery. If you microwave it straight from the fridge, the sauce can sometimes separate so don’t do that lol. Reheating gently in the oven is best, covered with foil, until it’s bubbly again. It keeps well for about 3-4 days in the fridge, and honestly, it tastes almost better the next day as the flavors deepen. Just avoid freezing, the texture gets a bit sad, I’m real with you.

Cheesy Cauliflower Gratin: Ingredient Substitutions
I’ve definitely played around with ingredient swaps when I’m out of something for my Cheesy Cauliflower Gratin. For the cheese, a mix of sharp cheddar and Monterey Jack works if Gruyere is too pricey, I tried it once and it worked… kinda, not quite as nutty but still good! If you don’t have Dijon, a tiny pinch of dry mustard powder can work in a pinch, but fresh is always better. For a dairy-free version, I’ve used unsweetened almond milk and a blend of nutritional yeast with vegan cheese shreds, but honestly, it’s a different experience. It’s still tasty, just don’t expect the same rich, creamy magic. Be brave and try what you have!
Cheesy Cauliflower Gratin: Serving Suggestions
This Cheesy Cauliflower Gratin, for me, is the ultimate sidekick. For Halloween, I love serving it alongside a hearty chili or a slow-roasted pork shoulder. It balances out those richer, sometimes spicier, main dishes perfectly. And honestly, a good glass of crisp white wine or even a pumpkin ale just completes the whole vibe. For a simple weeknight, I’ve even had a big scoop of it with a simple green salad sometimes that’s all you need, you know? It’s pure comfort, whether you’re having a spooky movie marathon or a quiet dinner. Just spoon it out warm, and watch it disappear!
Cheesy Cauliflower Gratin: Cultural Backstory
Gratin, at its heart, is a French technique, all about creating that beautiful browned crust over a dish. Think potatoes au gratin! While my Cheesy Cauliflower Gratin isn’t some ancient family heirloom, it became a part of my family’s traditions. I first saw a version of it in a cookbook from a little French bistro I visited years ago, and I was hooked. I brought it home, tweaked it, added more cheese (because, why not?), and made it my own. Now, it’s a staple, a little bit of French inspiration with a whole lot of my kitchen’s personality baked right in. It’s a classic, but with my own messy, joyful story.
So there you have it, my beloved Cheesy Cauliflower Gratin. It’s more than just a side dish, it’s a warm hug, a little bit of kitchen triumph, and a whole lot of cheesy happiness. Every time I pull it from the oven, with that golden crust and bubbly sauce, I just feel a rush of warmth. I hope it brings as much joy to your table as it does to mine. Honestly, go on, give it a try, and tell me how your version turns out!
Frequently Asked Questions
- → Can I make Cheesy Cauliflower Gratin ahead of time?
Yes, you totally can! I often assemble the whole thing, cover it tightly, and keep it in the fridge for up to a day before baking. Just add about 10-15 minutes to the baking time if it’s going in cold from the fridge.
- → What if I don’t have Gruyere cheese for my Cheesy Cauliflower Gratin?
No Gruyere? No problem! I’ve used sharp cheddar, Fontina, or even a mix of Monterey Jack and a touch of smoked gouda. The flavor profile changes, but it’s still deliciously cheesy, I promise!
- → My Cheesy Cauliflower Gratin sauce is lumpy, help!
- → How do I prevent my Cheesy Cauliflower Gratin from being watery?
The key is to really drain your blanched cauliflower well and let it steam dry for a few minutes. Also, don’t overcook the cauliflower initially, if it’s too soft, it releases more water into your beautiful sauce.
- → Can I add other vegetables to this Cheesy Cauliflower Gratin?
Absolutely! I’ve tossed in blanched broccoli, sliced mushrooms, or even some spinach (wring out the water!). It’s a great way to use up whatever veggies you have hanging around. Get creative!
Creamy Cheesy Cauliflower Gratin: Halloween Side
- Prep Time: 15 Minutes
- Cook Time: 30 Minutes
- Total Time: 45 Minutes
- Yield: 6 Servings 1x
- Category: Home
Description
Cheesy Cauliflower Gratin: Make this creamy, savory Halloween side your new favorite! My easy recipe delivers comforting flavors for any spooky gathering.
Ingredients
- Base Ingredients:
- 1 large head cauliflower, trimmed and cut into florets
- 1/4 cup unsalted butter
- 2 tbsp all-purpose flour
- Creamy Sauce Essentials:
- 2 cups whole milk, warmed slightly
- 1 cup Gruyere cheese, grated
- 1/2 cup sharp cheddar cheese, grated
- 1/4 cup freshly grated Parmesan (for topping)
- Flavor Boosters:
- 2 cloves garlic, minced
- 1 tsp Dijon mustard
- Pinch freshly grated nutmeg
- Salt and freshly ground black pepper, to taste
- Finishing Touch:
- 1/2 cup Panko breadcrumbs
Instructions
- Prep the Cauliflower:: First things first, get that cauliflower ready. Trim off the leaves and the tough core, then break it into bite-sized florets. I always try to keep them roughly the same size so they cook evenly; nobody wants a crunchy piece next to a mushy one, right? Bring a large pot of salted water to a rolling boil – this is where I always forget to salt the water, oops! Drop in the florets and blanch them for about 5-7 minutes. You want them tender-crisp, not soft. Drain them well and let them steam dry in a colander for a few minutes. Excess water is the enemy of a creamy gratin, trust me on this.
- Make the Roux:: Now for the creamy magic! In a large, oven-safe skillet or Dutch oven, melt your unsalted butter over medium heat. Once it’s shimmering, sprinkle in the all-purpose flour. Whisk, whisk, whisk! You want to cook this mixture, called a roux, for about 1-2 minutes until it smells a bit nutty and has a pale golden color. This step is crucial for thickening your sauce and getting rid of that raw flour taste. I once didn’t cook it long enough, and the sauce tasted… well, floury. Learn from my mistakes, hon! Keep whisking until it’s smooth and bubbly.
- Whisk in the Milk and Seasonings:: Slowly, and I mean *slowly*, pour in the warmed whole milk while continuously whisking. This prevents lumps. Seriously, don’t dump it all in at once! Keep whisking until the sauce is smooth and starts to thicken, about 5-7 minutes. It should coat the back of a spoon nicely. Now, add your minced garlic, Dijon mustard, a pinch of freshly grated nutmeg, and a good amount of salt and pepper. I always take a little taste here to adjust; you want those flavors to sing! The smell at this stage is divine, honestly, just pure comfort.
- Melt the Cheeses:: Reduce the heat to low and stir in your grated Gruyere and sharp cheddar cheeses. Keep stirring gently until the cheeses are completely melted and the sauce is wonderfully smooth and glossy. Don’t let it boil vigorously once the cheese is in, or it might get stringy. This is where the Cheesy Cauliflower Gratin really starts to come alive, transforming into that rich, dreamy sauce. I usually can’t resist a little dip of a spoon right here – it’s just too good!
- Combine and Transfer:: Gently fold the blanched cauliflower florets into the cheese sauce, making sure every single floret is coated in that lusciousness. Be careful not to mash them; we want distinct florets, not cauliflower mash. If your skillet isn’t oven-safe, transfer the mixture to a 9×13 inch baking dish. I often use my cast iron skillet for this, makes for fewer dishes, which is always a win in my book! Sometimes I get a little messy here, splattering cheese sauce, but hey, that’s real kitchen life.
- Bake to Golden Perfection:: Now for the grand finale! Sprinkle the top generously with the remaining freshly grated Parmesan cheese and the Panko breadcrumbs. This is what gives us that irresistible golden, crispy crust. Pop your Cheesy Cauliflower Gratin into a preheated oven at 375°F (190°C) and bake for 20-25 minutes, or until it’s bubbly around the edges and the topping is beautifully golden brown. The smell? Oh my goodness, it’s going to fill your whole house with cheesy, savory goodness! Let it rest for a few minutes before serving, if you can resist.


