Description
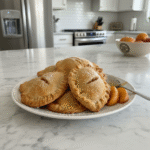
Quick Canned Peach Hand Pies are a delightful, easy treat. Flaky crust cradles warm, sweet peach filling. Perfect for a simple dessert.
Ingredients
- Flaky Crust Essentials:
- Refrigerated Pie Crusts: (2 counts, 9-inch each)
- Egg Wash: (1 egg, beaten with 1 tbsp water)
- Sweet Peach Filling:
- Canned Sliced Peaches: (1 can, 15 oz, drained well)
- Granulated Sugar: (1/4 cup)
- Cornstarch: (1 tablespoon)
- Ground Cinnamon: (1/2 teaspoon)
- Pinch of Nutmeg
- Flavor Boosters & Glaze:
- Unsalted Butter: (2 tablespoons, melted)
- Turbinado Sugar: (1 tablespoon, for sprinkling)
- Optional Extras:
- Vanilla Extract: (1/2 teaspoon, for filling)
- Lemon Zest: (1/2 teaspoon, for filling)
Instructions
- Prep the Peaches for Canned Peach Hand Pies:: Drain your canned peaches thoroughly. I mean, really press out that liquid! Then, gently chop them into smaller pieces. In a medium bowl, combine the chopped peaches, granulated sugar, cornstarch, ground cinnamon, and that little pinch of nutmeg. Give it a good stir until everything is nicely combined. This is where the magic starts for your Canned Peach Hand Pies. I always take a little sniff at this stage; it smells like pure comfort already!
- Roll and Cut the Dough:: Unroll your refrigerated pie crusts onto a lightly floured surface. You’re aiming for a slightly thinner crust, so a gentle roll with your pin helps. Using a 4-inch round cutter (or honestly, a clean can lid if you’re like me and can’t find your cutter!), cut out as many circles as you can from each crust. You’ll get about 8-10 circles per crust. Don’t worry about the scraps just yet; we’ll re-roll those and get a couple more.
- Fill the Canned Peach Hand Pies:: Spoon about 1-2 tablespoons of your peach filling onto one half of each pastry circle, leaving a small border around the edge. Don’t overfill, or you’ll have a sticky mess like my first attempt! Moisten the edges of the dough with a little water using your finger. Fold the other half of the dough over the filling to create a half-moon shape. It’s starting to look like a pie!
- Seal and Crimp Your Canned Peach Hand Pies:: Gently press the edges together to seal. Then, use the tines of a fork to crimp the edges, creating a pretty seal that also helps prevent the filling from escaping. This step is important for keeping those delicious Canned Peach Hand Pies intact. I sometimes get a little too enthusiastic with the fork and tear the dough, so be gentle! You want a good seal here.
- Prepare for Baking:: Place your assembled Canned Peach Hand Pies onto a baking sheet lined with parchment paper. This parchment paper is a lifesaver for easy cleanup, trust me! Use a small, sharp knife to cut 2-3 small slits on the top of each hand pie. This lets the steam escape and prevents them from puffing up too much. Brush the tops with your egg wash, then sprinkle with turbinado sugar for that extra sparkle.
- Bake to Golden Perfection:: Pop them into a preheated oven at 375°F (190°C) for 18-22 minutes, or until they’re beautifully golden brown and the filling is bubbly. Every oven is a little different, so keep an eye on them! The smell filling your kitchen at this point? Pure bliss. It’s like a warm hug, honestly. Let them cool slightly on a wire rack before diving in. Don’t burn your tongue, I’ve done it many times in my eagerness!