
Honestly, some recipes just stick with you, right? For me, the Black Forest Cake holds this super special place. I remember the first time I tasted it not in a fancy bakery, but at my grandma’s kitchen table. She’d pull out this gorgeous, towering cake, all dark chocolate and bright red cherries. The smell alone, a mix of cocoa and sweet kirsch, just filled the whole house. I was maybe seven, and I thought it was the most magical thing I’d ever seen. It wasn’t perfect, she’d sometimes tell me about a layer that cracked, or the time the cream was a little too soft, but it was always, always delicious. That’s the vibe I’m chasing with this classic recipe.
I didn’t expect that making my own version would be such an adventure. My first attempt? Oh, hon, it was a disaster. The cake layers crumbled, the cream wept, and the cherries looked more like a crime scene than a filling. I almost gave up! But the memory of Grandma’s kitchen kept me going. After a few more tries, and a lot of messy kitchen counters, I finally got this rich dessert right. It’s a labor of love, but so worth it!

Ingredients for Black Forest Cake
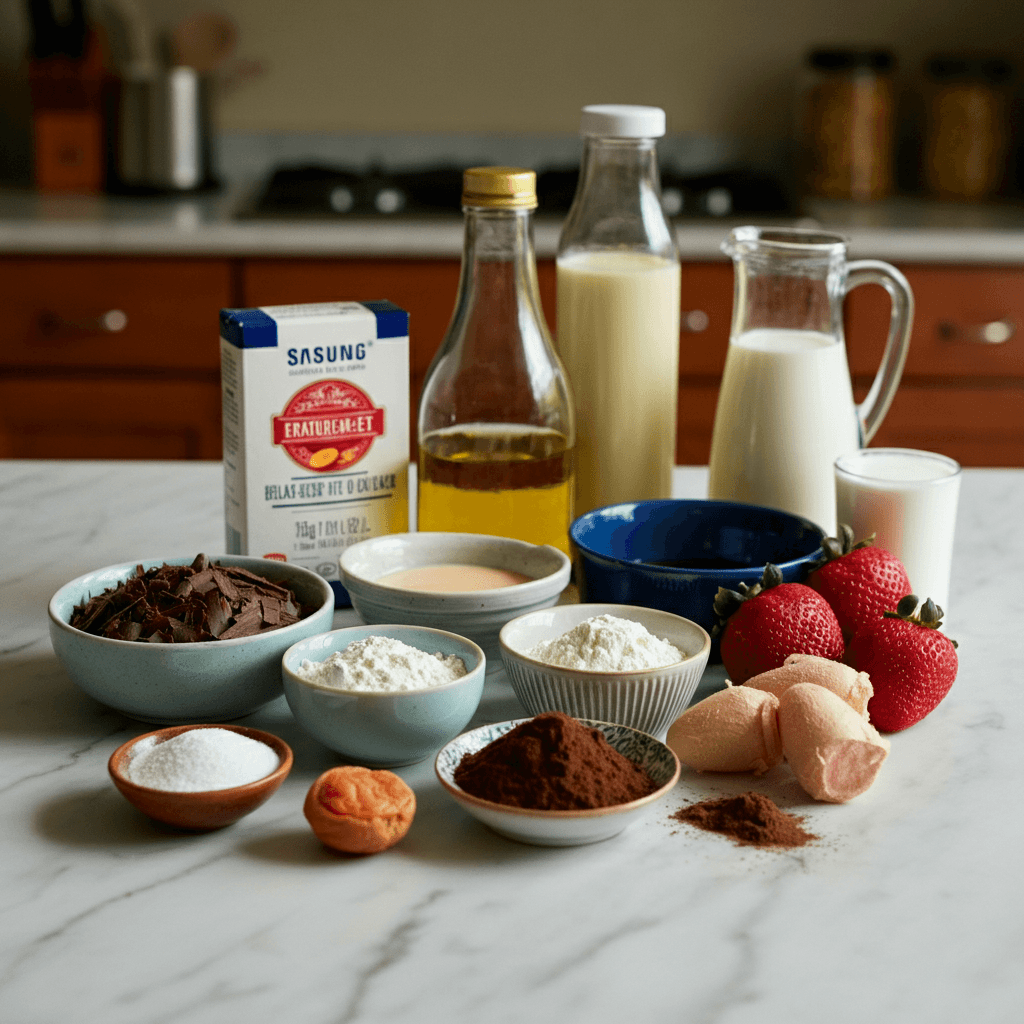
- All-Purpose Flour: Just your basic flour, but make sure it’s sifted! I learned the hard way that lumpy flour makes for lumpy cake. My kitchen gets covered in a fine layer of flour every time I bake, but it’s part of the charm, right?
- Unsweetened Cocoa Powder: This is where the deep chocolate magic for our cake begins. Don’t skimp on quality, a good cocoa makes all the difference. I once used a really cheap one, and the cake tasted… flat, you know? Never again!
- Granulated Sugar: Sweetness, obviously. But the right amount is key. I tend to lean a little less sweet than some recipes because the cherries and chocolate already bring so much flavor. Taste as you go, that’s my motto!
- Large Eggs: Room temperature is crucial for emulsifying everything properly. I used cold eggs once and the batter looked… separated. It still baked, but the texture was off. Lesson learned!
- Fresh Cherries (pitted): The star of the show! While canned works in a pinch, fresh tart cherries just elevate everything. I swear by them. I tried frozen once, and they released too much water oops!
- Heavy Cream (cold): For that cloud-like, dreamy whipped cream. You need it super cold, straight from the fridge. I made the mistake of letting it sit out for “just a minute” once, and it wouldn’t whip up. Total frustration!
- Kirsch (Cherry Brandy): This is what gives this classic dessert its signature boozy, aromatic punch. If you’re skipping alcohol, you can use cherry juice, but honestly, the kirsch adds something special. It’s a little secret weapon!
- Baking Powder & Baking Soda: The dynamic duo for a light, fluffy cake. Make sure they’re fresh! I keep mine in airtight containers, honestly, stale leaveners are the silent killers of many a cake.
- Vanilla Extract: A good quality vanilla really brings out the chocolate notes. Don’t use imitation if you can help it. The smell alone when you add it to the batter just screams “deliciousness is coming!”
Making Your Black Forest Cake
- Prep the Dry Ingredients & Pans:
- First things first, preheat that oven to 350°F (175°C). Grease and flour two 8-inch round cake pans. This is where I always get a little flour on my nose, oops! In a medium bowl, whisk together your dry ingredients: flour, cocoa powder, baking powder, baking soda, and salt. It’s all about getting that even distribution for a consistent cake texture. The cocoa smell starts to fill the kitchen, and it’s just wonderful.
- Mix the Wet Ingredients:
- In a separate, larger bowl, cream together the softened butter and granulated sugar until it’s light and fluffy. This step takes a minute, but don’t rush it, it incorporates air, which means a tender cake. Then, beat in the room-temperature eggs, one at a time, until fully combined. Add the vanilla extract. Honestly, the mixture should look smooth and creamy, almost like a delicious custard. If it looks curdled, don’t panic, just keep mixing!
- Combine and Bake the Layers:
- Gradually add the dry ingredients to the wet ingredients, alternating with buttermilk (or milk mixed with a splash of lemon juice if you’re like me and never have buttermilk on hand). Mix until just combined, overmixing is the enemy of a tender cake! Divide the batter evenly between your prepared pans. I always eyeball it, which sometimes leads to slightly uneven layers, but hey, that’s homemade charm! Bake for 25-30 minutes, or until a toothpick inserted into the center comes out clean.
- Craft the Cherry Filling:
- While the cakes cool, let’s get those cherries ready. In a saucepan, combine pitted fresh cherries, a bit of sugar, and a tablespoon of cornstarch mixed with a splash of water to make a slurry. Cook over medium heat, stirring, until the mixture thickens and the cherries are tender but still hold their shape. Remove from heat and stir in the kirsch, if using. The aroma of simmering cherries and kirsch is just divine. Let it cool completely, warm filling will melt your cream!
- Whip the Cream to Perfection:
- Now for the glorious whipped cream! In a very cold bowl (I pop mine in the freezer for 10 minutes), combine heavy cream, powdered sugar, and a splash of vanilla extract. Beat with an electric mixer on high speed until stiff peaks form. Be careful not to overbeat, or you’ll end up with butter I’ve done it, and it was a sad day for any cake! It should be light, airy, and hold its shape beautifully.
- Assemble Your Black Forest Cake:
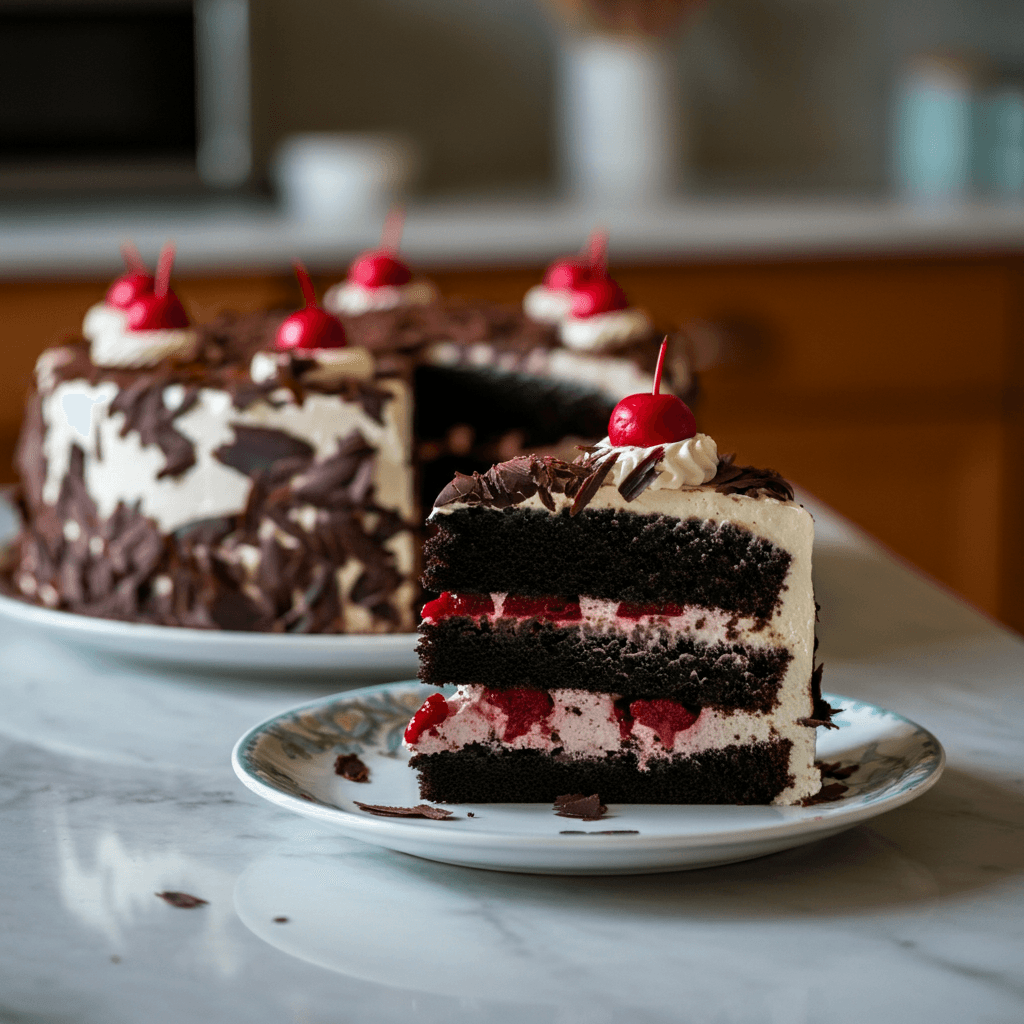
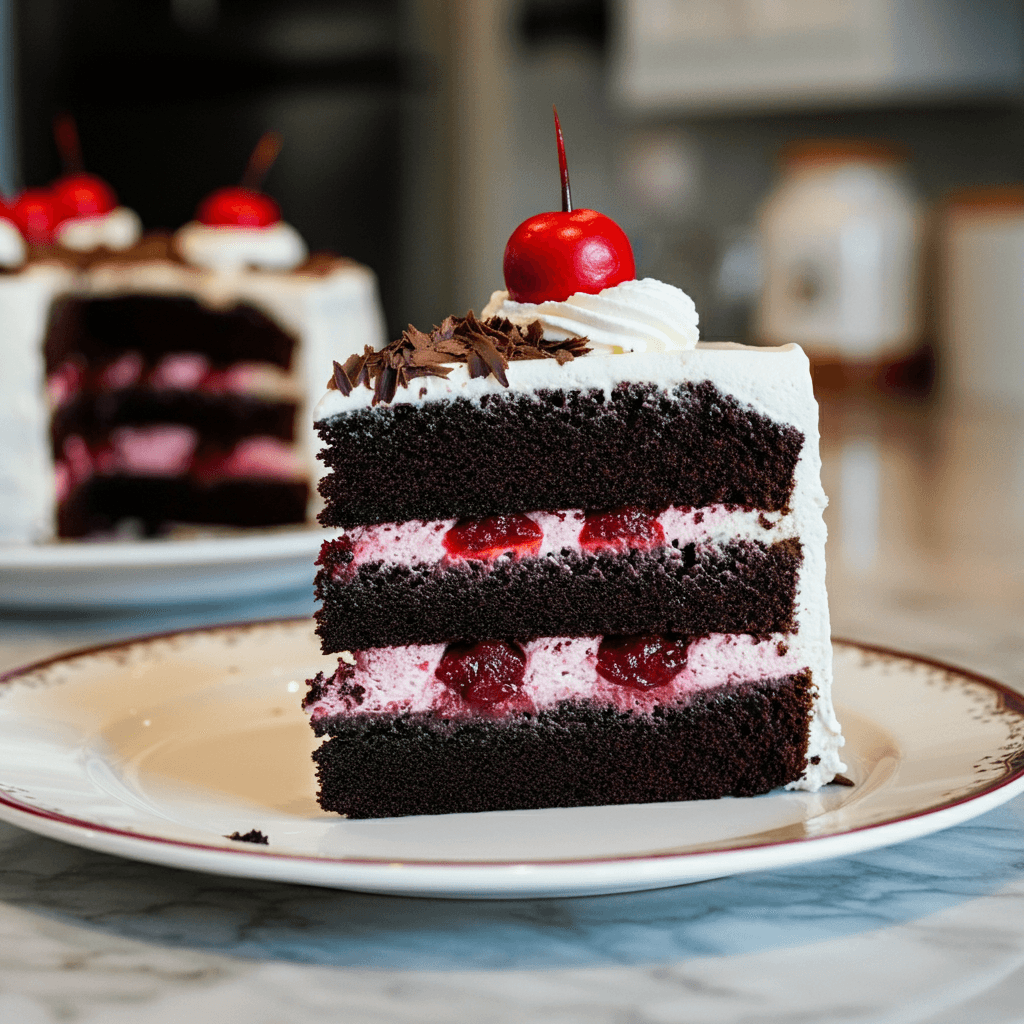
- Once the cake layers are completely cool, level them if needed (I usually just embrace the rustic look!). Place one layer on your serving plate. Brush generously with some kirsch or cherry juice. Spread half of the cherry filling, leaving a small border. Top with a generous layer of whipped cream. Place the second cake layer, brush with more kirsch, and repeat with the remaining cherry filling and whipped cream. Frost the sides of the cake with whipped cream. Garnish with chocolate shavings and a few extra cherries. It’s a masterpiece, honestly!
There’s something so satisfying about seeing the layers come together for this dessert. I remember one time, my little niece was “helping” me, and she ended up with chocolate smudges all over her face. It was total chaos, but also completely adorable. Those are the moments that make baking so special, messy hands and all. Every slice feels like a hug from Grandma, honestly.
Black Forest Cake Storage Tips
So, you’ve got leftover cake? Lucky you! Honestly, this cake is best enjoyed within 2-3 days. Keep it in an airtight container in the fridge. I learned the hard way that just covering it with plastic wrap isn’t enough, the cream can absorb fridge odors, and nobody wants onion-flavored cake, right? If you’ve got extra kirsch, you can brush the cake layers again before serving to re-moisten them a bit. Freezing is an option for the cake layers before assembly, wrapped tightly, but I wouldn’t freeze the whole assembled cake with the whipped cream it just doesn’t hold up as well. The cream gets a weird texture, and it just makes me sad.
Black Forest Cake Ingredient Substitutions
Okay, let’s talk swaps for this rich dessert. If kirsch isn’t your jam, or you’re avoiding alcohol, cherry juice is a fantastic substitute for soaking the cake layers. I’ve tried it, and it works, kinda, you lose that boozy kick, but the cherry flavor is still there. For the cherries, if fresh aren’t in season, good quality canned tart cherries (drained!) work well. I tried using sweet cherries once, but the cake was a bit too sugary for my taste, the tartness is key for a balanced flavor. And for the chocolate shavings, if you don’t have a bar, a coarse grater can turn chocolate chips into decent-enough sprinkles. It’s not quite the same elegant curl, but it gets the job done when you’re in a pinch!
Black Forest Cake Serving Suggestions
Serving this beautiful dessert is almost as fun as making it! Honestly, a slice is a meal in itself, but I love pairing it with a strong cup of coffee, or maybe a nice herbal tea for an afternoon treat. For a truly decadent experience, a small glass of cherry liqueur alongside it? Yes, please! It’s also fantastic after a light dinner, like a simple roasted chicken or a fresh salad. This cake just screams “celebration,” so it’s perfect for birthdays or just a regular Tuesday when you feel like treating yourself. A slice and a good book? That’s my kind of cozy night in.
Cultural Backstory of the Cake
The Black Forest Cake, or Schwarzwälder Kirschtorte as it’s known in Germany, has such a rich history! It’s believed to have originated in the Black Forest region of Germany, famous for its sour cherries and kirsch (cherry brandy). The traditional costume of the women in that region, with its distinctive Bollenhut (a hat with big red pom-poms), is sometimes said to have inspired the cake’s appearance chocolate shavings for the dark forest, cream for the snow, and cherries for the pom-poms. For me, discovering this cake was through my grandma, who had German heritage. She always told stories of her family’s recipes, and this was one of the crown jewels. It’s more than just a dessert, it’s a piece of history and family tradition on a plate.
And there you have it, my take on the classic Black Forest Cake. It’s messy, it’s a little bit wild, but it’s full of flavor and so much heart. Every time I make it, I think of Grandma and those sweet, cherry-filled memories. I honestly hope you give it a try and make some delicious memories of your own. Don’t worry if it’s not “perfect” the best cake is the one made with love, even if a cherry rolls off the side. I’d love to hear about your kitchen adventures with this one!
Black Forest Cake: Frequently Asked Questions
- → Can I make the cake layers ahead of time?
Absolutely! I often bake the cake layers a day in advance. Let them cool completely, wrap them tightly in plastic wrap, and store them at room temperature. It honestly makes assembly day so much less stressful, which is a win in my book!
- → Question about ingredients or substitutions?
For the kirsch, if you can’t find it, a good quality cherry liqueur or even just extra cherry juice will work for this dessert. Just know the flavor profile will be a little different. I tried a raspberry liqueur once, and it was… interesting, but not quite right!
- → Question about technique or cooking method?
Getting your whipped cream to stiff peaks is key for this recipe. Make sure your bowl and whisk are cold, and don’t walk away! It goes from perfect to butter surprisingly fast. I learned that the hard way, many times, oops!
- → Question about storage or leftovers?
Leftover cake stores best in an airtight container in the fridge for up to 3 days. The cream can start to weep a little after that, but it’s still delicious. I once left a slice out overnight and it was a sticky, sad mess don’t do that!
- → Question about variations or customization?
Feel free to play with the chocolate! Dark chocolate shavings are traditional, but I sometimes use a mix of milk and dark for a slightly sweeter profile. You could also add a touch of almond extract to the cake batter for a subtle nutty note.
Rich Black Forest Cake: Cherry Chocolate Delight
- Prep Time: 45 Minutes
- Cook Time: 30 Minutes
- Total Time: 1 Hour 15 Minutes
- Yield: 12 Servings 1x
- Category: Dessert
Description
This rich Black Forest Cake recipe brings dark chocolate, tart cherries, and vanilla cream together. It’s a classic German dessert, full of nostalgic flavor.
Ingredients
- Chocolate Cake Layers:
- 2 cups (240g) all-purpose flour
- ¾ cup (65g) unsweetened cocoa powder
- 2 cups (400g) granulated sugar
- 2 tsp baking powder
- 1 tsp baking soda
- 1 tsp salt
- 2 large eggs, room temperature
- 1 cup (240ml) buttermilk, room temperature
- ½ cup (120ml) vegetable oil
- 2 tsp vanilla extract
- Cherry Filling:
- 4 cups (about 600g) fresh tart cherries, pitted
- ½ cup (100g) granulated sugar (adjust to taste)
- 1 tbsp cornstarch
- ¼ cup (60ml) Kirsch (cherry brandy) or cherry juice
- Whipped Cream:
- 3 cups (720ml) heavy cream, very cold
- ½ cup (60g) powdered sugar
- 1 tsp vanilla extract
- Garnish & Soaking Syrup:
- ¼ cup (60ml) Kirsch (cherry brandy) or cherry juice (for brushing layers)
- 1 cup chocolate shavings or curls
- 12 fresh cherries with stems (for decoration)
Instructions
- Prep the Dry Ingredients & Pans:: First things first, preheat that oven to 350°F (175°C). Grease and flour two 8-inch round cake pans. This is where I always get a little flour on my nose, oops! In a medium bowl, whisk together your dry ingredients: flour, cocoa powder, baking powder, baking soda, and salt. It’s all about getting that even distribution for a consistent cake texture. The cocoa smell starts to fill the kitchen, and it’s just wonderful.
- Mix the Wet Ingredients:: In a separate, larger bowl, cream together the softened butter and granulated sugar until it’s light and fluffy. This step takes a minute, but don’t rush it; it incorporates air, which means a tender cake. Then, beat in the room-temperature eggs, one at a time, until fully combined. Add the vanilla extract. Honestly, the mixture should look smooth and creamy, almost like a delicious custard. If it looks curdled, don’t panic, just keep mixing!
- Combine and Bake the Layers:: Gradually add the dry ingredients to the wet ingredients, alternating with buttermilk (or milk mixed with a splash of lemon juice if you’re like me and never have buttermilk on hand). Mix until just combined; overmixing is the enemy of a tender cake! Divide the batter evenly between your prepared pans. I always eyeball it, which sometimes leads to slightly uneven layers, but hey, that’s homemade charm! Bake for 25-30 minutes, or until a toothpick inserted into the center comes out clean.
- Craft the Cherry Filling:: While the cakes cool, let’s get those cherries ready. In a saucepan, combine pitted fresh cherries, a bit of sugar, and a tablespoon of cornstarch mixed with a splash of water to make a slurry. Cook over medium heat, stirring, until the mixture thickens and the cherries are tender but still hold their shape. Remove from heat and stir in the kirsch, if using. The aroma of simmering cherries and kirsch is just divine. Let it cool completely; warm filling will melt your cream!
- Whip the Cream to Perfection:: Now for the glorious whipped cream! In a very cold bowl (I pop mine in the freezer for 10 minutes), combine heavy cream, powdered sugar, and a splash of vanilla extract. Beat with an electric mixer on high speed until stiff peaks form. Be careful not to overbeat, or you’ll end up with butter – I’ve done it, and it was a sad day for any cake! It should be light, airy, and hold its shape beautifully.
- Assemble Your Black Forest Cake:: Once the cake layers are completely cool, level them if needed (I usually just embrace the rustic look!). Place one layer on your serving plate. Brush generously with some kirsch or cherry juice. Spread half of the cherry filling, leaving a small border. Top with a generous layer of whipped cream. Place the second cake layer, brush with more kirsch, and repeat with the remaining cherry filling and whipped cream. Frost the sides of the cake with whipped cream. Garnish with chocolate shavings and a few extra cherries. It’s a masterpiece, honestly!


