
You know those nights, right? The ones where the takeout menu is practically calling your name, promising that sweet, savory, sticky chicken goodness? Honestly, I used to fall for it every time. But then came the moment of truth: could I actually make that Better-Than-Takeout Sticky Chicken myself? My kitchen, bless its chaotic heart, has seen its share of culinary experiments. There was the time the sauce seized up, or the chicken got a bit… over-crisped. Oops. But after a few tries, a little tweaking, and a lot of taste-testing (tough job, I know), I cracked the code. This recipe isn’t just good, it’s the kind of good that makes you wonder why you ever bothered with delivery. It brings warmth, comfort, and that undeniable sticky sweetness right to your table, no fuss, just pure joy.
I remember one particularly eventful evening, trying to get this Better-Than-Takeout Sticky Chicken just right. I was so focused on the sauce, I nearly forgot the chicken was still on the stove! A cloud of smoke, a frantic dash, and a lot of waving towels later, the chicken was mostly saved. It had a little extra ‘char’ that night, which, to be real, actually added a certain rustic charm. My husband still teases me about my dramatic cooking, but hey, it’s all part of the journey to deliciousness, right?

Better-Than-Takeout Sticky Chicken Ingredients
Main Stars
- Boneless, Skinless Chicken Thighs: These are the champions for Better-Than-Takeout Sticky Chicken. They stay juicy, unlike breasts which can dry out. Trust me, I once tried breasts and it was fine, but thighs? Oh, they’re a game-changer.
- Cornstarch: This is our secret weapon for that beautiful crispy coating and also for thickening the sauce. Don’t skip it, or your chicken will be sad and your sauce watery.
Sticky Sauce Essentials
- Soy Sauce: The backbone of our sticky sauce. I always use a good quality one, but honestly, any brand you have on hand will work. For gluten-free folks, tamari is your friend!
- Honey: For that irresistible sweetness and, well, stickiness! Maple syrup can work in a pinch if you’re out, but honey just hits different for this recipe.
- Rice Vinegar: Adds a crucial tang to balance the sweetness. I forgot it once, and the sauce was just… flat. Never again!
- Fresh Ginger & Garlic: These are non-negotiable flavor boosters. Fresh, always fresh! I’ve tried powdered in a pinch, and it’s okay, but the aroma and punch from fresh? Unbeatable. More garlic, always more garlic for me!
Fresh Finishes
- Sesame Oil: A tiny drizzle at the end for that nutty, authentic aroma. You really smell it, and it just screams “takeout!”
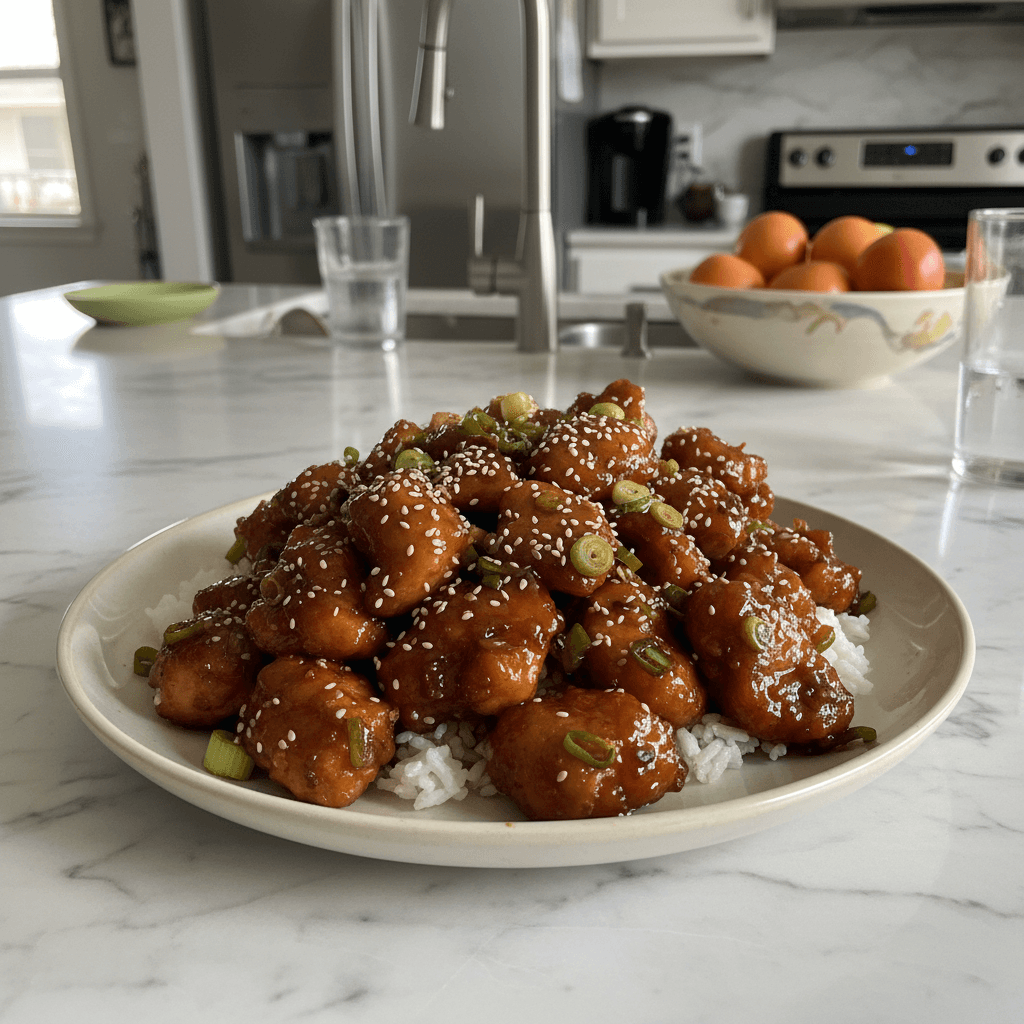
- Toasted Sesame Seeds: For a little crunch and visual appeal. I love watching them cling to the sticky chicken.
- Green Onions: A pop of color and fresh, mild oniony bite. I always chop extra for a garnish, because why not?
Cooking Better-Than-Takeout Sticky Chicken
- Prep the Chicken:
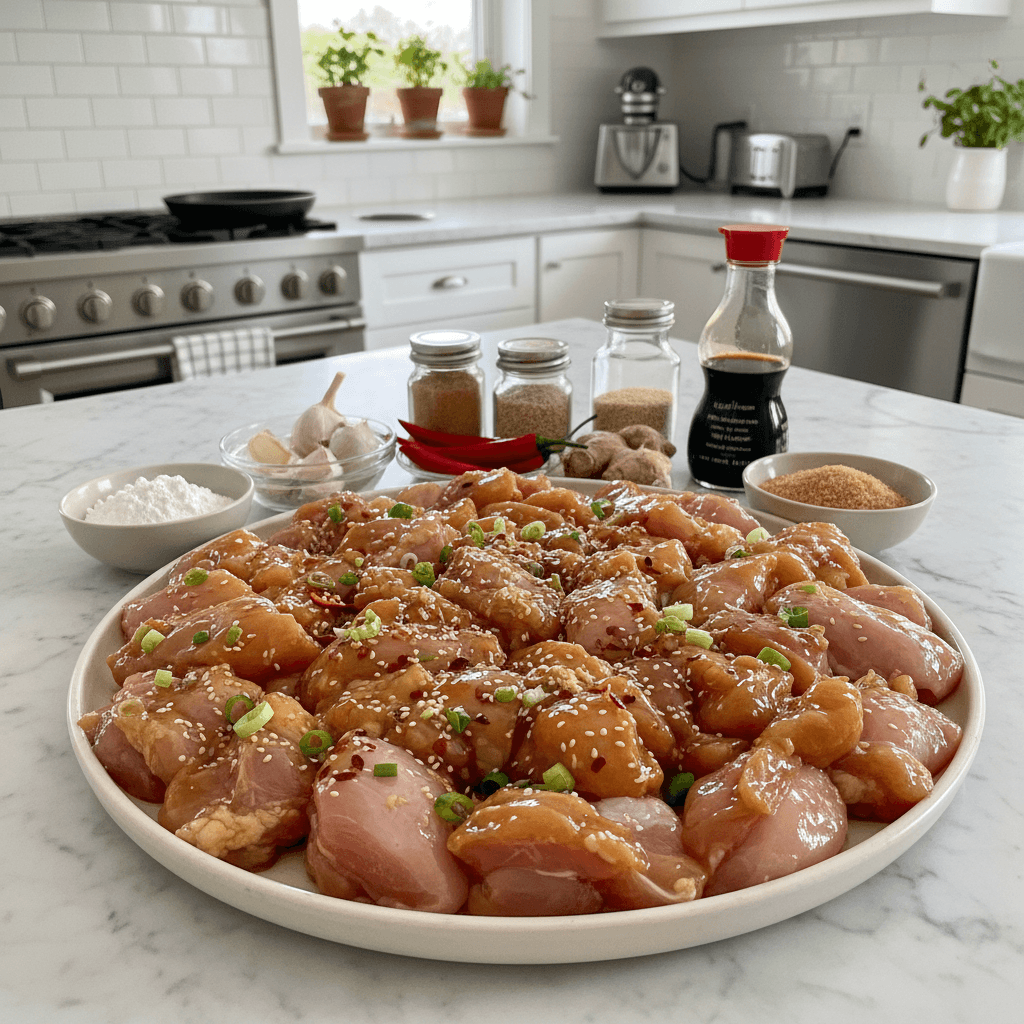
- First things first, get your chicken thighs ready. I usually pat them super dry with paper towels, this helps the cornstarch stick and gives us that lovely crispy crust. Then, I cut them into bite-sized pieces, roughly 1-inch chunks. This helps them cook evenly and absorb all that glorious sticky sauce. Don’t overcrowd your pan later, so cutting them uniformly is a little trick I learned the hard way. It’s all about that perfect sear!
- Coat and Sear:
- Now, toss those chicken pieces with cornstarch, salt, and pepper in a bowl. Make sure every bit is coated! Heat a good amount of oil in a large skillet or wok over medium-high heat. When it shimmers, add the chicken in a single layer, making sure not to overcrowd the pan. You’ll probably need to do this in batches. Let it sear for 3-4 minutes per side until golden brown and cooked through. This is where the magic starts to happen, you get that amazing aroma! I always get impatient here and try to flip too early, but resist! Let it get truly golden.
- Whip Up the Sticky Sauce:
- While your chicken is doing its thing, whisk together the soy sauce, honey, rice vinegar, grated ginger, and minced garlic in a small bowl. This is the heart of our Better-Than-Takeout Sticky Chicken! Give it a good mix until everything is combined. I sometimes add a tiny pinch of red pepper flakes here if I’m feeling spicy, but that’s totally optional. Don’t worry if it looks a bit thin now, it’ll thicken up beautifully.
- Combine and Thicken:
- Once all the chicken is seared, drain any excess oil from the pan, leaving just a little for flavor. Pour your prepared sauce over the chicken in the skillet. Bring it to a gentle simmer, stirring occasionally. You’ll see the sauce start to bubble and thicken pretty quickly, thanks to the cornstarch from the chicken. Keep stirring until it coats the chicken beautifully, maybe 3-5 minutes. It should look glossy and irresistible. This is the moment I always smell the ginger and garlic really pop!
- A Touch of Sesame:
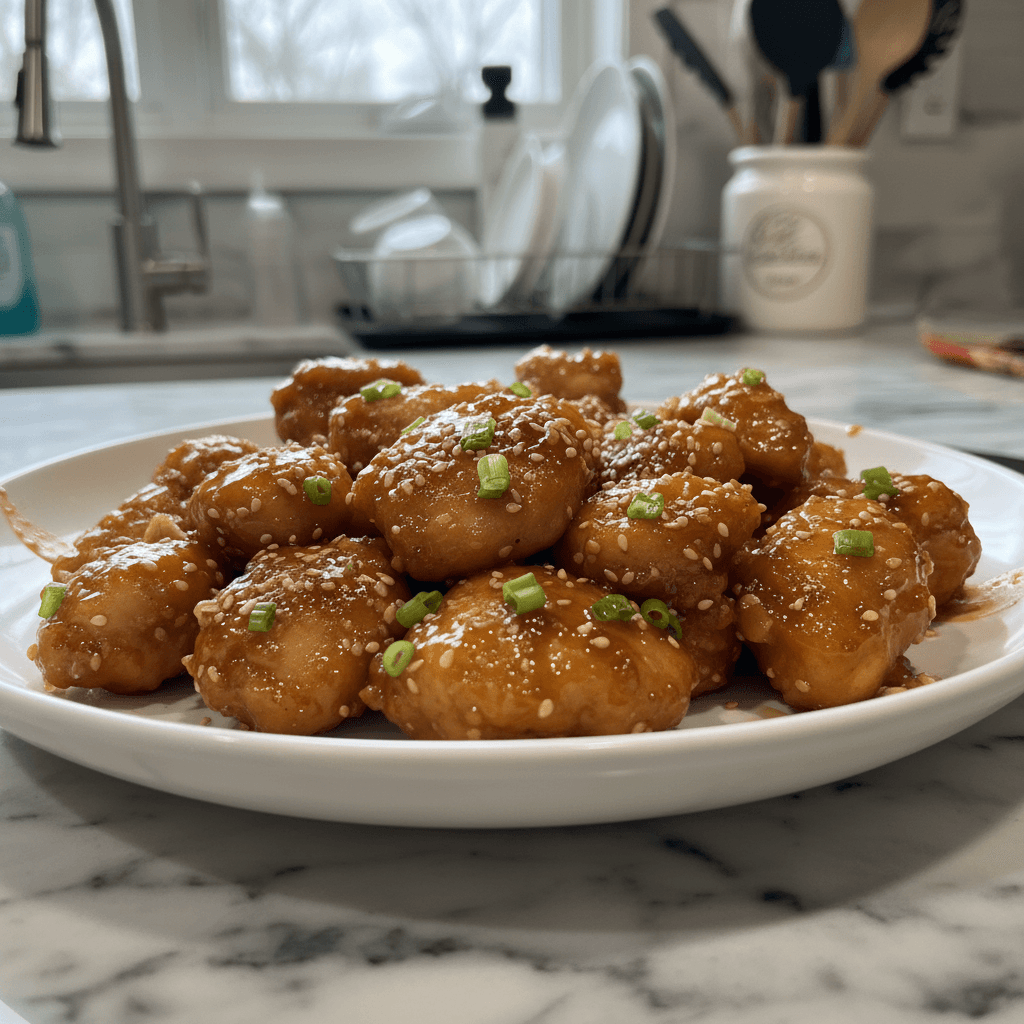
- Remove the pan from the heat. Drizzle in a bit of sesame oil and give it a quick stir. This adds that authentic, nutty depth that really elevates the dish. Honestly, it’s such a small step but makes a huge difference in the overall flavor profile of this Better-Than-Takeout Sticky Chicken. Don’t cook the sesame oil too long, just a quick stir to incorporate the aroma.
- Garnish and Serve:
- Transfer your glorious Better-Than-Takeout Sticky Chicken to a serving platter. Sprinkle generously with toasted sesame seeds and freshly chopped green onions. The vibrant green against the glistening chicken just looks so inviting! Serve it immediately over fluffy white rice, or even some quick noodles. The smell alone will have everyone rushing to the table, trust me. Enjoy your homemade takeout!
There was this one time I was so proud of my Better-Than-Takeout Sticky Chicken, I completely forgot to make rice! We ended up eating it straight from the pan with forks, laughing the whole time. It was messy, but honestly, some of the best kitchen chaos memories come from those little forgotten steps. This dish just brings out the joy in cooking, even when things go a little sideways.
Storing Better-Than-Takeout Sticky Chicken
This Better-Than-Takeout Sticky Chicken actually holds up pretty well! I usually pop any leftovers into an airtight container and stash it in the fridge. It’s good for about 3-4 days. I microwaved it once, and the sauce separated a little, which was a bit sad, so I learned my lesson. Now, I prefer reheating it gently in a skillet over low heat, adding a tiny splash of water if the sauce seems too thick. That way, the chicken stays tender and the sauce gets glossy again. It’s a meal-prep dream, honestly, making my lunch the next day something to actually look forward to!
Better-Than-Takeout Sticky Chicken Substitutions
Okay, so I’ve experimented a bit with this Better-Than-Takeout Sticky Chicken. If you don’t have chicken thighs, chicken breast works, but slice it thinner and watch it carefully so it doesn’t dry out it worked, kinda, but wasn’t as juicy. For a vegetarian twist, I’ve tried this sauce with pan-fried extra-firm tofu, and that was surprisingly delicious! Just press the tofu really well first. If you’re out of honey, maple syrup is a decent swap, though it gives a slightly different flavor profile. And for those who need gluten-free, tamari instead of soy sauce is a seamless switch. Don’t be afraid to play around with it!
Serving Suggestions for Sticky Chicken
My absolute favorite way to serve this Better-Than-Takeout Sticky Chicken is over a bed of steaming white rice. The rice soaks up all that glorious sticky sauce, and honestly, it’s just pure comfort. A simple side of steamed broccoli or quick-sautéed snap peas adds a lovely freshness and crunch. Sometimes, I’ll even whip up a quick cucumber salad with a light vinaigrette to cut through the richness. And for a truly cozy night in? This dish, a good rom-com, and maybe a fizzy ginger ale or a crisp lager. Yes please!
Cultural Backstory of Sticky Chicken
While my Better-Than-Takeout Sticky Chicken recipe is a home-cook friendly take, the concept of sticky, savory-sweet chicken is deeply rooted in various Asian cuisines, particularly Chinese and Korean dishes like General Tso’s or Korean Fried Chicken. These dishes often feature a crispy coating and a rich, glazed sauce that’s designed to cling to every piece. My personal connection started with countless trips to our local Chinese restaurant as a kid, always mesmerized by the glistening, flavorful chicken. Recreating that magic at home, with my own little twists, feels like a delicious homage to those cherished memories and the incredible flavors I grew up loving.
Making this Better-Than-Takeout Sticky Chicken always feels like a little win in my kitchen. It’s warm, it’s comforting, and honestly, it always tastes better than I expect it to. Seeing that glossy, rich sauce clinging to every piece of chicken just makes my heart happy. I hope you try it, maybe even make a glorious mess, and fall in love with making your own takeout at home. Let me know how your kitchen adventures go!
Better-Than-Takeout Sticky Chicken FAQs
- → Can I use chicken breast for this Better-Than-Takeout Sticky Chicken?
You can, but I really recommend thighs! Breasts tend to dry out more easily with this cooking method. If you do use them, cut them into slightly larger pieces and keep a close eye on them to avoid overcooking. I tried it once, and it was edible, but not quite the same juicy experience.
- → What if I don’t have fresh ginger or garlic?
Honestly, fresh is best here for that vibrant flavor! But if you’re in a pinch, you can use about 1/2 teaspoon of garlic powder and 1/2 teaspoon of ground ginger. I’ve done it, and it works okay, but the fresh aromatics really make this Better-Than-Takeout Sticky Chicken sing. Don’t be afraid to keep a little fresh stuff on hand!
- → How do I make sure the sauce gets nice and thick for Better-Than-Takeout Sticky Chicken?
The cornstarch on the chicken really helps, but the trick is to simmer it gently and stir. Don’t crank the heat too high! If it’s still too thin after a few minutes, you can whisk a tiny bit more cornstarch with cold water, then slowly add it to the simmering sauce until it reaches your desired thickness. I once added too much too fast, and ended up with chicken cement, oops!
- → Can I make this Better-Than-Takeout Sticky Chicken ahead of time?
You absolutely can! It reheats beautifully, especially if you warm it up gently in a skillet. The chicken stays tender, and the sauce gets glossy again. It’s a fantastic option for meal prep, making busy weeknights so much easier. I always make extra for lunch the next day, it’s a little treat!
- → Can I make this recipe spicier?
Oh, definitely! I love a little kick. You can add a pinch of red pepper flakes to the sauce mixture, or even a dash of sriracha for a more pronounced heat. I’ve even added a finely minced fresh chili to the pan with the ginger and garlic. Experiment and find your perfect level of spice!

Sticky Chicken: Easy Glazed Takeout Dinner
- Prep Time: 15 Minutes
- Cook Time: 25 Minutes
- Total Time: 40 Minutes
- Yield: 4 Servings 1x
- Category: Dinner
Description
Better-Than-Takeout Sticky Chicken is simple to make at home. Get that irresistible restaurant taste for a quick, satisfying dinner. You’ll love it!
Ingredients
- Main Stars:
- 1.5 lbs boneless, skinless chicken thighs, cut into 1-inch pieces
- 2 tbsp cornstarch (plus more if needed for sauce)
- Salt and freshly ground black pepper, to taste
- Sticky Sauce Essentials:
- 1/2 cup soy sauce (or tamari for gluten-free)
- 1/4 cup honey
- 2 tbsp rice vinegar
- 1 tbsp grated fresh ginger
- 4 cloves garlic, minced
- Fresh Finishes:
- 1 tbsp neutral oil (like vegetable or canola), for searing
- 1 tsp toasted sesame oil
- 2 tbsp toasted sesame seeds, for garnish
- 2 green onions, thinly sliced, for garnish
- Make It Your Own:
- Pinch of red pepper flakes (optional, for heat)
- Sriracha, to serve (optional)
Instructions
- Prep the Chicken:: First things first, get your chicken thighs ready. I usually pat them super dry with paper towels; this helps the cornstarch stick and gives us that lovely crispy crust. Then, I cut them into bite-sized pieces, roughly 1-inch chunks. This helps them cook evenly and absorb all that glorious sticky sauce. Don’t overcrowd your pan later, so cutting them uniformly is a little trick I learned the hard way. It’s all about that perfect sear!
- Coat and Sear:: Now, toss those chicken pieces with cornstarch, salt, and pepper in a bowl. Make sure every bit is coated! Heat a good amount of oil in a large skillet or wok over medium-high heat. When it shimmers, add the chicken in a single layer, making sure not to overcrowd the pan. You’ll probably need to do this in batches. Let it sear for 3-4 minutes per side until golden brown and cooked through. This is where the magic starts to happen, you get that amazing aroma! I always get impatient here and try to flip too early, but resist! Let it get truly golden.
- Whip Up the Sticky Sauce:: While your chicken is doing its thing, whisk together the soy sauce, honey, rice vinegar, grated ginger, and minced garlic in a small bowl. This is the heart of our Better-Than-Takeout Sticky Chicken! Give it a good mix until everything is combined. I sometimes add a tiny pinch of red pepper flakes here if I’m feeling spicy, but that’s totally optional. Don’t worry if it looks a bit thin now; it’ll thicken up beautifully.
- Combine and Thicken:: Once all the chicken is seared, drain any excess oil from the pan, leaving just a little for flavor. Pour your prepared sauce over the chicken in the skillet. Bring it to a gentle simmer, stirring occasionally. You’ll see the sauce start to bubble and thicken pretty quickly, thanks to the cornstarch from the chicken. Keep stirring until it coats the chicken beautifully, maybe 3-5 minutes. It should look glossy and irresistible. This is the moment I always smell the ginger and garlic really pop!
- A Touch of Sesame:: Remove the pan from the heat. Drizzle in a bit of sesame oil and give it a quick stir. This adds that authentic, nutty depth that really elevates the dish. Honestly, it’s such a small step but makes a huge difference in the overall flavor profile of this Better-Than-Takeout Sticky Chicken. Don’t cook the sesame oil too long, just a quick stir to incorporate the aroma.
- Garnish and Serve:: Transfer your glorious Better-Than-Takeout Sticky Chicken to a serving platter. Sprinkle generously with toasted sesame seeds and freshly chopped green onions. The vibrant green against the glistening chicken just looks so inviting! Serve it immediately over fluffy white rice, or even some quick noodles. The smell alone will have everyone rushing to the table, trust me. Enjoy your homemade takeout!


