
Honestly, I remember the first time I stumbled upon the idea of Baked Caesar Chicken. It was one of those chaotic weeknights, dinner plans were a mess, and I had a half-used bottle of Caesar dressing staring at me from the fridge. My little one was doing homework at the kitchen table, asking for ‘something yummy, Mama!’ and I just thought, ‘What if…?’ The kitchen smelled like a mix of impending disaster and hopeful garlic. I didn’t expect that simple experiment to become such a comforting staple, but here we are! This dish, with its creamy Parmesan sauce, just feels like a warm hug after a long day. It’s comforting, easy, and always a hit.
I still laugh thinking about the time I tried to rush the baking process for this creamy Baked Caesar Chicken. I cranked up the oven, thinking I was a genius, and ended up with slightly dry edges and a sauce that was a little too bubbly. Oops! My husband, bless his heart, still ate it, but I learned my lesson: patience is key, especially with that gorgeous creamy Parmesan sauce. It’s all part of the kitchen adventure, right?

Ingredients for Baked Caesar Chicken
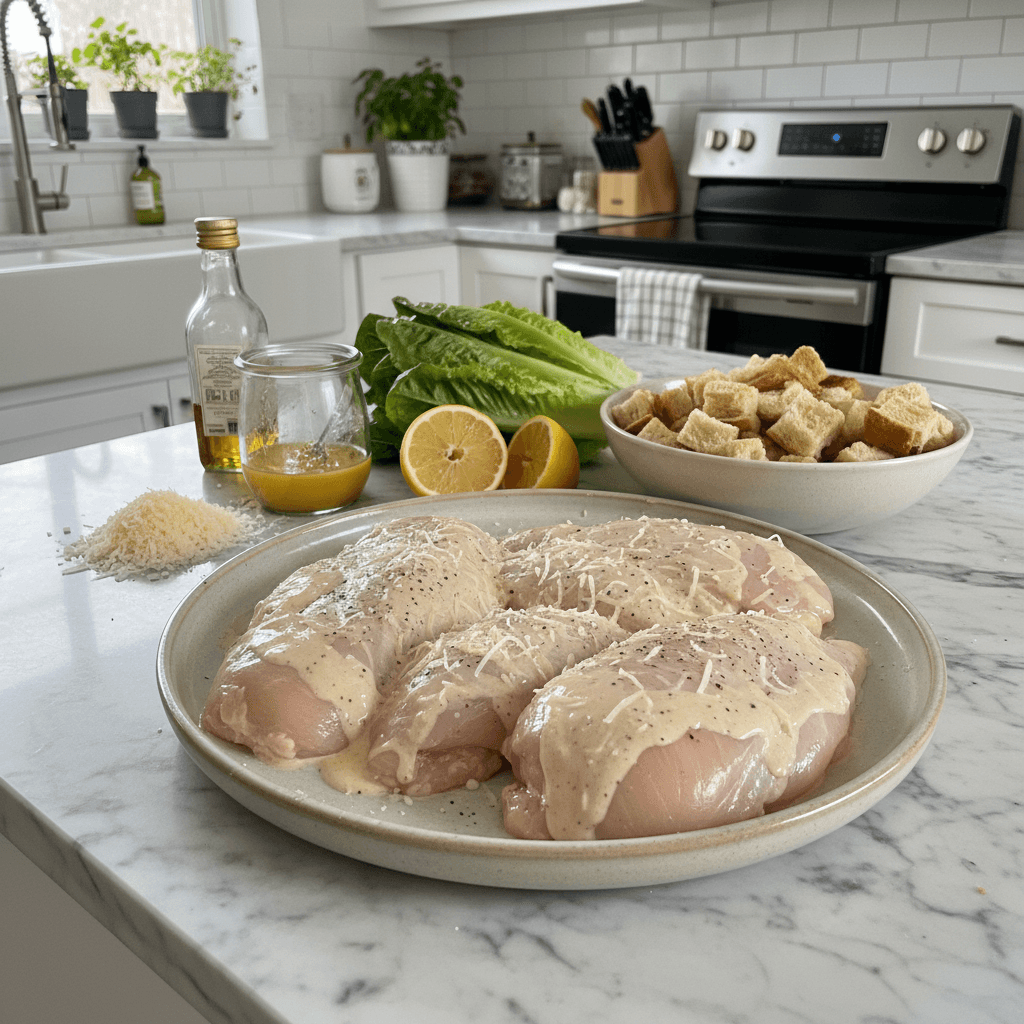
- Boneless, Skinless Chicken Breasts: These are your main players, hon. I always go for thicker cuts because they stay juicier when baked. Don’t use those super thin cutlets, they dry out way too fast. We want tender, succulent chicken, not cardboard!
- Creamy Caesar Dressing: This is the secret sauce, literally! Don’t skimp here, a good quality, creamy dressing makes all the difference. I tried a ‘light’ version once and it just wasn’t the same. To be real, full-fat is where the flavor’s at.
Parmesan Cheese (grated): Freshly grated, always! The pre-shredded stuff has additives that make it melt weird. I always keep a wedge of good Parmigiano-Reggiano in my fridge. It adds that nutty, salty kick that makes the creamy Parmesan sauce sing.
Heavy Cream: This is what gives us that luscious, rich creamy Parmesan sauce. Honestly, don’t even think about using half-and-half or milk. I did that once and the sauce separated and looked… well, unappetizing. Heavy cream is non-negotiable for that velvety texture.
Garlic Powder: A little goes a long way here to boost that classic Caesar flavor. I love garlic, so sometimes I’ll add a touch more than the recipe calls for. It just deepens the savory notes without being overpowering.
- Italian Seasoning: My little flavor booster! It adds a nice herbaceous background that complements the Caesar beautifully. I remember one time I ran out and used just oregano, and it worked, kinda, but the blend is truly better.
- Fresh Parsley (chopped): For a pop of color and freshness at the end. It brightens everything up and makes the dish look fancy, even though it was super simple to make. Don’t skip this, it really elevates the presentation and gives a nice, clean finish.
How to Make Creamy Baked Caesar Chicken
- Prep Your Chicken:
- Alright, first things first, let’s get that chicken ready. Pat your boneless, skinless chicken breasts really dry with paper towels. This is a crucial step, seriously! If they’re wet, they’ll steam instead of getting that lovely golden crust. I usually lay them out on a cutting board and give them a good pat-down while the oven preheats. You want them about an inch thick, if they’re super plump, give ’em a little gentle pound with a meat mallet (or a heavy pan, in my kitchen chaos) to even them out. This helps them cook through evenly, and nobody wants half-cooked chicken, right?
- Whip Up the Creamy Parmesan Sauce:
- Now for the star of the show, that glorious creamy Parmesan sauce! In a medium bowl, combine your creamy Caesar dressing, heavy cream, about half of the grated Parmesan, garlic powder, and Italian seasoning. Whisk it all together until it’s smooth and beautifully combined. I always give it a little taste test here sometimes I add an extra pinch of garlic powder if I’m feeling bold. This is where the magic happens, so make sure it’s well mixed. You’ll smell that amazing blend of garlic and cheese already, it’s just wonderful!
- Arrange and Drench:
- Next, grab a baking dish something that fits your chicken snugly but not too tightly. Place your prepped chicken breasts in a single layer. Now, pour that luscious creamy Parmesan sauce evenly over each piece of chicken. Make sure every inch is coated! I usually use a spoon to coax the sauce over any bare spots. You want the chicken swimming in it, honestly. This is what keeps it incredibly moist and infuses every bite with that amazing flavor. Don’t be shy with the sauce!
- Time for a Cheesy Blanket:
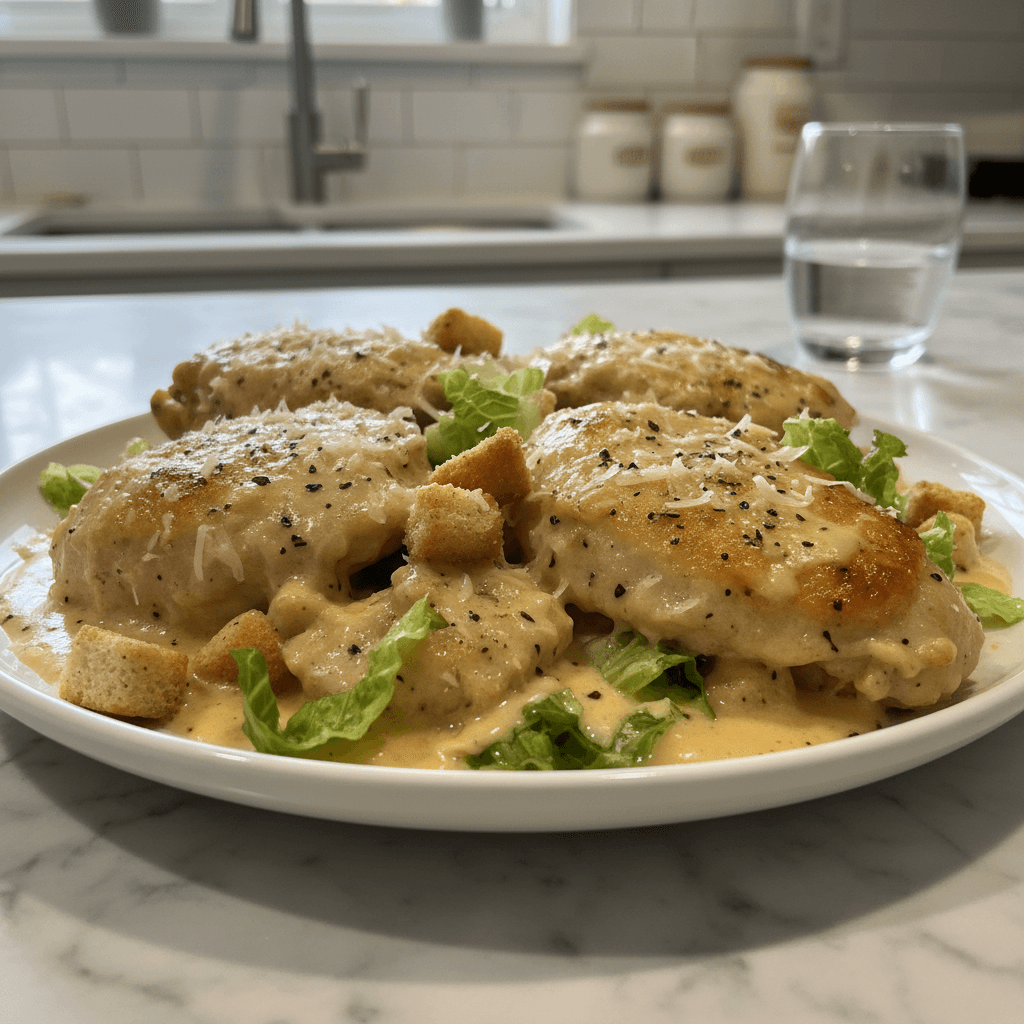
- Sprinkle the remaining grated Parmesan cheese generously over the sauced chicken. This is going to create a beautiful, golden-brown crust as it bakes, adding another layer of texture and flavor. I love watching the cheese melt and bubble in the oven, it’s honestly one of my favorite parts of making this Baked Caesar Chicken. Make sure it’s a nice, even layer so every piece gets that delightful cheesy topping. Don’t worry if some falls into the sauce, that’s just extra goodness!
- Bake to Perfection:
- Slide that baking dish into your preheated oven. Now, here’s where we practice patience no rushing this part! Let it bake for about 25-35 minutes, depending on the thickness of your chicken. You’re looking for the chicken to be cooked through (internal temperature of 165°F or 74°C) and for that creamy Parmesan sauce to be bubbling and slightly golden around the edges. If it starts to get too brown too quickly, you can loosely tent it with foil. I always use a meat thermometer, it takes the guesswork out and prevents dry chicken!
- Rest and Garnish:
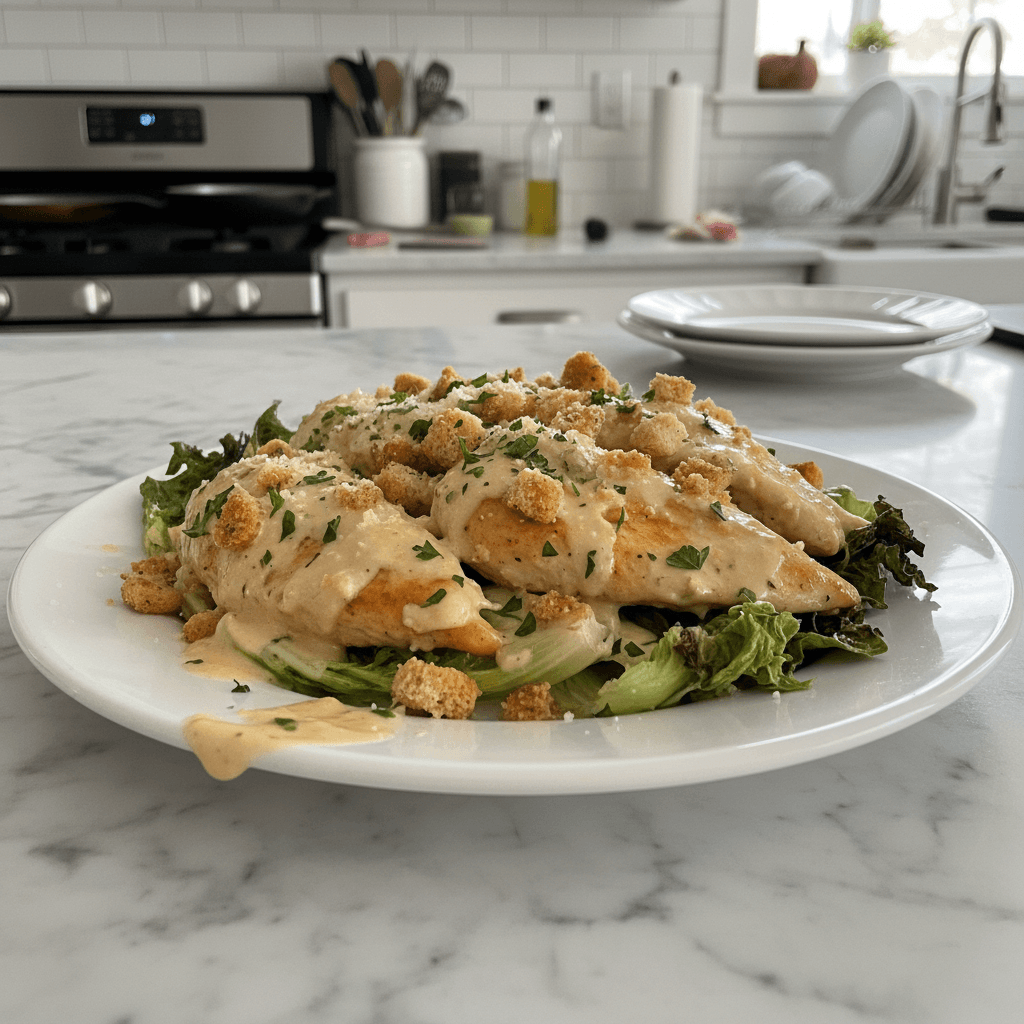
- Once your Baked Caesar Chicken is out of the oven, don’t just dive in immediately! Let it rest in the baking dish for 5-10 minutes. This resting period is super important, as it allows the juices to redistribute, keeping the chicken incredibly tender and juicy. While it rests, those flavors continue to meld. Before serving, sprinkle generously with fresh chopped parsley. It adds a vibrant pop of color and a lovely fresh counterpoint to the rich, creamy Parmesan sauce. Enjoy, my friend, you’ve earned this!
Honestly, this creamy Baked Caesar Chicken became my go-to dish for potlucks or when friends drop by unexpectedly. I remember one time, I had completely forgotten about a dinner party until an hour before! I threw this together, sauce splattering a bit on the countertop, but when it came out of the oven, smelling incredible, everyone thought I’d spent hours. That’s the beauty of this dish, it feels special without all the fuss.
Storing Your Baked Caesar Chicken
So, you’ve got leftovers of this delicious Baked Caesar Chicken? Lucky you! To store, let the chicken cool completely first this is really important to prevent condensation and keep things fresh. Transfer any remaining chicken and that glorious creamy Parmesan sauce into an airtight container. Honestly, I’ve tried just covering the baking dish with foil, and it just doesn’t keep as well, the sauce tends to dry out or absorb fridge smells. It’ll keep beautifully in the refrigerator for up to 3-4 days. When reheating, I avoid the microwave if possible, especially for the chicken. I microwaved it once and the sauce separated so don’t do that lol. A gentle reheat in a covered skillet on the stovetop or in the oven at a low temperature (around 300°F/150°C) with a splash of extra cream or chicken broth works wonders to bring that creamy Parmesan sauce back to life. It holds up surprisingly well!
Baked Caesar Chicken Ingredient Swaps
Life happens, and sometimes you don’t have every ingredient for this creamy Baked Caesar Chicken. I get it! I’ve experimented a lot with this recipe. For the chicken, if you’re out of breasts, boneless, skinless thighs work beautifully too, though they might need a few extra minutes to cook. I tried it once with bone-in, skin-on thighs, and it worked, kinda, but the sauce was a bit greasy. If you’re out of creamy Caesar dressing, you can whisk together some mayonnaise, lemon juice, Dijon mustard, minced garlic, and a dash of Worcestershire sauce it’s not exactly the same, but it gets the job done in a pinch! For the heavy cream, you could try full-fat coconut milk for a dairy-free twist, but be warned, it will add a slight coconut flavor. I haven’t tried that personally for this dish, but I’ve heard it works for other creamy sauces. And if you’re out of Parmesan, a good quality Grana Padano or Asiago can be a decent stand-in, though the flavor profile will be slightly different. Don’t be afraid to play around, that’s how we discover new favorites!
Serving Your Baked Caesar Chicken
Oh, the possibilities for serving this creamy Baked Caesar Chicken! Honestly, it’s so versatile. For a classic, comforting meal, I love to serve it with a simple side of buttered egg noodles or a fluffy bed of mashed potatoes that creamy Parmesan sauce just begs to be soaked up! If I’m feeling a bit lighter, a fresh green salad (maybe with a little extra Caesar dressing!) or some steamed asparagus is perfect. This dish and a rom-com? Yes please. For a more substantial dinner, roasted broccoli or green beans tossed with a little lemon zest would be lovely. And for drinks? A crisp white wine, like a Sauvignon Blanc, or even just a tall glass of iced tea would be a great complement. My kids love it with some garlic bread to scoop up every last bit of that amazing sauce. It’s perfect for a weeknight family dinner or even a casual gathering with friends. It just makes everyone happy!
Cultural Backstory of Baked Caesar Chicken
While Caesar dressing itself has a fascinating origin story, born in Tijuana, Mexico, this particular creamy Baked Caesar Chicken dish is more of a modern, comforting twist that’s found its way into countless home kitchens, including mine! It’s a testament to how adaptable and beloved the classic Caesar flavors are. I remember seeing a similar recipe in an old community cookbook from my grandmother’s church, but it used cream of mushroom soup! My version, with the rich heavy cream and real Parmesan, feels like a more elevated, yet still incredibly accessible, take on that ‘dump-and-bake’ comfort food. It’s not steeped in ancient tradition, but it embodies that universal desire for a delicious, fuss-free meal that brings people together. For me, it became special because it was one of the first dishes my daughter asked me to teach her how to make, connecting us through food in a really sweet way.
Honestly, making this creamy Baked Caesar Chicken always feels like a little victory in my kitchen. From those initial ‘oops’ moments to now, where it comes out perfectly golden and bubbly, it’s a dish filled with happy memories. The smell of that rich, creamy Parmesan sauce filling the house just makes everything feel right. I really hope you give it a try and find as much joy in it as my family and I do. Don’t forget to tell me how your version turns out!
Frequently Asked Questions About Baked Caesar Chicken
- → Can I use chicken thighs instead of breasts for Baked Caesar Chicken?
Yes, absolutely! I’ve used boneless, skinless chicken thighs many times. They tend to stay even juicier than breasts, which is fantastic. Just keep in mind they might need an extra 5-10 minutes of baking time to cook through properly. Always check with a meat thermometer!
- → What if I don’t have heavy cream for the creamy Parmesan sauce?
While heavy cream gives the best, richest creamy Parmesan sauce, you could try half-and-half in a pinch, but it might not be as thick or stable. I wouldn’t recommend milk, as it’s too thin and likely to separate. For a non-dairy option, full-fat coconut milk might work, but it will slightly alter the flavor profile.
- → How do I prevent my Baked Caesar Chicken from drying out?
The key here is not to overbake it! Use a meat thermometer to ensure your chicken reaches 165°F (74°C) and then pull it from the oven. Resting the chicken for 5-10 minutes after baking also helps keep those juices locked in. Plus, that generous creamy Parmesan sauce helps a lot!
- → Can I prepare this creamy Baked Caesar Chicken ahead of time?
You can definitely prep the chicken by coating it in the creamy Parmesan sauce and storing it in the baking dish, covered, in the fridge for up to 24 hours before baking. I’ve done this for busy evenings, and it works great! Just add the final Parmesan right before it goes into the oven.
- → What are some good vegetable sides for Baked Caesar Chicken?
Oh, so many options! Roasted asparagus, steamed green beans, a simple side salad, or even some roasted broccoli florets are all fantastic. I personally love something light and fresh to balance the richness of the creamy Parmesan sauce. Quick and easy is my motto!

Creamy Baked Caesar Chicken with Parmesan Sauce
- Prep Time: 15 Minutes
- Cook Time: 30 Minutes
- Total Time: 45 Minutes
- Yield: 4 Servings 1x
- Category: Dinner
Description
Creamy Baked Caesar Chicken is a weeknight dream! Juicy chicken drenched in a rich Parmesan sauce, it’s comforting and oh-so-easy. Perfect for a cozy meal.
Ingredients
- Main Players:
- 4 boneless, skinless chicken breasts (about 1.5–2 lbs total)
- Sauce Essentials:
- 1 cup creamy Caesar dressing (good quality is key!)
- 1/2 cup heavy cream
- 1/2 cup grated Parmesan cheese, divided
- Flavor Boosters:
- 1 tsp garlic powder
- 1 tsp Italian seasoning
- Finishing Touches:
- 2 tbsp fresh parsley, chopped (for garnish)
Instructions
- Prep Your Chicken:: Alright, first things first, let’s get that chicken ready. Pat your boneless, skinless chicken breasts really dry with paper towels. This is a crucial step, seriously! If they’re wet, they’ll steam instead of getting that lovely golden crust. I usually lay them out on a cutting board and give them a good pat-down while the oven preheats. You want them about an inch thick; if they’re super plump, give ’em a little gentle pound with a meat mallet (or a heavy pan, in my kitchen chaos) to even them out. This helps them cook through evenly, and nobody wants half-cooked chicken, right?
- Whip Up the Creamy Parmesan Sauce:: Now for the star of the show, that glorious creamy Parmesan sauce! In a medium bowl, combine your creamy Caesar dressing, heavy cream, about half of the grated Parmesan, garlic powder, and Italian seasoning. Whisk it all together until it’s smooth and beautifully combined. I always give it a little taste test here – sometimes I add an extra pinch of garlic powder if I’m feeling bold. This is where the magic happens, so make sure it’s well mixed. You’ll smell that amazing blend of garlic and cheese already, it’s just wonderful!
- Arrange and Drench:: Next, grab a baking dish – something that fits your chicken snugly but not too tightly. Place your prepped chicken breasts in a single layer. Now, pour that luscious creamy Parmesan sauce evenly over each piece of chicken. Make sure every inch is coated! I usually use a spoon to coax the sauce over any bare spots. You want the chicken swimming in it, honestly. This is what keeps it incredibly moist and infuses every bite with that amazing flavor. Don’t be shy with the sauce!
- Time for a Cheesy Blanket:: Sprinkle the remaining grated Parmesan cheese generously over the sauced chicken. This is going to create a beautiful, golden-brown crust as it bakes, adding another layer of texture and flavor. I love watching the cheese melt and bubble in the oven; it’s honestly one of my favorite parts of making this Baked Caesar Chicken. Make sure it’s a nice, even layer so every piece gets that delightful cheesy topping. Don’t worry if some falls into the sauce, that’s just extra goodness!
- Bake to Perfection:: Slide that baking dish into your preheated oven. Now, here’s where we practice patience – no rushing this part! Let it bake for about 25-35 minutes, depending on the thickness of your chicken. You’re looking for the chicken to be cooked through (internal temperature of 165°F or 74°C) and for that creamy Parmesan sauce to be bubbling and slightly golden around the edges. If it starts to get too brown too quickly, you can loosely tent it with foil. I always use a meat thermometer; it takes the guesswork out and prevents dry chicken!
- Rest and Garnish:: Once your Baked Caesar Chicken is out of the oven, don’t just dive in immediately! Let it rest in the baking dish for 5-10 minutes. This resting period is super important, as it allows the juices to redistribute, keeping the chicken incredibly tender and juicy. While it rests, those flavors continue to meld. Before serving, sprinkle generously with fresh chopped parsley. It adds a vibrant pop of color and a lovely fresh counterpoint to the rich, creamy Parmesan sauce. Enjoy, my friend, you’ve earned this!


