
You know how some recipes just happen? Like you had good intentions, a fridge full of apples from that orchard trip (oops, bought too many!), and then suddenly, these amazing Apple Crumble Bars appeared. That’s pretty much how these came to be in my kitchen. I remember one crisp autumn afternoon, armed with a bushel of Granny Smiths and a wild idea. My counter was a disaster zone, honestly, flour everywhere, apple peels threatening to trip the cat. But the smell? Oh, the cinnamon and baking apples, it was worth every bit of the mess. These Apple Crumble Bars aren’t just a dessert, they’re a little slice of comfort, a hug in bar form, reminding me of those happy, chaotic baking days. They’ve become a family favorite, a sweet memory of fall.
I remember one time, I got so excited about the apple filling that I totally forgot to press down the base layer properly. The result? A slightly crumbly mess that still tasted divine, but definitely wasn’t “bar” shaped. My husband just laughed and grabbed a spoon. That’s the beauty of these Apple Crumble Bars, even when they’re imperfect, they’re still utterly delicious. No need for perfection here, just good, honest baking.

Apple Crumble Bars: Ingredients
- All-Purpose Flour: This is the backbone of our crumble. Honestly, I’ve tried whole wheat, and while it works, it gives a denser bar. Stick to all-purpose for that classic tender-crisp texture.
- Old-Fashioned Rolled Oats: Don’t even think about instant oats here, hon. The old-fashioned kind gives that satisfying chewiness to the Apple Crumble Bars. It’s a texture thing, and it matters!
- Cold Unsalted Butter: This is key for a flaky, tender crumble. I’ve definitely tried using slightly softened butter in a pinch, and the crumble just doesn’t get that lovely, distinct texture. Keep it cold, trust me.
- Granulated Sugar: For sweetness in both the crust and the filling. I once accidentally used brown sugar in the crust, and while it was okay, it made the Apple Crumble Bars a bit too rich for my taste.
- Brown Sugar (packed): This brings that deep, caramel-like sweetness to our apple filling. It’s non-negotiable for that warm, inviting flavor.
- Granny Smith Apples: My absolute favorite for Apple Crumble Bars. They hold their shape beautifully and offer that perfect tart counterpoint to the sweetness. I’ve tried other apples, but sometimes they turn to mush, which is a bit of a kitchen disaster for bars.
- Cinnamon: The star spice! It just screams fall. Honestly, I sometimes add a tiny bit more than the recipe calls for because, well, I love cinnamon.
- Nutmeg: Just a whisper of this really enhances the apple flavor. Don’t go overboard, or it can be a bit much.
- Lemon Juice: A splash brightens the apples and keeps them from browning. It’s a small detail, but it makes a difference in these Apple Crumble Bars.
How to Make Apple Crumble Bars
- Prepare the Crumble:
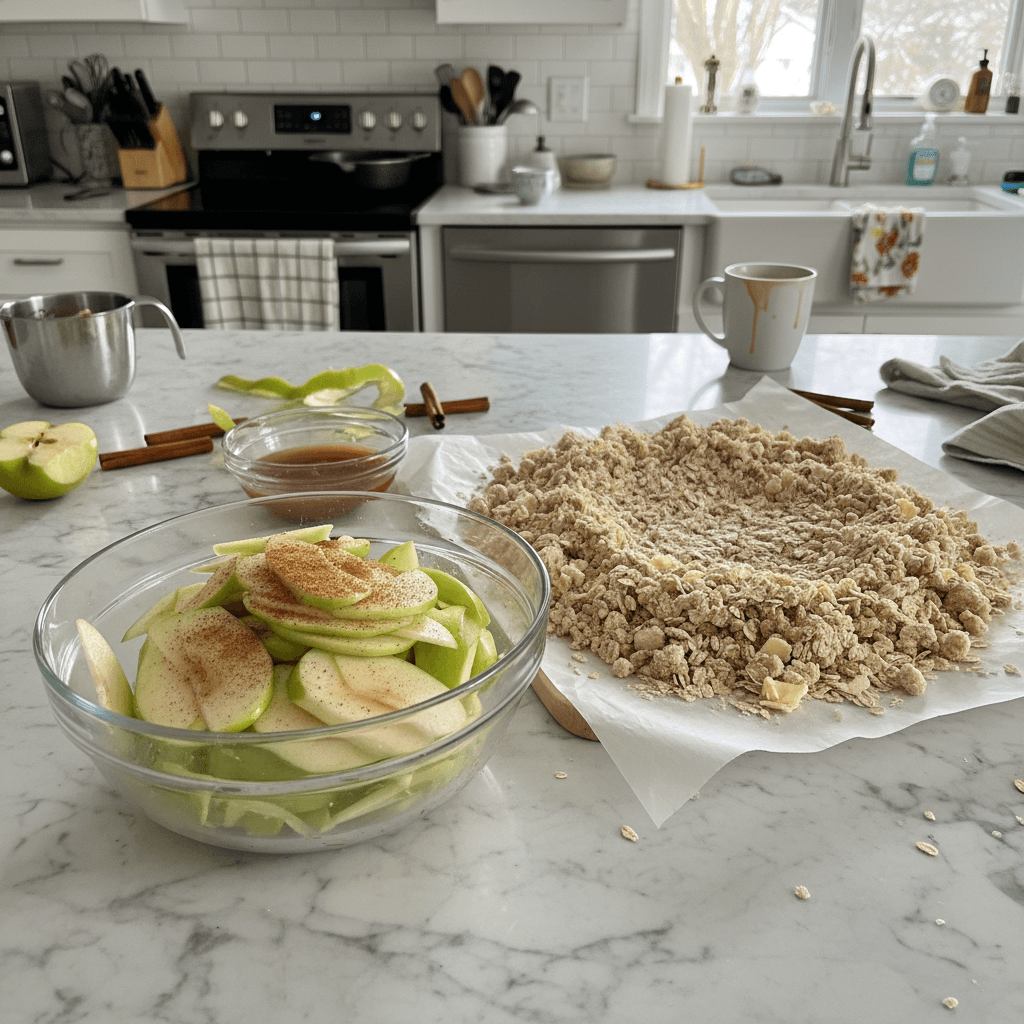
- First things first, preheat your oven to 375°F (190°C) and line a 9×13 inch baking pan with parchment paper, leaving an overhang on the sides. This makes lifting the Apple Crumble Bars out so much easier, honestly. In a large bowl, whisk together the flour, rolled oats, granulated sugar, and a pinch of salt. Then, cut your very cold butter into small cubes and use a pastry blender or your fingertips to cut it into the dry ingredients until it resembles coarse crumbs. I usually end up with a bit of a floury mess on my counter at this stage, but it’s all part of the charm!
- Form the Base of Your Apple Crumble Bars:
- Take about two-thirds of that glorious crumble mixture and press it firmly and evenly into the bottom of your prepared baking pan. Really get in there and compact it! I’ve definitely made the mistake of not pressing hard enough, and then the base crumbles apart when you try to slice the Apple Crumble Bars. Learn from my oops moment, a firm base is crucial. Pop this into the preheated oven for about 10-12 minutes, just until it’s lightly golden. You want a head start on that crispiness.
- Whip Up the Apple Filling:
- While the base is baking, peel, core, and dice your Granny Smith apples into small, uniform pieces. This is where I sometimes get a little too enthusiastic with the dicing, but consistency helps them cook evenly. In a separate bowl, toss the diced apples with the brown sugar, cinnamon, nutmeg, and lemon juice. Give it a good stir until every apple piece is coated. The smell alone at this stage? Divine! It smells like autumn magic, honestly.
- Assemble Your Apple Crumble Bars:
- Once the base is lightly golden, carefully pull it out of the oven. Spread the apple filling evenly over the warm crust. Don’t be shy, pile those apples high! Then, sprinkle the remaining one-third of the crumble mixture generously over the top of the apples. This is the part that will get wonderfully golden and crunchy, adding that essential texture to our Apple Crumble Bars. I usually try to get an even distribution, but a little haphazardness gives it a rustic charm, right?
- Bake to Golden Perfection:
- Return the pan to the oven and bake for another 35-45 minutes, or until the apples are tender when pierced with a fork, and the topping is a beautiful golden brown. Your kitchen will smell absolutely incredible, trust me. I’ve definitely peeked in the oven too many times, which probably doesn’t help with even baking, but I just can’t resist that aroma! The edges of the Apple Crumble Bars should be bubbling gently.
- Cool and Enjoy Your Apple Crumble Bars:
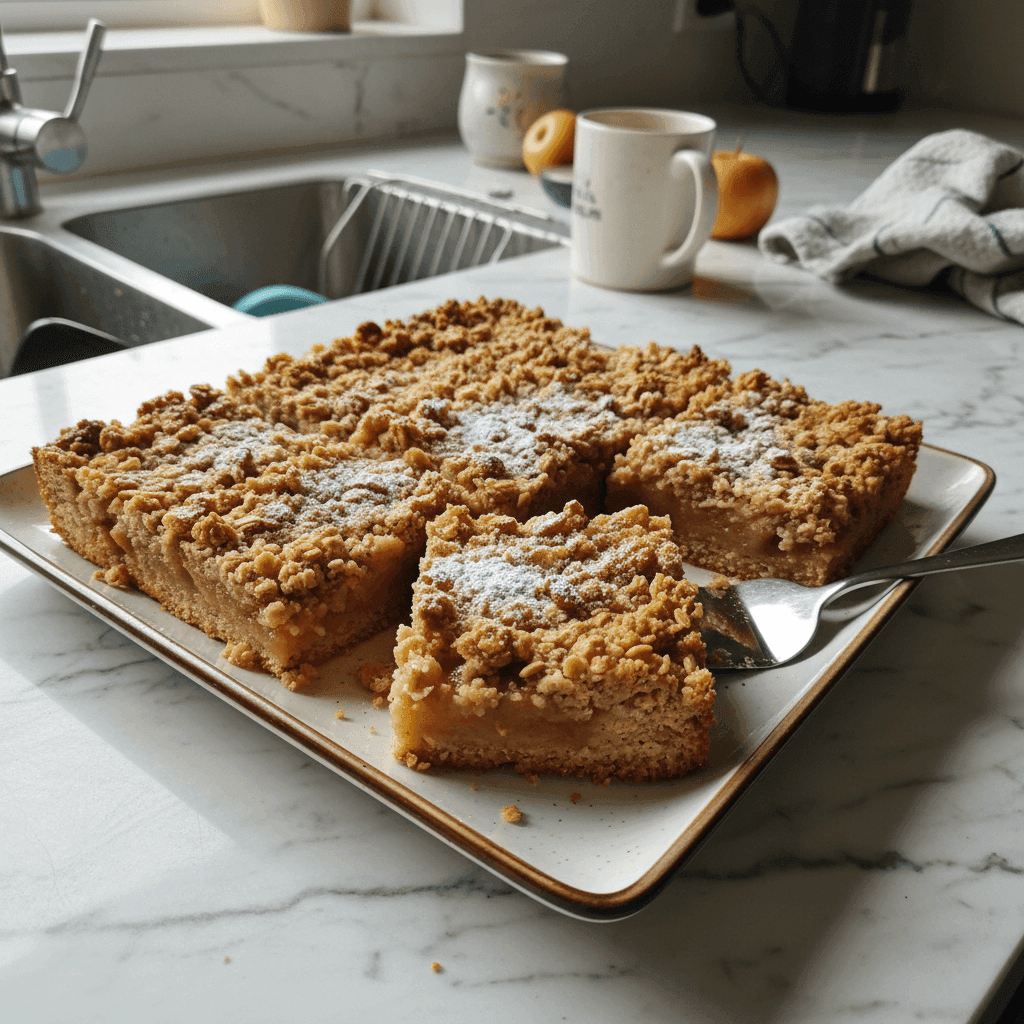
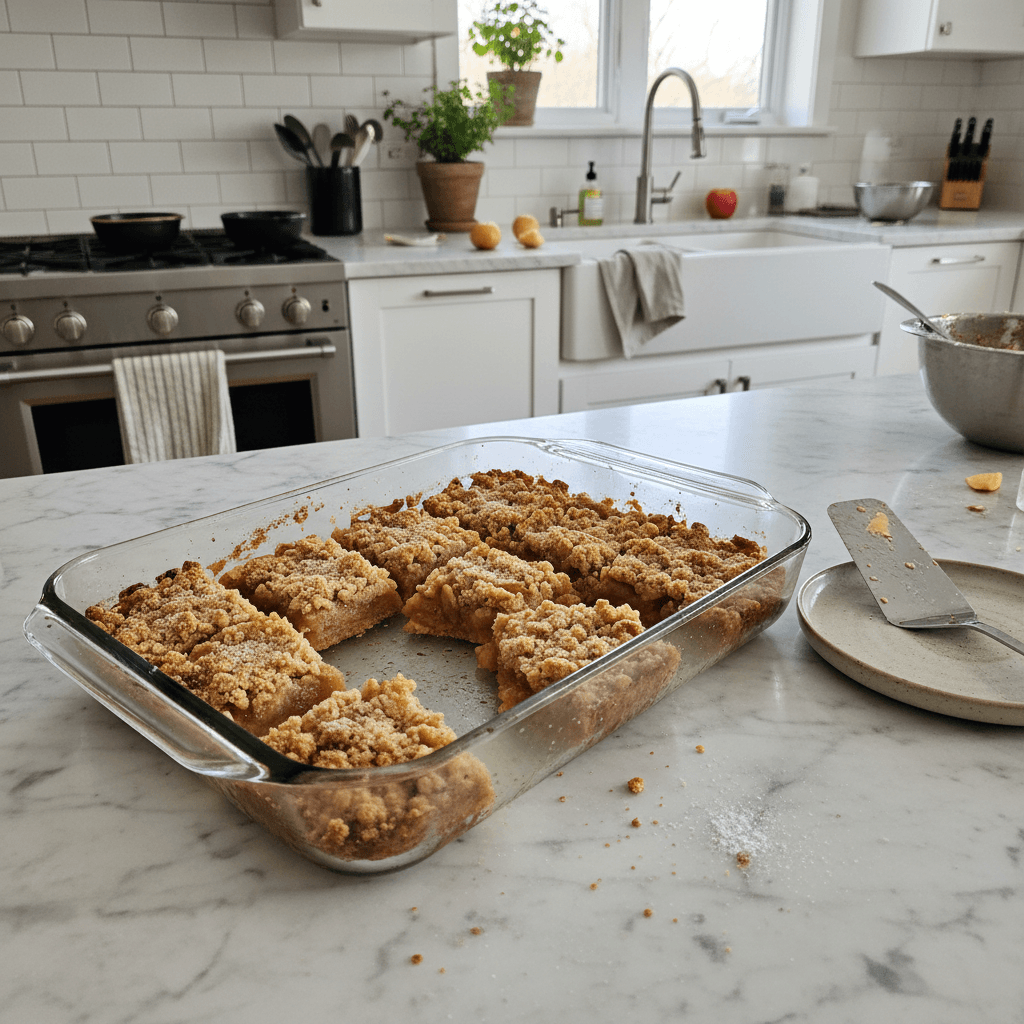
- This is the hardest part, honestly waiting! Let the Apple Crumble Bars cool completely in the pan on a wire rack before attempting to slice them. I know, I know, it’s tempting to dig in right away, but if you try to cut them warm, they’ll fall apart. I learned that the hard way, with a spoon and a very messy plate. Once cooled, use the parchment paper overhang to lift the entire slab out and then slice into individual bars. They should look gorgeous, smell amazing, and taste like pure, apple-y bliss!
Baking these Apple Crumble Bars always brings me back to simpler times. There’s something so grounding about the process, from peeling the apples to watching the crumble turn golden. One time, my dog, Buster, snuck a tiny piece off the cooling rack when I wasn’t looking. He was fine, just a little extra pep in his step! It just goes to show, even the furry family members can’t resist these delightful treats.
Apple Crumble Bars: Storage Tips
Storing these Apple Crumble Bars is pretty straightforward, thankfully. Once they’re completely cooled (and I mean completely, or you’ll get condensation and a soggy top, I’ve made that mistake!), you can store them in an airtight container at room temperature for up to 3 days. If you want them to last a bit longer, pop them in the fridge for up to a week. I’ve microwaved a cold bar once for a quick warm-up, and while it was still tasty, the crumble lost a bit of its crispness. My personal tip? If you want that fresh-baked crunch, a few minutes in a toaster oven works wonders for reheating. They also freeze beautifully! Just wrap individual bars tightly in plastic wrap, then foil, and they’ll keep for up to 2-3 months. Thaw them at room temperature or warm gently in the oven.
Apple Crumble Bars: Ingredient Substitutions
Okay, so I’ve experimented a bit here, because, well, that’s what we home cooks do, right? For the apples in these Apple Crumble Bars, while Granny Smiths are my top pick for their tartness and firm texture, I’ve tried Honeycrisp or Fuji apples, and they work, but they’re sweeter, so you might want to dial back the brown sugar a touch. I once tried Red Delicious, and honestly, they turned to total mush live and learn! If you’re out of all-purpose flour for the crumble, a 1:1 gluten-free baking blend usually works pretty well, though the texture might be a tiny bit different. For the oats, old-fashioned is truly best, but quick oats can work in a pinch for a softer crumble, though I wouldn’t recommend it if you want that classic chew. You could swap out some of the cinnamon for apple pie spice if you’re feeling fancy, I’ve done that and it adds a lovely depth of flavor.
Serving Your Apple Crumble Bars
Oh, the ways to enjoy these Apple Crumble Bars! My absolute favorite is warm, with a scoop of really good vanilla bean ice cream melting slowly over the top. It’s just a classic for a reason, that warm-cold, sweet-tart combo is pure magic. A dollop of whipped cream is also a fantastic choice, especially if you want something a little lighter. For a truly indulgent experience, a drizzle of homemade caramel sauce takes them to another level I usually save that for special occasions, or when I’m having a particularly rough day. Honestly, these bars are also fantastic with a strong cup of coffee or a warm mug of spiced cider on a chilly evening. They make for a delightful breakfast too, I won’t tell if you don’t! Pair them with a cozy blanket and a good book for maximum comfort.
The Story Behind Apple Crumble Bars
Apple crumbles, in their many forms, have a lovely, humble history, often linked to Britain during wartime when ingredients for traditional pies were scarce. The crumble topping was a clever, less fussy way to make a comforting dessert. These Apple Crumble Bars are my own take on that classic, making it portable and perfect for sharing (or, let’s be real, hoarding). My grandma used to make a similar apple bake, and while hers was in a dish, the smell of cinnamon and baked apples always brings me back to her kitchen. This recipe is a nod to those simple, comforting desserts that just make you feel loved. It’s about taking those classic flavors and turning them into something that fits perfectly into our busy lives, a little piece of tradition with a modern, convenient twist.
So there you have it, my beloved Apple Crumble Bars recipe. They’re a little bit of work, a little bit of love, and a whole lot of deliciousness. I hope they bring as much joy and comfort to your kitchen as they do to mine. Don’t be afraid to get a little flour on your nose, or to make a happy mess. That’s what home baking is all about, right? If you give these a try, I’d honestly love to hear how your Apple Crumble Bars turn out!
Frequently Asked Questions About Apple Crumble Bars
- → Can I use other types of apples for these Apple Crumble Bars?
Yes, you can! I’ve had success with Honeycrisp or Fuji, but they’re sweeter, so I’d reduce the sugar a bit. Just avoid really soft apples like Red Delicious, they tend to get mushy, and nobody wants mushy Apple Crumble Bars!
- → What if I don’t have old-fashioned oats for the Apple Crumble Bars?
You can use quick oats in a pinch, but the texture of the crumble will be softer and less chewy. Old-fashioned oats really give these Apple Crumble Bars that satisfying bite, so I always recommend them if you can get them!
- → How do I prevent the bottom crust of my Apple Crumble Bars from being soggy?
Ah, the soggy bottom! My trick is pre-baking the crust for about 10-12 minutes before adding the apple filling. Also, make sure your apples aren’t too watery, a splash of lemon juice helps, but don’t add extra liquid!
- → How long do Apple Crumble Bars last, and how should I store them?
Once cooled, they’re good for 3 days at room temperature in an airtight container, or up to a week in the fridge. I’ve even frozen them for a couple of months. Just make sure they’re completely cool before storing, I learned that the hard way!
- → Can I add nuts or other spices to my Apple Crumble Bars?
Absolutely! I sometimes add a handful of chopped walnuts or pecans to the crumble for extra crunch. A touch of ginger or allspice in the apple filling can also be lovely, honestly, just experiment with what you like!

Rustic Apple Crumble Bars: A Sweet Fall Treat
- Prep Time: 20 Minutes
- Cook Time: 55 Minutes
- Total Time: 75 Minutes
- Yield: 12 Servings 1x
- Category: Home
Description
Rustic Apple Crumble Bars with spiced apples and buttery oat topping. A delightful, easy-to-make dessert for any season. Get the recipe!
Ingredients
- Crumble Base & Topping:
- 2 cups (240g) all-purpose flour
- 1 ½ cups (135g) old-fashioned rolled oats
- 1 cup (226g) cold unsalted butter, cubed
- ½ cup (100g) granulated sugar
- ¼ teaspoon salt
- Apple Filling:
- 6 medium (about 4–5 cups diced) Granny Smith apples, peeled, cored, and diced
- ½ cup (100g) packed light brown sugar
- 1 tablespoon lemon juice
- Flavor Boosters:
- 1 ½ teaspoons ground cinnamon
- ¼ teaspoon ground nutmeg
Instructions
- Prepare the Crumble:: First things first, preheat your oven to 375°F (190°C) and line a 9×13 inch baking pan with parchment paper, leaving an overhang on the sides. This makes lifting the Apple Crumble Bars out so much easier, honestly. In a large bowl, whisk together the flour, rolled oats, granulated sugar, and a pinch of salt. Then, cut your very cold butter into small cubes and use a pastry blender or your fingertips to cut it into the dry ingredients until it resembles coarse crumbs. I usually end up with a bit of a floury mess on my counter at this stage, but it’s all part of the charm!
- Form the Base of Your Apple Crumble Bars:: Take about two-thirds of that glorious crumble mixture and press it firmly and evenly into the bottom of your prepared baking pan. Really get in there and compact it! I’ve definitely made the mistake of not pressing hard enough, and then the base crumbles apart when you try to slice the Apple Crumble Bars. Learn from my oops moment, a firm base is crucial. Pop this into the preheated oven for about 10-12 minutes, just until it’s lightly golden. You want a head start on that crispiness.
- Whip Up the Apple Filling:: While the base is baking, peel, core, and dice your Granny Smith apples into small, uniform pieces. This is where I sometimes get a little too enthusiastic with the dicing, but consistency helps them cook evenly. In a separate bowl, toss the diced apples with the brown sugar, cinnamon, nutmeg, and lemon juice. Give it a good stir until every apple piece is coated. The smell alone at this stage? Divine! It smells like autumn magic, honestly.
- Assemble Your Apple Crumble Bars:: Once the base is lightly golden, carefully pull it out of the oven. Spread the apple filling evenly over the warm crust. Don’t be shy; pile those apples high! Then, sprinkle the remaining one-third of the crumble mixture generously over the top of the apples. This is the part that will get wonderfully golden and crunchy, adding that essential texture to our Apple Crumble Bars. I usually try to get an even distribution, but a little haphazardness gives it a rustic charm, right?
- Bake to Golden Perfection:: Return the pan to the oven and bake for another 35-45 minutes, or until the apples are tender when pierced with a fork, and the topping is a beautiful golden brown. Your kitchen will smell absolutely incredible, trust me. I’ve definitely peeked in the oven too many times, which probably doesn’t help with even baking, but I just can’t resist that aroma! The edges of the Apple Crumble Bars should be bubbling gently.
- Cool and Enjoy Your Apple Crumble Bars:: This is the hardest part, honestly – waiting! Let the Apple Crumble Bars cool completely in the pan on a wire rack before attempting to slice them. I know, I know, it’s tempting to dig in right away, but if you try to cut them warm, they’ll fall apart. I learned that the hard way, with a spoon and a very messy plate. Once cooled, use the parchment paper overhang to lift the entire slab out and then slice into individual bars. They should look gorgeous, smell amazing, and taste like pure, apple-y bliss!


