
I remember the first time I really saw rhubarb, not just in a pie, but really saw it. It was at a little farmer’s market, those vibrant ruby-red stalks practically glowing. My mind immediately went to pies, crumbles, all the usual suspects, but then a little voice, probably fueled by a craving for something a bit more… substantial, whispered “cheesecake.” Honestly, the idea of pairing that tart, bright rhubarb with a creamy, rich cheesecake felt a bit rebellious at first, but these Rhubarb Cheesecake Squares became my little kitchen triumph. The smells that filled my kitchen as they baked? Oh, pure bliss a mix of sweet vanilla, tangy fruit, and that warm, buttery crust. A truly comforting vibe.
\n

\n
My first attempt at these Rhubarb Cheesecake Squares wasn’t without its drama, of course. I got a little overzealous with the rhubarb topping and it bubbled over, making a sticky mess in the oven. The smoke alarm even had a moment! But that’s cooking, right? You learn, you clean, and you adjust. The next batch, I used a slightly deeper pan and reduced the rhubarb liquid a touch. Small adjustments, big difference. That’s the real magic of home baking, I think.
\n
Ingredients for Rhubarb Cheesecake Squares
\n
Crust Foundation
- Graham Cracker Crumbs: These are the backbone of our crust, giving it that familiar, comforting crunch. I always go for the pre-crushed kind, saves a messy step, honestly.
- Granulated Sugar: Just a touch to sweeten the crust and help it crisp up. Don’t go wild, we want the cheesecake and rhubarb to shine.
- Unsalted Butter (melted): This binds the crumbs together beautifully. Don’t use margarine, it just doesn’t give the same rich flavor or texture, I’ve tried.
Creamy Cheesecake Core
- Cream Cheese (full-fat, softened): The star of the show! Full-fat is non-negotiable here, you need that richness. I once tried light cream cheese, and it was… well, let’s just say it lacked the soul these Rhubarb Cheesecake Squares deserve.
- Granulated Sugar: Sweetens our creamy layer. You can adjust this slightly if your rhubarb is particularly tart, or if you just prefer a less sweet dessert.
- Large Eggs: These are crucial for structure and creaminess. Make sure they’re at room temperature, it helps everything mix smoothly without lumps.
- Vanilla Extract: A splash of pure vanilla is a must for that classic cheesecake warmth. I use a good quality one, it really makes a difference, honestly.
- Lemon Zest: This brightens up the cheesecake layer beautifully, a little secret weapon that complements the rhubarb so well. Don’t skip it!
Tart Rhubarb Topping
- Fresh Rhubarb (chopped): The hero of our topping! Those vibrant pink and green stalks bring all the tang. If you’re using frozen, thaw it first and drain any excess water, or your topping might get too watery.
- Granulated Sugar: Balances the rhubarb’s tartness. You might need to adjust based on how sweet your rhubarb is, or your personal preference.
- Cornstarch: Our thickening agent. It ensures the rhubarb topping stays put and doesn’t make the cheesecake soggy. I mixed it with water once, and it worked okay.
- Water or Orange Juice: Just enough liquid to get the rhubarb cooking down into a lovely compote. Orange juice adds a nice extra layer of flavor, I think.
Making Your Rhubarb Cheesecake Squares
- Prepare the Crust Foundation:
- First things first, preheat your oven to 350°F (175°C) and grab an 8×8 inch baking pan. Line it with parchment paper, leaving an overhang on the sides trust me, this makes getting your Rhubarb Cheesecake Squares out so much easier later. In a medium bowl, mix those graham cracker crumbs with the sugar. Pour in the melted butter and stir until it’s all moistened, like wet sand. Press this mixture firmly into the bottom of your prepared pan. I use the bottom of a glass to get it really compact, don’t be shy! Pop it in the oven for about 8-10 minutes until it’s lightly golden. Take it out and let it cool a bit while you move on.
- Whip Up the Creamy Cheesecake Core:
- While the crust cools, let’s tackle the cheesecake layer. In a large bowl, using an electric mixer, beat the softened cream cheese and sugar together until it’s super smooth and fluffy. This is where you want to avoid lumps, so scrape down the sides of the bowl often. Once it’s creamy, beat in the eggs one at a time, mixing just until combined after each addition. This is a critical step, overmixing here can incorporate too much air, which can cause your cheesecake to crack. Finally, stir in the vanilla extract and that lovely lemon zest. The smell alone is already making me happy!
- Craft the Tart Rhubarb Topping:
- Now for the star of the show, the rhubarb! In a medium saucepan, combine your chopped rhubarb, sugar, cornstarch, and water (or orange juice). Stir it all together until the cornstarch is dissolved. Bring the mixture to a simmer over medium heat, stirring pretty constantly. Let it cook for about 5-7 minutes, or until the rhubarb softens and the mixture thickens into a lovely, glossy compote. It should coat the back of a spoon. Take it off the heat and let it cool down a little, we don’t want to put hot rhubarb on our delicate cheesecake batter!
- Assemble Your Rhubarb Cheesecake Squares:
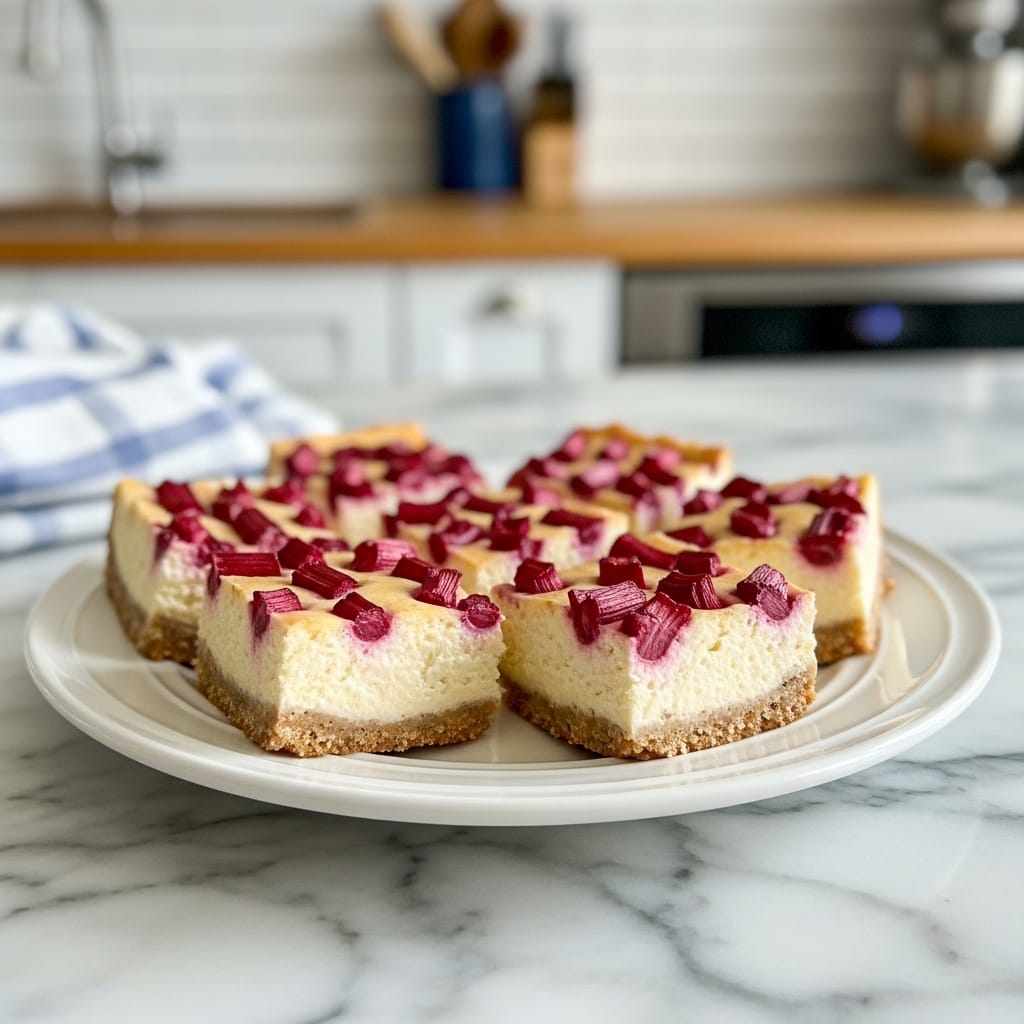
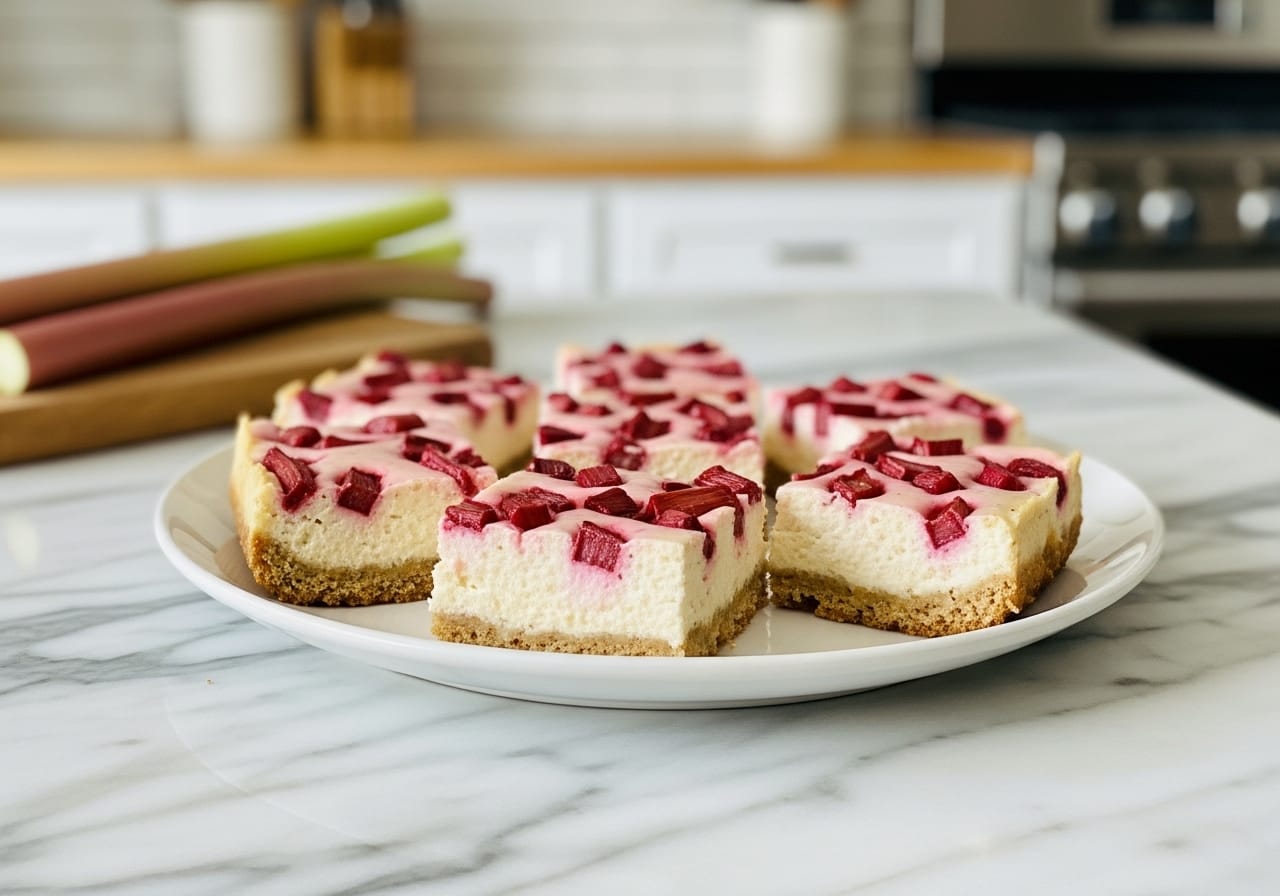
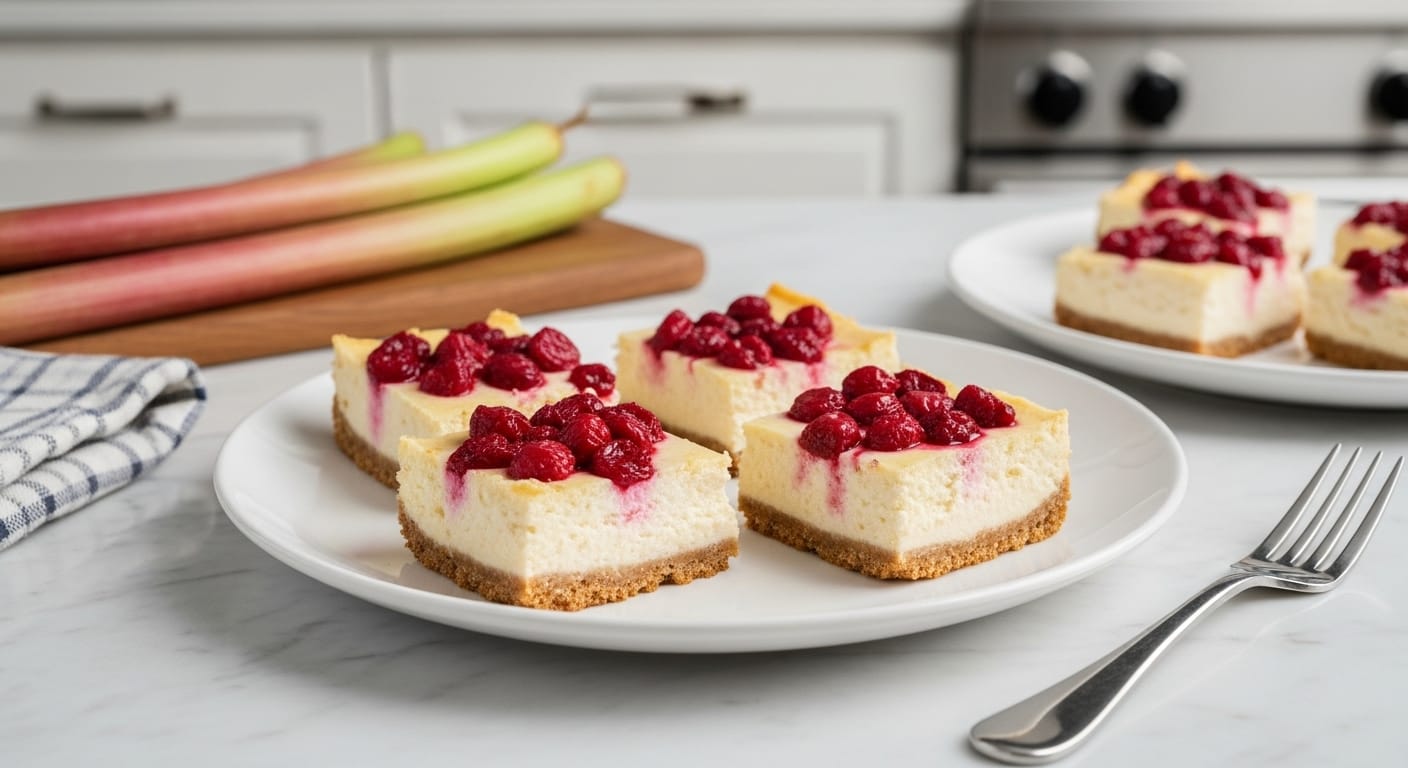
- Time to bring it all together! Pour the cheesecake batter evenly over your cooled graham cracker crust in the pan. Now, here’s where it gets artistic: spoon dollops of the cooled rhubarb topping over the cheesecake layer. You can leave it as dollops, or if you’re feeling fancy, take a knife and gently swirl the rhubarb into the cheesecake. Don’t go too crazy with the swirling, though, or you’ll mix it all in too much. I usually just do a few lazy swirls, it looks rustic and lovely. The contrast of the white and red is just beautiful.
- Bake to Golden Perfection:
- Carefully place your pan back into the preheated oven. Bake for about 40-45 minutes. You’re looking for the edges to be set, but the center should still have a slight jiggle that’s how you know it’s perfectly cooked. Don’t worry if it doesn’t look completely firm, it will set up more as it cools. Overbaking can lead to a dry cheesecake, and nobody wants that! My kitchen always smells incredible at this point, a mix of sweet and tangy. Once done, turn off the oven, crack the door slightly, and let the cheesecake cool in the oven for another 15 minutes. This helps prevent cracking.
- Cool and Chill for the Best Rhubarb Cheesecake Squares:
- After its oven cool-down, take the pan out and place it on a wire rack to cool completely to room temperature. This usually takes an hour or two. Patience is key here, honestly! Once cool, cover the pan loosely with plastic wrap and transfer it to the refrigerator. You’ll want to chill these Rhubarb Cheesecake Squares for at least 4 hours, but overnight is even better. Chilling makes them firm up beautifully, ensuring clean, perfect slices. This is where the magic truly happens, trust me, it’s worth the wait for those perfect Rhubarb Cheesecake Squares.
\n
There was one time I was rushing and tried to slice them before they were fully chilled. Oh, the humanity! Crumbly mess, cheesecake squishing out, a true kitchen disaster. I learned my lesson then: these Rhubarb Cheesecake Squares demand patience. But when they’re perfectly set, and you cut into them, seeing those distinct layers of crust, creamy cheesecake, and tart rhubarb? Pure satisfaction. It really makes all the little kitchen chaos worth it.
\n
Storage Tips for Rhubarb Cheesecake Squares
These Rhubarb Cheesecake Squares are fantastic for making ahead, which is a huge plus in my book! Once they’re completely cooled and chilled, you can store them in an airtight container in the refrigerator for up to 3-4 days. I’ve found they actually taste even better the next day, as the flavors have more time to meld together. If you’re stacking them, place a piece of parchment paper between the layers to prevent them from sticking. Freezing? You can, but it’s a bit tricky. I tried freezing a whole batch once, and while edible, the texture of the cheesecake wasn’t quite as smooth and creamy after thawing. If you must freeze, wrap individual squares tightly in plastic wrap, then foil, and store in a freezer-safe bag for up to 1 month. Thaw them in the fridge overnight. Just don’t microwave them to thaw, it’ll mess with the texture, trust me.
\n
\n
Ingredient Substitutions for Rhubarb Cheesecake Squares
Life happens, and sometimes you don’t have exactly what the recipe calls for. For the crust, vanilla wafers or even shortbread cookies can be crushed and used instead of graham crackers. I tried shortbread once, and it gave it a really buttery, delicate crunch kinda worked even better for a fancy feel! If fresh rhubarb isn’t available, frozen works perfectly. Just make sure to thaw it completely and drain any excess liquid before cooking it down for the topping, otherwise, your Rhubarb Cheesecake Squares might end up a bit watery. For a slightly different flavor profile in the rhubarb topping, you could swap some of the sugar for maple syrup or a touch of honey, but start with less and taste as you go. And if you’re not a fan of lemon zest, a tiny splash of orange zest can provide a similar bright lift to the cheesecake layer.
Serving Rhubarb Cheesecake Squares
These Rhubarb Cheesecake Squares are pretty perfect on their own, honestly. But if you want to elevate the experience, I’ve got some ideas! A simple dollop of freshly whipped cream on top is always a winner, adding another layer of creamy texture. Or, for a truly decadent treat, a small scoop of vanilla bean ice cream melting slightly into the tart rhubarb and cool cheesecake is just heavenly. I love serving these with a strong cup of coffee in the morning (yes, for breakfast, don’t judge!) or a comforting mug of herbal tea in the afternoon. They also make a lovely light dessert after a spring dinner, maybe with a glass of sparkling rosé. They’re versatile, really, perfect for a casual snack or a more special occasion, and always hit that sweet-tart spot.
The Story Behind Rhubarb Cheesecake Squares
Rhubarb itself has a fascinating history, often called the “pie plant” because it was so commonly used in desserts, especially when other fruits were out of season. It’s technically a vegetable, but its tartness makes it a culinary fruit in our kitchens! Combining it with cheesecake, a dessert with its own ancient roots, feels like a modern twist on a classic pairing. Cheesecake, in various forms, has been around since ancient Greece, evolving over centuries. My own connection to these Rhubarb Cheesecake Squares started with that farmer’s market find, but it grew into something more. It became a way for me to celebrate spring’s bounty, to bring a little bit of that vibrant outdoor energy into my kitchen. It’s not just a recipe, it’s a feeling, a little taste of home and renewal that I hope you find too.
\n
Honestly, these Rhubarb Cheesecake Squares have become a staple in my spring baking rotation. There’s something so satisfying about the way the tart rhubarb cuts through the rich cheesecake, all balanced by that buttery crust. Every time I make them, I’m reminded of that first market trip, and how a simple idea can turn into something truly delicious. I hope you give them a try and maybe even create your own little kitchen story with them. Let me know how your batch turns out!
\n
\n
Frequently Asked Questions
- → Can I use frozen rhubarb for these Rhubarb Cheesecake Squares?
Yes, absolutely! Just make sure to thaw it completely first and drain any excess liquid. Otherwise, your topping might become too watery, and we don’t want that!
- → Why did my cheesecake crack while baking?
Oh, the dreaded crack! It often happens from overmixing the batter or cooling it too quickly. Try not to overbeat the eggs and let it cool gradually in the oven with the door ajar.
- → How do I know when my Rhubarb Cheesecake Squares are done baking?
The edges should be set, but the center should still have a slight jiggle when you gently shake the pan. Don’t worry, it will firm up nicely as it cools and chills!
- → Can I make these Rhubarb Cheesecake Squares ahead of time?
Yes, please do! They actually taste even better the next day once the flavors have had a chance to fully develop. Just store them covered in the fridge.
- → What other fruits could I use instead of rhubarb in this recipe?
Strawberries, blueberries, or even a mixed berry compote would work beautifully! Just adjust the sugar content based on the sweetness of your chosen fruit. I’ve tried blueberries, and it was pretty good!
Tangy Rhubarb Cheesecake Squares: A Springtime Treat
- Prep Time: 30 Minutes
- Cook Time: 45 Minutes
- Total Time: 1 Hour 15 Minutes
- Yield: 12 Servings 1x
- Category: Dessert
Description
Bake delightful Rhubarb Cheesecake Squares! This recipe balances tart rhubarb with creamy cheesecake for a perfect spring dessert.
Ingredients
- Crust Foundation:
- 1 ½ cups graham cracker crumbs (about 10–12 full sheets)
- ¼ cup granulated sugar
- 6 tbsp unsalted butter, melted
- Creamy Cheesecake Core:
- 2 (8 oz) packages full-fat cream cheese, softened
- ½ cup granulated sugar
- 2 large eggs, room temperature
- 1 tsp vanilla extract
- 1 tsp lemon zest
- Tart Rhubarb Topping:
- 2 cups fresh rhubarb, chopped into ½-inch pieces
- ½ cup granulated sugar (adjust to taste)
- 1 tbsp cornstarch
- ¼ cup water or orange juice
Instructions
- Prepare the Crust Foundation:: First things first, preheat your oven to 350°F (175°C) and grab an 8×8 inch baking pan. Line it with parchment paper, leaving an overhang on the sides – trust me, this makes getting your Rhubarb Cheesecake Squares out so much easier later. In a medium bowl, mix those graham cracker crumbs with the sugar. Pour in the melted butter and stir until it’s all moistened, like wet sand. Press this mixture firmly into the bottom of your prepared pan. I use the bottom of a glass to get it really compact; don’t be shy! Pop it in the oven for about 8-10 minutes until it’s lightly golden. Take it out and let it cool a bit while you move on.
- Whip Up the Creamy Cheesecake Core:: While the crust cools, let’s tackle the cheesecake layer. In a large bowl, using an electric mixer, beat the softened cream cheese and sugar together until it’s super smooth and fluffy. This is where you want to avoid lumps, so scrape down the sides of the bowl often. Once it’s creamy, beat in the eggs one at a time, mixing just until combined after each addition. This is a critical step; overmixing here can incorporate too much air, which can cause your cheesecake to crack. Finally, stir in the vanilla extract and that lovely lemon zest. The smell alone is already making me happy!
- Craft the Tart Rhubarb Topping:: Now for the star of the show, the rhubarb! In a medium saucepan, combine your chopped rhubarb, sugar, cornstarch, and water (or orange juice). Stir it all together until the cornstarch is dissolved. Bring the mixture to a simmer over medium heat, stirring pretty constantly. Let it cook for about 5-7 minutes, or until the rhubarb softens and the mixture thickens into a lovely, glossy compote. It should coat the back of a spoon. Take it off the heat and let it cool down a little; we don’t want to put hot rhubarb on our delicate cheesecake batter!
- Assemble Your Rhubarb Cheesecake Squares:: Time to bring it all together! Pour the cheesecake batter evenly over your cooled graham cracker crust in the pan. Now, here’s where it gets artistic: spoon dollops of the cooled rhubarb topping over the cheesecake layer. You can leave it as dollops, or if you’re feeling fancy, take a knife and gently swirl the rhubarb into the cheesecake. Don’t go too crazy with the swirling, though, or you’ll mix it all in too much. I usually just do a few lazy swirls; it looks rustic and lovely. The contrast of the white and red is just beautiful.
- Bake to Golden Perfection:: Carefully place your pan back into the preheated oven. Bake for about 40-45 minutes. You’re looking for the edges to be set, but the center should still have a slight jiggle – that’s how you know it’s perfectly cooked. Don’t worry if it doesn’t look completely firm; it will set up more as it cools. Overbaking can lead to a dry cheesecake, and nobody wants that! My kitchen always smells incredible at this point, a mix of sweet and tangy. Once done, turn off the oven, crack the door slightly, and let the cheesecake cool in the oven for another 15 minutes. This helps prevent cracking.
- Cool and Chill for the Best Rhubarb Cheesecake Squares:: After its oven cool-down, take the pan out and place it on a wire rack to cool completely to room temperature. This usually takes an hour or two. Patience is key here, honestly! Once cool, cover the pan loosely with plastic wrap and transfer it to the refrigerator. You’ll want to chill these Rhubarb Cheesecake Squares for at least 4 hours, but overnight is even better. Chilling makes them firm up beautifully, ensuring clean, perfect slices. This is where the magic truly happens, trust me, it’s worth the wait for those perfect Rhubarb Cheesecake Squares.


