
Honestly, I remember the first time I tried to make a Red Velvet Oreo Cheesecake. It was a complete disaster! My kitchen looked like a crime scene with red food coloring everywhere, and the cheesecake itself… well, let’s just say it leaned more ‘leaning tower of Pisa’ than ‘decadent dessert’. But oh, the idea of it! That rich red velvet, the creamy cheesecake, the crunchy Oreos it just spoke to my soul. That initial flop fueled a mission, and after many attempts (and a few more kitchen explosions), I finally cracked the code. This isn’t just a recipe, it’s a triumph over sticky situations and a testament to the fact that persistence, even in baking, pays off. This Red Velvet Oreo Cheesecake is the one that started it all for me, and I can’t wait for you to try it.
One time, I was so excited to pull my Red Velvet Oreo Cheesecake out of the oven, I completely forgot about the water bath. Steam billowed, I screamed a little, and the cheesecake emerged with a crack so wide you could practically drive a truck through it. My family still teases me about ‘Grand Canyon Cheesecake.’ It tasted good, bless its heart, but it looked like a battle scar. I learned my lesson that day: patience, Nina, patience! Now, I always double-check everything, even when I’m buzzing with anticipation.

Ingredients for Red Velvet Oreo Cheesecake
- Oreo Cookies: About 36 cookies, crushed fine. Don’t skimp here, the Oreo crust is the foundation of this Red Velvet Oreo Cheesecake’s magic. I usually just blitz them in my food processor until they’re like sand, cream filling and all.
- Unsalted Butter: Melted, for binding the crust. I’ve tried using less butter once, and the crust was crumbly and sad. Just embrace the butter, it’s worth it for that perfect crunch.
Full-Fat Cream Cheese: Room temperature is non-negotiable, hon! If it’s cold, you’ll get lumps in your Red Velvet Oreo Cheesecake batter, and nobody wants lumpy cheesecake. I always use Philadelphia brand, it just works best.
Granulated Sugar: Sweetens the cheesecake. I once accidentally grabbed powdered sugar instead, and the texture was all off. Stick to granulated, trust me on this.
Large Eggs: Room temperature, too! They incorporate better into the batter, making for a smoother, richer Red Velvet Oreo Cheesecake. I’ve broken a yolk or two in my day, but it’s fine, just get another one.
Sour Cream: Full-fat, room temperature. This is my secret weapon for that extra creamy, slightly tangy cheesecake texture. It balances the sweetness beautifully. I tried Greek yogurt once, and it was… okay, but not the same.
- Vanilla Extract: Pure vanilla is key. Don’t use imitation if you can help it, the flavor difference in this Red Velvet Oreo Cheesecake is noticeable. It’s like the soul of the dessert.
- Red Gel Food Coloring: This is where you get that vibrant red velvet color. Liquid food coloring just won’t cut it, it’ll make your batter too thin and the color will be pink, not red. I learned that the hard way, my first attempt looked like a pastel dream, not a decadent dessert.
- All-Purpose Flour: Just a touch! It helps prevent cracking in your Red Velvet Oreo Cheesecake, giving it a bit more structure. I used to skip this, and my cheesecakes would always get those little hairline fractures.
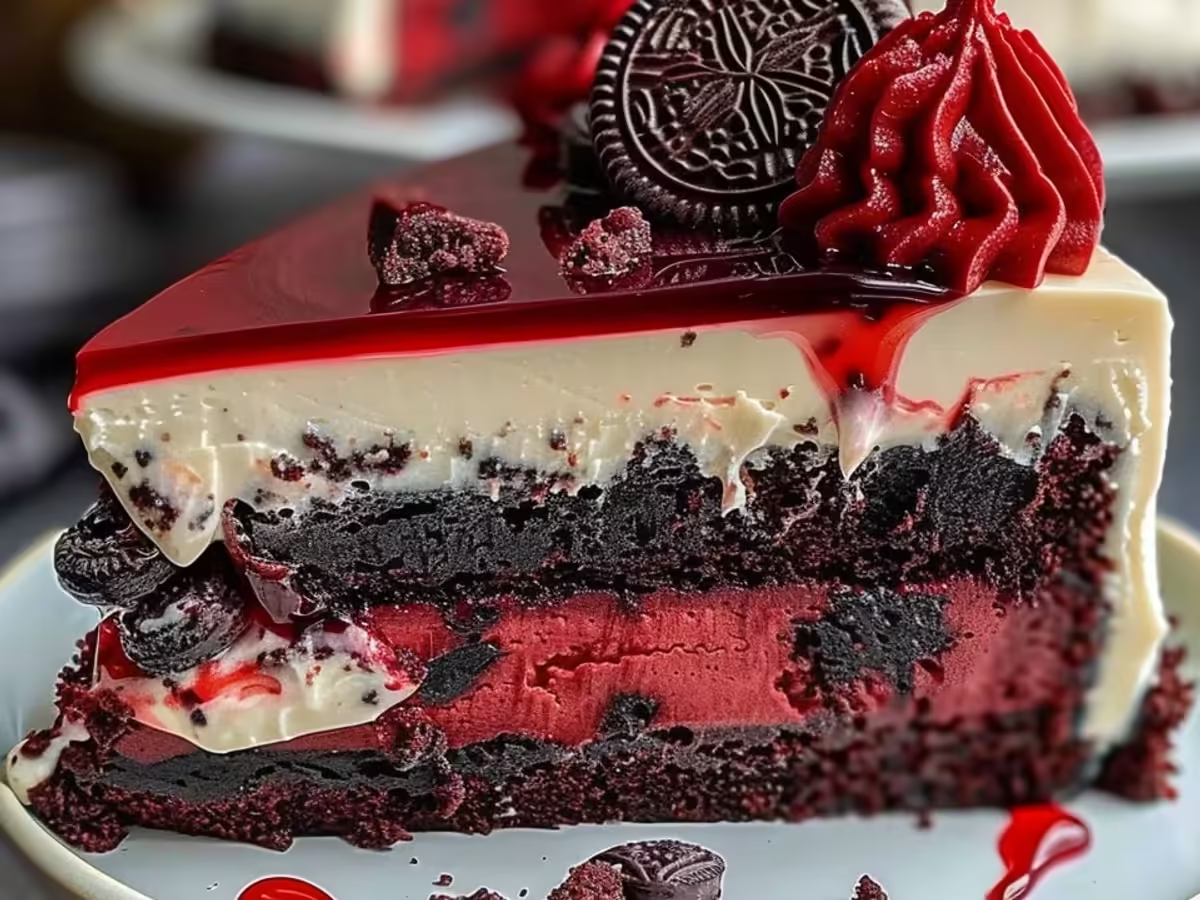
- Extra Crushed Oreos: For swirling into the batter and sprinkling on top. Because more Oreos are always a good idea, right? This takes your Red Velvet Oreo Cheesecake to the next level.
- Cream Cheese Frosting Ingredients: Softened cream cheese, unsalted butter, powdered sugar, vanilla extract, and a splash of milk. This isn’t strictly necessary, but for a true Red Velvet Oreo Cheesecake experience, I wouldn’t skip it!
Instructions for Red Velvet Oreo Cheesecake
- Prep the Crust & Pan:
- First things first, let’s get that crust ready for your Red Velvet Oreo Cheesecake. Grab your 9-inch springform pan and lightly grease it. Now, take those crushed Oreos and mix them with the melted butter in a medium bowl until they’re all coated and look like wet sand. Press this mixture firmly into the bottom of your prepared pan. I like to use the bottom of a flat glass to really pack it down it helps create a sturdy base that won’t crumble when you cut into it. Pop this in the fridge for at least 15 minutes to firm up. Honestly, I’ve skipped this chilling step before, and the crust was a bit of a mess. Don’t be like me, chill that crust!
- Whip the Cheesecake Batter:
- While the crust chills, let’s get that creamy Red Velvet Oreo Cheesecake batter going. In a large bowl, beat the softened cream cheese and granulated sugar together with an electric mixer until it’s super smooth and fluffy, no lumps allowed! This usually takes me about 3-4 minutes. Then, beat in the sour cream and vanilla extract until just combined. Don’t overmix here, we’re aiming for smooth, not airy. I once beat it way too long, and my cheesecake turned out a bit airy, which isn’t what we want for that dense, creamy texture. Keep it mellow.
- Add Eggs and Color:
- Now for the eggs add them one at a time, mixing on low speed just until each egg is incorporated. Seriously, just until it disappears into the batter, overmixing eggs can introduce too much air, which leads to cracks in your Red Velvet Oreo Cheesecake later. After the eggs, gently mix in the red gel food coloring until you get that rich, vibrant red velvet shade you’re dreaming of. This is where the magic happens! Finally, fold in the all-purpose flour. I always forget this little bit of flour, but it truly helps with preventing those dreaded cracks. Just a quick fold, and you’re good to go.
- Assemble and Swirl:
- Pour about two-thirds of your gorgeous Red Velvet Oreo Cheesecake batter over the chilled Oreo crust. Now, sprinkle about half of your extra crushed Oreos over the batter. Take the remaining one-third of batter and gently spoon it over the Oreos. Use a knife or a skewer to gently swirl the top layer of batter and Oreos. Don’t overdo the swirling, hon, we want distinct layers, not a muddy mess. I’ve definitely made it look like a brown-red blob before, so learn from my mistakes less is more when it comes to swirling!
- Bake with a Water Bath:
- This is the crucial step for a crack-free Red Velvet Oreo Cheesecake! Wrap the bottom of your springform pan tightly with several layers of heavy-duty aluminum foil to prevent water from seeping in. Place the foil-wrapped pan into a larger roasting pan. Carefully pour hot water into the roasting pan until it comes about halfway up the sides of the springform pan. Bake in a preheated 325°F (160°C) oven for about 60-75 minutes. The center should still be slightly jiggly when you gently shake the pan, it will firm up as it cools. I once didn’t wrap the foil tight enough, and my Red Velvet Oreo Cheesecake got a soggy bottom. Total bummer, so wrap it well!
- Cool and Chill:
- Once baked, turn off the oven and prop the oven door open slightly, letting the Red Velvet Oreo Cheesecake cool in the oven for an hour. This gradual cooling helps prevent cracks. After an hour, remove it from the oven and the water bath, then let it cool completely on a wire rack at room temperature. Once fully cooled, cover it loosely and transfer it to the refrigerator to chill for at least 6-8 hours, or even better, overnight. I know, the waiting is the hardest part! But trust me, a properly chilled Red Velvet Oreo Cheesecake is a happy Red Velvet Oreo Cheesecake. It just tastes so much better when it’s had time to set.
Making this Red Velvet Oreo Cheesecake has become a little ritual in my kitchen. There’s something so satisfying about seeing that vibrant red batter come together, knowing the deliciousness that’s about to unfold. I even have a specific red apron I wear just for red velvet baking, which, let’s be real, still ends up with red splatters. It’s a messy process sometimes, but the joy of slicing into that creamy, crunchy beauty makes every single red speckle worth it. This Red Velvet Oreo Cheesecake is a labor of love.
Red Velvet Oreo Cheesecake Storage Tips
Okay, so you’ve got leftover Red Velvet Oreo Cheesecake a good problem to have, honestly! To keep it tasting fresh, you’ll want to store any uneaten slices or the whole cake in an airtight container in the refrigerator. I usually wrap individual slices in plastic wrap first, then pop them into a container. This helps prevent the cheesecake from absorbing any fridge odors, which, trust me, can happen! I once left a slice uncovered, and it tasted faintly of last night’s garlic bread. Not ideal, lol. Your Red Velvet Oreo Cheesecake will stay lovely and delicious for about 4-5 days in the fridge. For longer storage, you can actually freeze individual slices! Just wrap them tightly in plastic wrap, then a layer of foil, and they’ll keep well for up to a month. Thaw them in the fridge overnight before serving. Don’t try to microwave it to thaw, that’s another mistake I’ve made, and it just gets weirdly soft and watery.

Red Velvet Oreo Cheesecake Ingredient Substitutions
Life happens, and sometimes you don’t have exactly what the recipe calls for. I get it! For the Oreo crust, if you’re out of Oreos (gasp!), you could try chocolate graham crackers mixed with a little cocoa powder for a similar chocolatey base for your Red Velvet Oreo Cheesecake. It worked, kinda, when I was in a pinch, but the Oreo distinctiveness wasn’t there. For the sour cream, full-fat plain Greek yogurt can be a decent substitute for that tang and creaminess, but expect a slightly different texture a little denser, maybe. I’ve tried it, and while it’s okay, the sour cream gives a truly richer, smoother Red Velvet Oreo Cheesecake. As for the red food coloring, please, please use gel! Liquid versions will thin your batter and give you a sad, pale pink, not the show-stopping red this Red Velvet Oreo Cheesecake deserves. I learned that the hard way, thinking ‘more liquid equals more color,’ nope, just watery batter.
Serving Your Red Velvet Oreo Cheesecake
This Red Velvet Oreo Cheesecake is a star on its own, but a few little touches can make it an absolute showstopper. I love serving slices with a dollop of homemade whipped cream, just for that extra cloud-like softness against the rich cheesecake. Sometimes, I’ll sprinkle a few extra crushed Oreos or even some chocolate shavings on top for a bit more texture and visual appeal. For drinks, a strong cup of coffee or a glass of cold milk is classic, but if you’re feeling fancy, a sparkling rosé or even a dry red wine pairs surprisingly well with the richness. Honestly, this Red Velvet Oreo Cheesecake and a good book on a rainy afternoon? That’s my kind of perfect pairing. It’s the kind of dessert that feels special, no matter the occasion.
Cultural Backstory of Red Velvet Oreo Cheesecake
The Red Velvet Oreo Cheesecake itself is a modern twist on a classic. Red velvet cake has a fascinating history, starting as a luxurious dessert, sometimes colored with beet juice or non-Dutched cocoa powder reacting with buttermilk and vinegar to create that reddish-brown hue. During WWII, bakers used beet juice to enhance the color. It really gained popularity in the South, becoming a staple. Cheesecake, on the other hand, dates back to ancient Greece! Combining them, especially with the addition of Oreos, is a purely American innovation, born from a love of decadence. My grandma used to make a killer red velvet cake, and she’d always tell me stories about how it was a treat only for the fanciest occasions. This Red Velvet Oreo Cheesecake feels like a nod to her old-school charm, but with my own playful, modern spin. It’s a taste of history, with a fun, crunchy twist.
So there you have it, my friends. This Red Velvet Oreo Cheesecake is more than just a dessert, it’s a journey, a memory, and honestly, a little piece of my heart on a plate. It’s been through kitchen chaos, triumphant moments, and has always brought a smile to faces. I hope you love making it as much as I do, and that it brings a little bit of sweet celebration to your home. Don’t forget to share your own Red Velvet Oreo Cheesecake adventures with me!

Red Velvet Oreo Cheesecake Frequently Asked Questions
- → Why did my Red Velvet Oreo Cheesecake crack?
Oh, the dreaded crack! In my experience, it’s usually from overbaking or a drastic temperature change. Make sure you use that water bath, and let your Red Velvet Oreo Cheesecake cool gradually in the oven with the door ajar. It’s a patience game, I know!
- → Can I use reduced-fat cream cheese for this Red Velvet Oreo Cheesecake?
I wouldn’t recommend it, honestly. I tried it once to be ‘healthy,’ and the texture just wasn’t the same, it was a bit watery and less creamy. For that truly decadent Red Velvet Oreo Cheesecake experience, stick with full-fat cream cheese.
- → How do I get the perfect red velvet color for my Red Velvet Oreo Cheesecake?
Gel food coloring is your best friend here! Liquid coloring just doesn’t deliver that deep, vibrant red without thinning the batter too much. A little bit of gel goes a long way for a stunning Red Velvet Oreo Cheesecake.
- → How long does Red Velvet Oreo Cheesecake last?
Stored properly in an airtight container in the fridge, your Red Velvet Oreo Cheesecake will stay delicious for about 4-5 days. I usually grab a slice for my morning coffee, it’s a little treat!
- → Can I make this Red Velvet Oreo Cheesecake ahead of time?
Absolutely! This Red Velvet Oreo Cheesecake is a fantastic make-ahead dessert. I often bake it a day or two before I need it, the flavors actually deepen and it sets up beautifully. Perfect for parties, less stress for you!
Rich Red Velvet Oreo Cheesecake: A Sweet Celebration
- Prep Time: 45 Minutes
- Cook Time: 70 Minutes
- Total Time: 4 Hours
- Yield: 12 Servings 1x
- Category: AllRecipes
Description
Red Velvet Oreo Cheesecake: Craving something special? This decadent recipe layers creamy cheesecake, red velvet, & Oreo crunch. Get yours!
Ingredients
- Crust Ingredients:
- 36 Oreo cookies, crushed
- 6 tablespoons unsalted butter, melted
- Cheesecake Batter:
- 3 (8-ounce) packages full-fat cream cheese, softened to room temperature
- 1 ½ cups granulated sugar
- 4 large eggs, room temperature
- ⅔ cup full-fat sour cream, room temperature
- 2 teaspoons vanilla extract
- 2 teaspoons red gel food coloring
- 2 tablespoons all-purpose flour
- Oreo Swirl & Topping:
- ½ cup extra crushed Oreo cookies
- Optional Cream Cheese Frosting:
- 4 ounces cream cheese, softened
- 4 tablespoons unsalted butter, softened
- 2 cups powdered sugar
- ½ teaspoon vanilla extract
- 1–2 tablespoons milk
Instructions
- Prep the Crust & Pan:: First things first, let’s get that crust ready for your Red Velvet Oreo Cheesecake. Grab your 9-inch springform pan and lightly grease it. Now, take those crushed Oreos and mix them with the melted butter in a medium bowl until they’re all coated and look like wet sand. Press this mixture firmly into the bottom of your prepared pan. I like to use the bottom of a flat glass to really pack it down – it helps create a sturdy base that won’t crumble when you cut into it. Pop this in the fridge for at least 15 minutes to firm up. Honestly, I’ve skipped this chilling step before, and the crust was a bit of a mess. Don’t be like me, chill that crust!
- Whip the Cheesecake Batter:: While the crust chills, let’s get that creamy Red Velvet Oreo Cheesecake batter going. In a large bowl, beat the softened cream cheese and granulated sugar together with an electric mixer until it’s super smooth and fluffy, no lumps allowed! This usually takes me about 3-4 minutes. Then, beat in the sour cream and vanilla extract until just combined. Don’t overmix here, we’re aiming for smooth, not airy. I once beat it way too long, and my cheesecake turned out a bit airy, which isn’t what we want for that dense, creamy texture. Keep it mellow.
- Add Eggs and Color:: Now for the eggs – add them one at a time, mixing on low speed just until each egg is incorporated. Seriously, just until it disappears into the batter; overmixing eggs can introduce too much air, which leads to cracks in your Red Velvet Oreo Cheesecake later. After the eggs, gently mix in the red gel food coloring until you get that rich, vibrant red velvet shade you’re dreaming of. This is where the magic happens! Finally, fold in the all-purpose flour. I always forget this little bit of flour, but it truly helps with preventing those dreaded cracks. Just a quick fold, and you’re good to go.
- Assemble and Swirl:: Pour about two-thirds of your gorgeous Red Velvet Oreo Cheesecake batter over the chilled Oreo crust. Now, sprinkle about half of your extra crushed Oreos over the batter. Take the remaining one-third of batter and gently spoon it over the Oreos. Use a knife or a skewer to gently swirl the top layer of batter and Oreos. Don’t overdo the swirling, hon; we want distinct layers, not a muddy mess. I’ve definitely made it look like a brown-red blob before, so learn from my mistakes – less is more when it comes to swirling!
- Bake with a Water Bath:: This is the crucial step for a crack-free Red Velvet Oreo Cheesecake! Wrap the bottom of your springform pan tightly with several layers of heavy-duty aluminum foil to prevent water from seeping in. Place the foil-wrapped pan into a larger roasting pan. Carefully pour hot water into the roasting pan until it comes about halfway up the sides of the springform pan. Bake in a preheated 325°F (160°C) oven for about 60-75 minutes. The center should still be slightly jiggly when you gently shake the pan; it will firm up as it cools. I once didn’t wrap the foil tight enough, and my Red Velvet Oreo Cheesecake got a soggy bottom. Total bummer, so wrap it well!
- Cool and Chill:: Once baked, turn off the oven and prop the oven door open slightly, letting the Red Velvet Oreo Cheesecake cool in the oven for an hour. This gradual cooling helps prevent cracks. After an hour, remove it from the oven and the water bath, then let it cool completely on a wire rack at room temperature. Once fully cooled, cover it loosely and transfer it to the refrigerator to chill for at least 6-8 hours, or even better, overnight. I know, the waiting is the hardest part! But trust me, a properly chilled Red Velvet Oreo Cheesecake is a happy Red Velvet Oreo Cheesecake. It just tastes so much better when it’s had time to set.
- Prepare Optional Frosting:: If you’re going for the full Red Velvet Oreo Cheesecake experience, whip up that frosting! In a medium bowl, beat the softened cream cheese and butter until light and fluffy. Gradually add the powdered sugar, beating until smooth. Stir in the vanilla extract, and then add milk a tablespoon at a time until you reach your desired consistency. I like mine thick enough to spread but still creamy. Spread this glorious frosting over your chilled Red Velvet Oreo Cheesecake just before serving for an extra touch of decadence.


