
I remember the first time I tried a chocolate orange combo. It was at a little bakery, a tiny tart, and honestly, I didn’t expect to love it so much. My brain just went, “Wait, these two? Together?” But oh, they sang! That moment sparked a mission: to create a dessert that captured that same zingy, decadent magic. My kitchen, well, it’s seen its share of chocolate orange experiments since then, some glorious, some… less so. But this Rich Chocolate Orange Cheesecake? This one, hon, is the keeper. It’s got that creamy, dreamy texture with a bright citrus kick that just makes my heart happy.
My first attempt at a Chocolate Orange Cheesecake involved a springform pan that, unbeknownst to me, had a tiny leak. I pulled it out of the oven, proud as punch, only to find a sad puddle of cheesecake batter slowly oozing onto the oven floor. Cleanup was a nightmare, and honestly, I almost gave up. But the smell! The sheer potential kept me going. Lesson learned: always, always double-check that pan seal. Or just wrap it in foil, like I do now.

Ingredients for Your Chocolate Orange Cheesecake
- Chocolate Wafer Cookies: These give us that deep, dark chocolate base. Don’t skimp on quality here, it makes a difference, I swear. I’ve tried using regular Oreos once, and it was fine, but these wafers? They’re the real deal.
- Unsalted Butter: Melts down to bind our crust together. I usually have a stick or two chilling in the fridge. Honestly, I’ve tried using less butter to be “healthier,” but the crust just doesn’t hold up as well. Live a little, right?
- Cream Cheese: Full-fat, room temperature. Please, for the love of all that is creamy, don’t use the low-fat stuff. It just won’t give you that luxurious texture we’re after. I learned that the hard way with a surprisingly watery cheesecake. Oops.
- Granulated Sugar: Sweetens things up, obviously. I sometimes play with the amount, depending on how tart my oranges are, but this amount is usually spot-on.
- Large Eggs: Binders! They help set the cheesecake beautifully. Make sure they’re at room temp too, it helps everything blend smoothly. I once added cold eggs, and it created little lumps. Not cute.
- Orange Zest: This is where the magic happens! Bright, aromatic, and just bursts with fresh orange flavor. I always use a microplane for this, it gets the finest zest without any bitter pith. The smell alone is heavenly.
- Orange Juice: Freshly squeezed is non-negotiable for this Chocolate Orange Cheesecake. Bottled juice just doesn’t have the same vibrant kick, and honestly, it shows. I sometimes add a tiny splash more if I’m feeling extra zesty.
- Dark Chocolate: Good quality dark chocolate, 60-70% cocoa. This isn’t the time for chocolate chips, hon. Chop up a good bar, you’ll taste the difference. I’ve tried milk chocolate, and it was too sweet, lost the sophisticated edge.
- Heavy Cream: Creates that silky ganache. Make sure it’s cold before you heat it, and don’t let it boil, just a gentle simmer. I once scorched it, and the whole kitchen smelled like burnt sugar. Not my finest moment.
- Vanilla Extract: A splash just rounds out all the flavors. I’m a bit heavy-handed with vanilla, I’ll admit it. Good quality vanilla makes a difference, trust me.
- Pinch of Salt: Balances the sweetness and really brings out the chocolate and orange notes. Don’t skip it! It’s tiny but mighty.
Crafting Your Chocolate Orange Cheesecake
- Prepare the Crust:
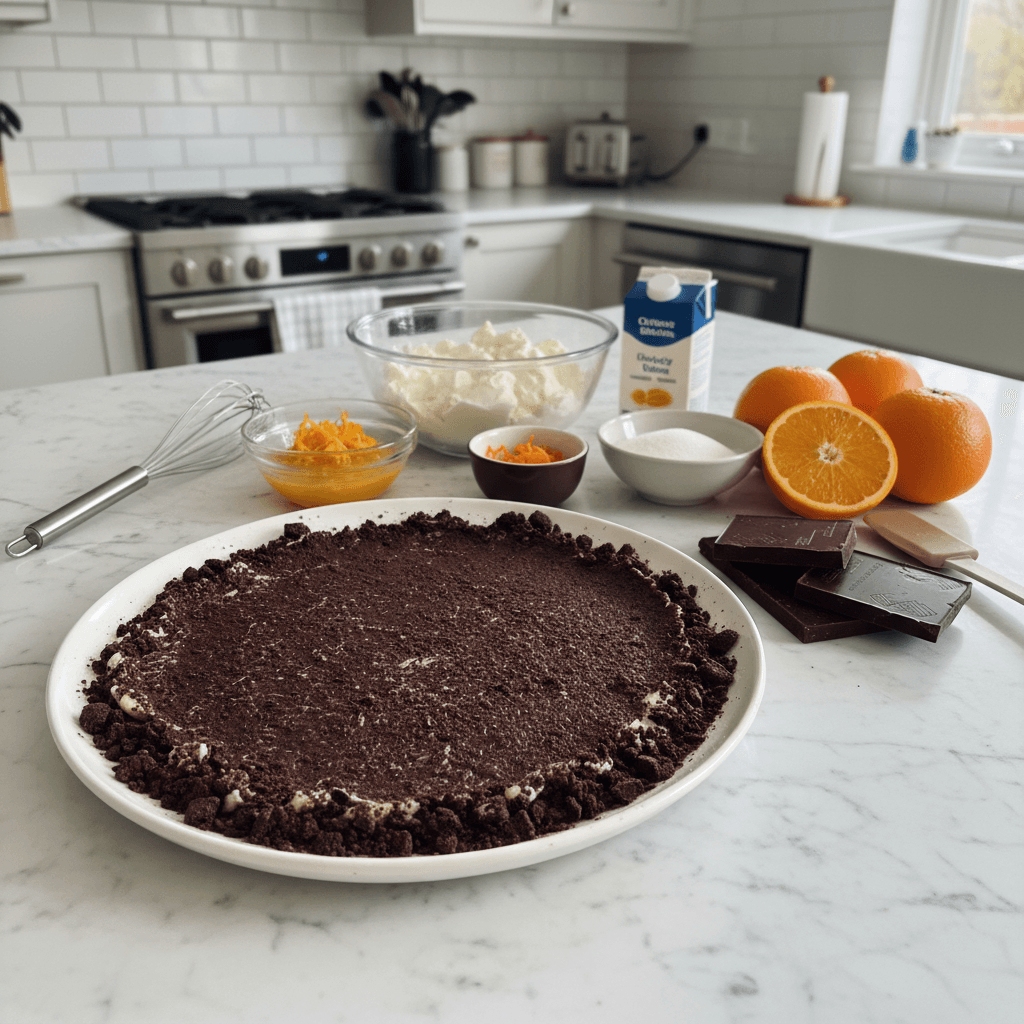
- Alright, first things first, let’s get that oven preheating to 350°F (175°C), and make sure you’ve got your springform pan ready. I usually line the bottom with parchment paper and grease the sides it helps so much with removal later, honestly. Then, crush those chocolate wafers until they’re fine crumbs. A food processor makes quick work of this, but I’ve totally used a Ziploc bag and a rolling pin in a pinch, just embrace the chaos! Mix those crumbs with your melted butter until it looks like wet sand, then press it firmly into the bottom of your prepared pan. I use the bottom of a flat glass to get it really compact. Pop it in the oven for about 8-10 minutes, just to set it a bit, then let it cool while you work on the filling. Don’t forget this step, a pre-baked crust is key!
- Whip Up the Creamy Filling:
- Now for the good stuff! In a large bowl, beat your room-temperature cream cheese and granulated sugar together until it’s super smooth and fluffy, no lumps allowed! I start on low speed, then crank it up. Scrape down the sides of the bowl often, because honestly, sometimes those sneaky bits of cream cheese hide. Once it’s looking gloriously creamy, beat in the orange zest, fresh orange juice, and vanilla extract. Oh, the smell at this point is just incredible, so zesty and bright! Mix until just combined, we don’t want to overmix here. Overmixing can incorporate too much air, which can lead to cracks. Oops, learned that one the hard way!
- Gently Incorporate Eggs:
- This is a delicate step, hon. Add your eggs one at a time, mixing on low speed just until each egg is incorporated. Don’t beat them to death, we’re aiming for smooth, not frothy. Overmixing the eggs can also contribute to those dreaded cracks in your cheesecake, and trust me, nobody wants a cracked cheesecake on their watch! The mixture should look silky and uniform. I usually stop the mixer and give it a final gentle stir with a spatula, just to make sure everything is perfectly blended from the bottom up. It should feel rich and thick, ready for its big bake!
- Bake Your Chocolate Orange Cheesecake:
- Pour that beautiful filling over your cooled crust. Now, here’s a trick I swear by: a water bath! Wrap the outside of your springform pan tightly with heavy-duty foil (I usually do two layers, just to be safe, remembering that leaky pan incident). Place the pan in a larger roasting pan, then carefully pour hot water into the roasting pan until it comes about halfway up the sides of your cheesecake pan. This creates a moist baking environment that helps prevent cracks and ensures a super creamy texture. Bake for 50-60 minutes, or until the edges are set but the center still has a slight wobble when you gently jiggle the pan. Don’t open the oven door too often, that’s my personal rule!
- Cool Down Slowly:
- Once it’s baked, turn off the oven but leave the cheesecake inside with the door slightly ajar for about an hour. This slow cooling prevents drastic temperature changes that can cause cracking. Honestly, this step feels like torture because you just want to dig in, but patience is key here! After an hour, take the cheesecake out of the water bath and remove the foil. Let it cool completely on a wire rack at room temperature. It needs to be totally cool before it goes into the fridge, or condensation will form. I sometimes forget and get impatient, but it’s not worth it!
- Chill & Top with Ganache:
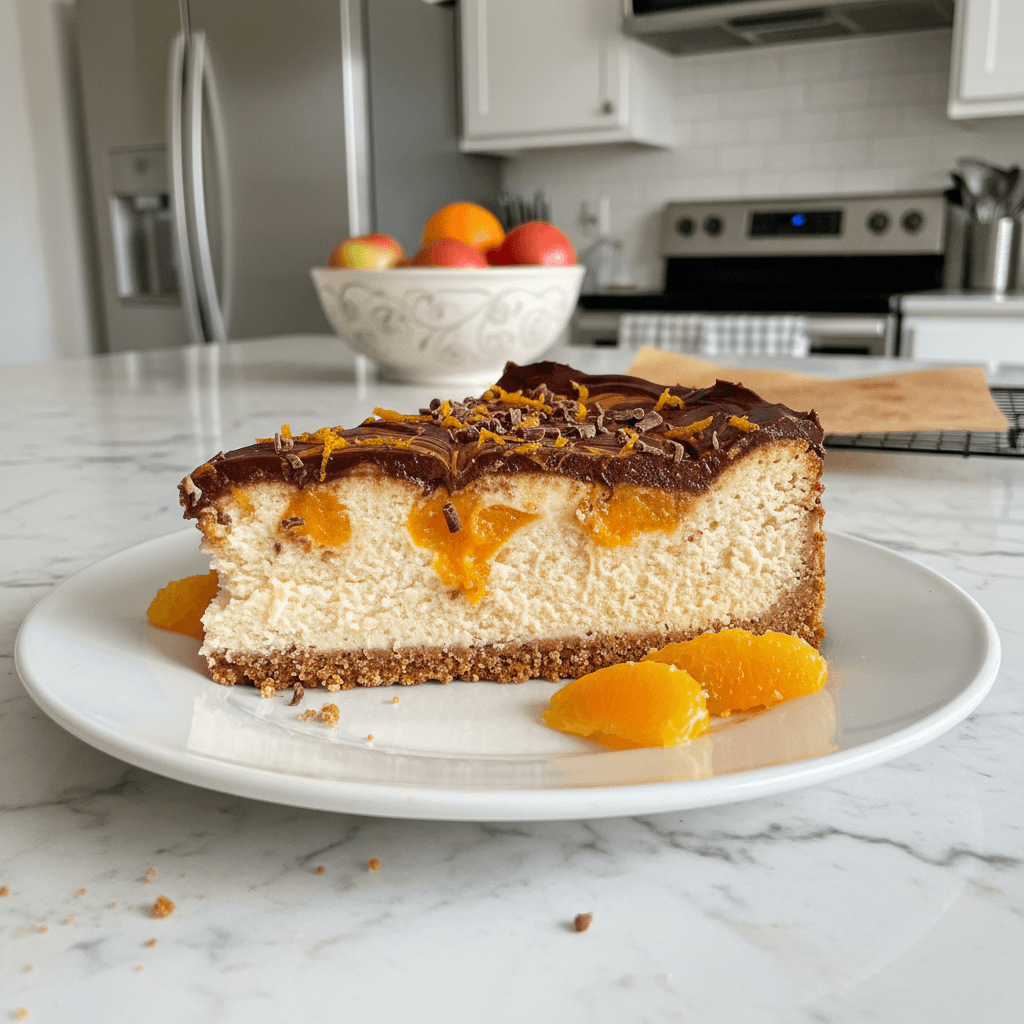
- Once completely cool, cover the cheesecake loosely with plastic wrap and chill it in the refrigerator for at least 6 hours, or even better, overnight. This is crucial for it to fully set and develop its flavors. While it’s chilling, make your ganache: heat the heavy cream until just simmering, then pour it over your chopped dark chocolate. Let it sit for 5 minutes, then whisk until smooth and glossy. Once the cheesecake is chilled, pour the slightly cooled ganache over the top, spreading it gently. You can add extra orange zest for a pop of color and extra zing. Then, slice it up and enjoy your masterpiece! The smell of the chocolate and orange together is just divine.
There was one time I was making this for a friend’s birthday, and my kitchen was a total disaster zone. Flour everywhere, chocolate smears on the counter, and I almost grabbed the wrong zest (lemon instead of orange, can you imagine?!). But through all the chaos, the smell of that orange zest hitting the cream cheese just centered me. It’s funny how certain scents can do that, isn’t it? Even with the mess, the end result was a showstopper, and my friend absolutely loved it.
Storage Tips for Chocolate Orange Cheesecake
Okay, so you’ve made this glorious Chocolate Orange Cheesecake, and hopefully, you have some left! Storing it properly is key to keeping it tasting fresh and delicious. I usually keep mine in an airtight container or covered tightly with plastic wrap in the refrigerator. Honestly, I once left a slice uncovered for a few hours, and the edges started to dry out not the end of the world, but definitely not ideal for that creamy texture we worked so hard for. It holds up beautifully in the fridge for up to 4-5 days. If you’re feeling ambitious, you can even freeze individual slices (without the ganache, or add it fresh after thawing) for a quick treat later. Just wrap them really well in plastic wrap and then foil. Thaw in the fridge overnight. I’ve found that freezing the whole cheesecake with the ganache can sometimes make the ganache a bit dull, so I prefer to add it fresh if I’m freezing.

Ingredient Substitutions for Chocolate Orange Cheesecake
Sometimes you’re just missing an ingredient, right? I get it. For the crust, if you can’t find chocolate wafers, you can totally use regular chocolate sandwich cookies (like Oreos, just scrape out the cream filling, or leave it for extra sweetness). I tried graham crackers once, and it worked, kinda, but the chocolate flavor wasn’t as deep. For the orange, honestly, fresh zest and juice are hard to beat. But in a real pinch, you could use a tiny bit of orange extract for the zest, just be super careful, it’s potent! I’ve even swapped the orange for lemon zest and juice for a “Chocolate Lemon Cheesecake,” and it was surprisingly good, a different vibe but still lovely. Don’t be afraid to experiment a little, but for this specific Chocolate Orange Cheesecake, the fresh orange really shines.
Chocolate Orange Cheesecake Serving Suggestions
This Chocolate Orange Cheesecake is a star all on its own, but a few little touches can make it extra special. I love serving it with a dollop of freshly whipped cream, maybe a sprinkle of candied orange peel, or even a few chocolate shavings for that fancy restaurant look. A strong cup of coffee or a rich espresso pairs beautifully with the chocolate notes. For a cozy evening, a glass of dessert wine, like a Moscato or a port, is just divine. Honestly, this dish and a good book on the couch? Yes please. It’s perfect after a hearty dinner, but also makes an excellent centerpiece for a brunch spread. My favorite combo is a slice with a tiny sprig of fresh mint the green just pops, and the aroma is lovely.
Cultural Backstory
Cheesecakes, in some form, have been around since ancient Greece, believe it or not! But the creamy, New York-style cheesecake we know and love today really took off in America. The combination of chocolate and orange, though, feels distinctly European to me, especially with those classic chocolate orange confections. I first fell in love with this flavor pairing during a trip to England, where those chocolate oranges are a holiday staple. Bringing those two worlds together into a rich Chocolate Orange Cheesecake felt like creating a little fusion of my own culinary adventures a classic American dessert embracing a beloved European flavor duo. It’s a reminder that food traditions can always evolve and find new, delicious expressions right in our own kitchens.
Honestly, this Chocolate Orange Cheesecake has become a little tradition in my home. It’s the dessert I turn to when I want to impress without too much fuss, or when I just need a slice of pure comfort. Each time I make it, I remember those early kitchen mishaps and how far I’ve come. I hope it brings as much joy and deliciousness to your table as it does to mine. Don’t be shy, give it a try, and tell me how your version turns out!
Frequently Asked Questions About Chocolate Orange Cheesecake
- → Can I use bottled orange juice for this Chocolate Orange Cheesecake?
Honestly, I wouldn’t recommend it. Freshly squeezed orange juice and zest make a huge difference in the vibrant flavor of this Chocolate Orange Cheesecake. Bottled juice just doesn’t have the same zing, and you’ll definitely notice it. I tried it once, and it was… fine, but not special.
- → My cheesecake cracked! What did I do wrong?
Oh, hon, we’ve all been there! Cracks usually happen from overmixing the batter (especially after adding eggs) or from rapid temperature changes during baking or cooling. Next time, try the water bath method and let it cool slowly in the oven. My first one was a disaster, but practice makes perfect!
- → Can I make the Chocolate Orange Cheesecake ahead of time?
Absolutely! This Chocolate Orange Cheesecake is actually even better the next day once the flavors have had a chance to meld. I often make it the day before I plan to serve it. Just make sure it’s well-chilled before you add the ganache, and keep it covered in the fridge.
- → What if I don’t have chocolate wafers for the crust?
No worries! You can use regular chocolate sandwich cookies (like Oreos, just remove the cream filling if you prefer less sweetness) or even a mix of graham cracker crumbs and cocoa powder. I’ve even used digestive biscuits with cocoa powder, and it worked pretty well in a pinch!
- → Can I use milk chocolate for the ganache topping?
You can, but I find dark chocolate really balances the sweetness of the cheesecake and the brightness of the orange. Milk chocolate might make it a bit too sweet and less sophisticated, in my opinion. I tried it, and while tasty, it didn’t have that rich depth.

Rich Chocolate Orange Cheesecake: A Zesty Treat
- Prep Time: 30 Minutes
- Cook Time: 60 Minutes
- Total Time: 90 Minutes
- Yield: 10-12 Servings 1x
- Category: Dessert
Description
Creamy Chocolate Orange Cheesecake offers a delightful blend of rich chocolate and bright orange. Perfect for celebrations or a sweet escape.
Ingredients
- Crust Components:
- 1 ½ cups (about 180g) chocolate wafer cookies, finely crushed
- ¼ cup (56g) unsalted butter, melted
- Cheesecake Filling Essentials:
- 3 (8-ounce) blocks (680g) full-fat cream cheese, softened to room temperature
- 1 cup (200g) granulated sugar
- 3 large eggs, room temperature
- 1 tablespoon orange zest (from about 1 large orange)
- ¼ cup (60ml) fresh orange juice
- 1 teaspoon vanilla extract
- Chocolate Orange Topping:
- 4 ounces (113g) good quality dark chocolate (60-70% cocoa), chopped
- ½ cup (120ml) heavy cream
- Flavor Enhancers:
- Pinch of salt
Instructions
- Prepare the Crust:: Alright, first things first, let’s get that oven preheating to 350°F (175°C), and make sure you’ve got your springform pan ready. I usually line the bottom with parchment paper and grease the sides—it helps so much with removal later, honestly. Then, crush those chocolate wafers until they’re fine crumbs. A food processor makes quick work of this, but I’ve totally used a Ziploc bag and a rolling pin in a pinch, just embrace the chaos! Mix those crumbs with your melted butter until it looks like wet sand, then press it firmly into the bottom of your prepared pan. I use the bottom of a flat glass to get it really compact. Pop it in the oven for about 8-10 minutes, just to set it a bit, then let it cool while you work on the filling. Don’t forget this step, a pre-baked crust is key!
- Whip Up the Creamy Filling:: Now for the good stuff! In a large bowl, beat your room-temperature cream cheese and granulated sugar together until it’s super smooth and fluffy, no lumps allowed! I start on low speed, then crank it up. Scrape down the sides of the bowl often, because honestly, sometimes those sneaky bits of cream cheese hide. Once it’s looking gloriously creamy, beat in the orange zest, fresh orange juice, and vanilla extract. Oh, the smell at this point is just incredible, so zesty and bright! Mix until just combined; we don’t want to overmix here. Overmixing can incorporate too much air, which can lead to cracks. Oops, learned that one the hard way!
- Gently Incorporate Eggs:: This is a delicate step, hon. Add your eggs one at a time, mixing on low speed just until each egg is incorporated. Don’t beat them to death; we’re aiming for smooth, not frothy. Overmixing the eggs can also contribute to those dreaded cracks in your cheesecake, and trust me, nobody wants a cracked cheesecake on their watch! The mixture should look silky and uniform. I usually stop the mixer and give it a final gentle stir with a spatula, just to make sure everything is perfectly blended from the bottom up. It should feel rich and thick, ready for its big bake!
- Bake Your Chocolate Orange Cheesecake:: Pour that beautiful filling over your cooled crust. Now, here’s a trick I swear by: a water bath! Wrap the outside of your springform pan tightly with heavy-duty foil (I usually do two layers, just to be safe, remembering that leaky pan incident). Place the pan in a larger roasting pan, then carefully pour hot water into the roasting pan until it comes about halfway up the sides of your cheesecake pan. This creates a moist baking environment that helps prevent cracks and ensures a super creamy texture. Bake for 50-60 minutes, or until the edges are set but the center still has a slight wobble when you gently jiggle the pan. Don’t open the oven door too often, that’s my personal rule!
- Cool Down Slowly:: Once it’s baked, turn off the oven but leave the cheesecake inside with the door slightly ajar for about an hour. This slow cooling prevents drastic temperature changes that can cause cracking. Honestly, this step feels like torture because you just want to dig in, but patience is key here! After an hour, take the cheesecake out of the water bath and remove the foil. Let it cool completely on a wire rack at room temperature. It needs to be totally cool before it goes into the fridge, or condensation will form. I sometimes forget and get impatient, but it’s not worth it!
- Chill & Top with Ganache:: Once completely cool, cover the cheesecake loosely with plastic wrap and chill it in the refrigerator for at least 6 hours, or even better, overnight. This is crucial for it to fully set and develop its flavors. While it’s chilling, make your ganache: heat the heavy cream until just simmering, then pour it over your chopped dark chocolate. Let it sit for 5 minutes, then whisk until smooth and glossy. Once the cheesecake is chilled, pour the slightly cooled ganache over the top, spreading it gently. You can add extra orange zest for a pop of color and extra zing. Then, slice it up and enjoy your masterpiece! The smell of the chocolate and orange together is just divine.


