
Honestly, some recipes just stick with you, right? For me, the Classic Peanut Butter Blossoms Cookies Recipe is one of those. I remember being maybe seven, standing on a step stool in my grandma’s kitchen, watching her roll these little peanut butter spheres in sugar. The smell of warm peanut butter and melting chocolate still takes me right back to those sticky, flour-dusted moments. She’d always let me press the chocolate kiss into the warm cookie, and sometimes, okay, often, I’d sneak a few before they cooled. It’s more than just a cookie, it’s a hug from childhood, a reminder of simpler times, and honestly, a testament to how good a simple cookie can be. This recipe? It’s pure comfort.
I swear, one time I was so excited to get these in the oven, I completely forgot to add the sugar to the dough! My husband took a bite and looked at me with this puzzled expression, “Nina, did you forget something?” Oops! We ended up drizzling them with melted chocolate afterward, which was actually pretty good, but not quite the Classic Peanut Butter Blossoms Cookies Recipe I was aiming for. Lesson learned: always double-check your ingredients, even when you’re sure you know the recipe by heart!

Ingredients for Classic Peanut Butter Blossoms
Cookie Base Essentials
- All-purpose flour: This is the structure, the backbone of our cookie. Don’t go swapping it for almond flour unless you’re ready for a whole different texture, I tried that once, and they spread like crazy, kinda like a pancake cookie.
- Granulated sugar: Provides sweetness and helps with that lovely crisp-chewy texture. I like to use a fine-grain sugar here, it just mixes in smoother.
- Brown sugar: This is where the chewiness comes from, and that hint of molasses flavor? Divine. Honestly, don’t skimp on the brown sugar, it makes all the difference.
- Creamy peanut butter: The star of the show! Use a good, creamy, processed peanut butter (like Jif or Skippy) for the best results. Natural peanut butter tends to be too oily and can make the cookies crumbly, I learned that the hard way.
Flavor & Sweetness
- Unsalted butter: Softened, please! This adds richness and helps create that tender crumb. I always let mine sit out for at least an hour, cold butter just fights you.
- Large egg: Binds everything together and adds a little moisture. Make sure it’s at room temperature for better emulsification with the other ingredients.
- Vanilla extract: A splash of warmth and depth. Use real vanilla, hon, it really elevates the flavor profile. I feel like it just makes everything taste more “homemade.”
Pantry Staples
- Baking soda: Our leavening agent, it helps the cookies puff up slightly and get that classic blossom shape.
- Salt: Balances the sweetness and enhances all those lovely peanut butter flavors. A little pinch goes a long way, don’t forget it!
The Signature Topping
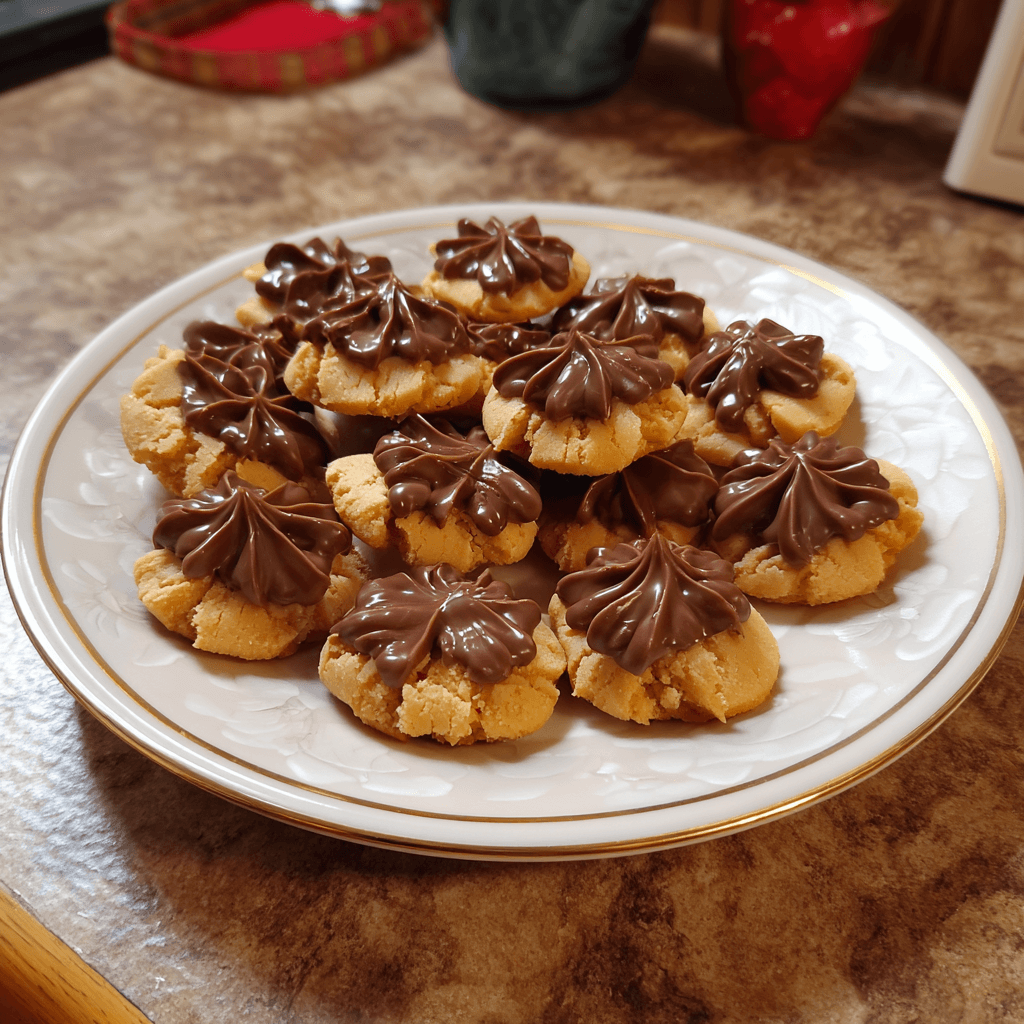
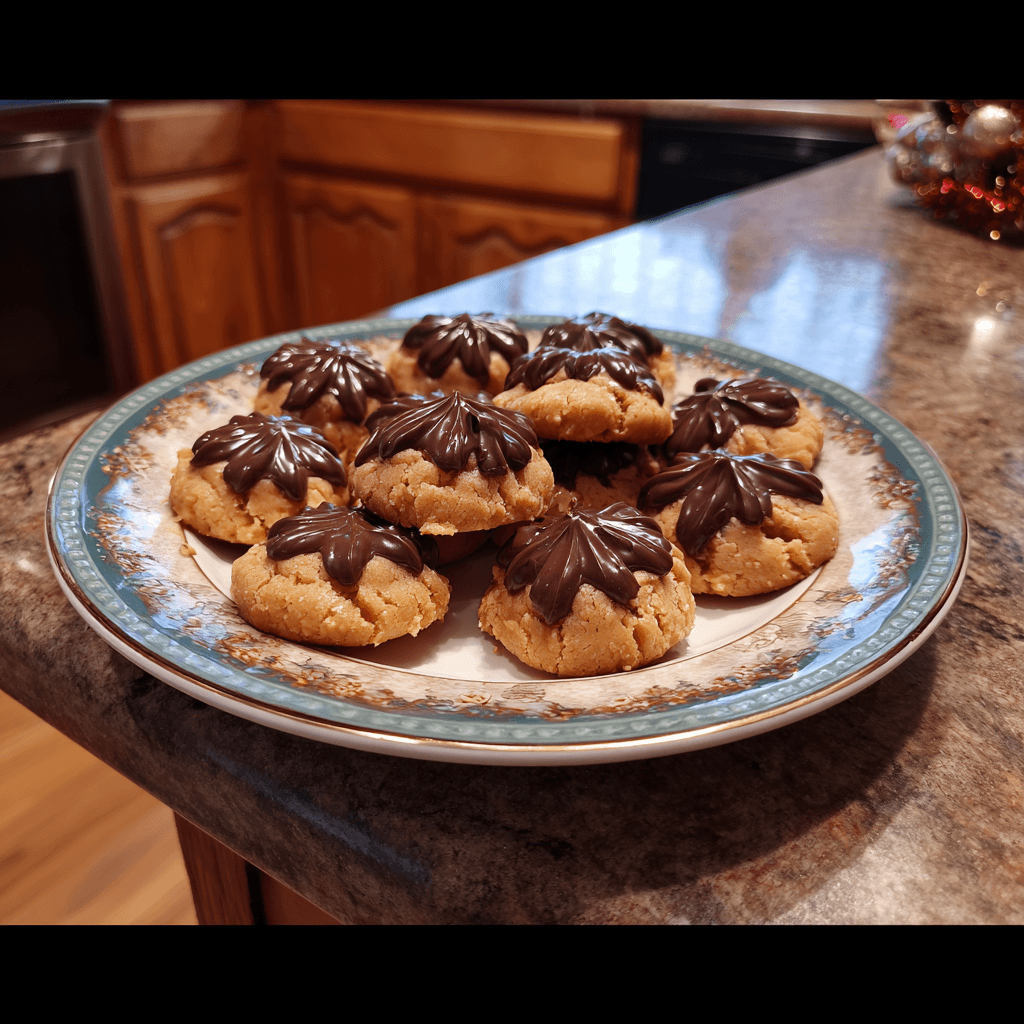
- Hershey’s Kisses: The iconic finishing touch! Unwrapped, please. I always buy extra because, well, chocolate. And sometimes, one or two (or five) go missing before they even make it to the cookies.
Instructions for Your Classic Peanut Butter Blossoms Cookies Recipe
- Prep Your Oven & Kisses:
- First things first, preheat your oven to 375°F (190°C). While it’s warming up, go ahead and unwrap all those Hershey’s Kisses. This is the part I always forget until the cookies are already out of the oven, frantically tearing wrappers! Trust me, do it now. It makes the whole process so much smoother, and you won’t be fumbling with chocolate when the cookies are hot and ready.
- Cream the Wet Ingredients:
- In a large bowl, or your stand mixer, cream together the softened butter, granulated sugar, and brown sugar until it’s light and fluffy. This usually takes me about 2-3 minutes. You want it to look pale and airy, not dense. Then, beat in the peanut butter, egg, and vanilla extract until everything is well combined and smells absolutely heavenly. Honestly, this is where the magic starts to happen!
- Combine Dry Ingredients:
- In a separate, smaller bowl, whisk together your flour, baking soda, and salt. Give it a good whisk to make sure everything is evenly distributed. This step is important for consistent texture, I once just dumped it all in, and let’s just say some cookies were flatter than others. Don’t skip this, it’s quick!
- Mix Dough & Chill (If You’re Patient):
- Gradually add the dry ingredients to the wet ingredients, mixing on low speed until just combined. Be careful not to overmix, or your cookies will be tough I learned that the hard way! The dough should be soft but manageable. If it feels too sticky, a quick 15-minute chill in the fridge can help, though for this Classic Peanut Butter Blossoms Cookies Recipe, I often skip it if I’m in a rush.
- Roll ‘Em in Sugar:
- Pour some extra granulated sugar into a shallow dish. Roll the cookie dough into 1-inch balls. I usually just eyeball it, but a small cookie scoop works wonders for consistency. Then, roll each ball generously in the sugar until it’s fully coated. This gives them that signature sparkle and a little extra crunch. Place them about 2 inches apart on an ungreased baking sheet.
- Bake & Blossom:
- Bake for 8-10 minutes, or until the edges are lightly golden. The centers might look a little soft, and that’s okay! As soon as they come out of the oven, immediately press a Hershey’s Kiss into the center of each warm cookie. The chocolate will get all soft and melty, which is exactly what we want. Let them cool on the baking sheet for a few minutes before transferring to a wire rack to cool completely. That warm chocolate smell? Irresistible!
Honestly, these Classic Peanut Butter Blossoms Cookies Recipe cookies always bring a smile. I remember one holiday season, I made a triple batch, and my kitchen looked like a flour bomb went off. But the joy of seeing those trays filled with perfectly bloomed cookies, ready for gifting, was totally worth the mess. There’s something so satisfying about a simple cookie that just tastes like home, you know?
Storage Tips for Classic Peanut Butter Blossoms
Okay, so these Classic Peanut Butter Blossoms Cookies Recipe cookies are pretty forgiving when it comes to storage, thankfully! Once they’ve cooled completely and I mean completely, or you’ll end up with a sticky mess store them in an airtight container at room temperature. They’ll stay wonderfully fresh and chewy for about 3-5 days. I once tried to microwave one from the fridge to “re-melt” the chocolate, and it just ended up a little greasy and the chocolate seized a bit. So, maybe don’t do that, lol. If you want to keep them longer, they freeze beautifully! Just arrange them in a single layer in an airtight container or freezer bag, separated by parchment paper, and they’ll be good for up to 3 months. Thaw them at room temperature, and they’ll taste almost fresh-baked.
Ingredient Substitutions for Classic Peanut Butter Blossoms
I’m all about using what you’ve got, and this Classic Peanut Butter Blossoms Cookies Recipe can handle a few swaps. No Hershey’s Kisses? I’ve tried mini peanut butter cups, and honestly, they’re a fantastic alternative, giving an extra burst of peanut butter goodness. Or, if you’re feeling fancy, a square of dark chocolate works too, though it won’t have the same iconic “blossom” look. If you only have salted butter, just reduce the added salt in the recipe by about half, I did that once in a pinch, and it worked out pretty well, just be mindful of the saltiness. For a different flavor profile, you could try almond butter instead of peanut butter, but be warned, the texture might be a little different, and it won’t be a classic peanut butter blossom anymore, obviously!
Serving Suggestions with Your Classic Peanut Butter Blossoms
These Classic Peanut Butter Blossoms Cookies Recipe cookies are honestly perfect on their own, fresh from the cooling rack with that slightly melted chocolate. But if you want to elevate the experience, I love serving them with a tall, cold glass of milk pure nostalgia! For a cozy evening, a warm mug of hot cocoa or even a simple black coffee complements the rich flavors beautifully. During the holidays, I’ve arranged them on a festive platter with other cookies, and they always disappear first. And for a truly decadent treat? A scoop of vanilla bean ice cream with a warm blossom on top is just chef’s kiss. It’s like a deconstructed peanut butter cup sundae!
The Sweet History of the Classic Peanut Butter Blossoms Cookies Recipe
The Classic Peanut Butter Blossoms Cookies Recipe has such a charming history, originating in 1957 when Freda Smith of Gibsonburg, Ohio, submitted her recipe to a Pillsbury Bake-Off contest. She called them “Peanut Butter Kisses,” and while they didn’t win the grand prize, they quickly became a national sensation! It’s wild to think that a simple home baker created something that would become such a beloved staple in so many kitchens, including mine. I always feel a little connection to Freda when I’m pressing those chocolate kisses into the warm cookies, carrying on a tradition that started with a simple idea and a love for baking. It just goes to show, you don’t need fancy ingredients to create something truly memorable and comforting.
So there you have it, my take on the Classic Peanut Butter Blossoms Cookies Recipe. Honestly, making these cookies always feels like a little moment of peace in my sometimes-chaotic kitchen. That sweet peanut butter smell, the simple act of rolling and baking it’s just good for the soul. I hope you give them a try and maybe even make a few happy memories of your own. Let me know how your blossoms turn out!

Frequently Asked Questions about Classic Peanut Butter Blossoms
- → Why did my Classic Peanut Butter Blossoms spread too much?
Oh, I’ve been there! Usually, it’s due to butter being too warm or not enough flour. Make sure your butter is just softened, not melted, and measure your flour accurately. A quick chill of the dough can help too, honestly!
- → Can I use natural peanut butter for this Classic Peanut Butter Blossoms Cookies Recipe?
I wouldn’t recommend it for this particular Classic Peanut Butter Blossoms Cookies Recipe. Natural peanut butter tends to be oilier and can make the cookies dry and crumbly. Stick to the creamy, processed stuff for the best texture, trust me on this one!
- → My chocolate kisses aren’t melting properly into the cookies. What happened?
This happens if you wait too long after pulling the cookies from the oven! You need to press those kisses in immediately while the cookies are still piping hot. If they’ve cooled too much, the chocolate won’t get that lovely melty sheen.
- → How long do these Classic Peanut Butter Blossoms stay fresh?
In an airtight container at room temperature, they’re usually good for 3-5 days. Beyond that, they start to lose their soft texture. Freezing them is a great option for longer storage, they hold up surprisingly well!
- → Can I make these Classic Peanut Butter Blossoms gluten-free?
I haven’t personally tried a gluten-free version of this exact recipe, but you could experiment with a 1:1 gluten-free baking flour blend. Just be aware that the texture might be a little different, and you might need to adjust the liquid slightly. Let me know if you try it!
Classic Peanut Butter Blossoms: Chewy Chocolate Kiss Cookies
- Prep Time: 15 Minutes
- Cook Time: 10 Minutes
- Total Time: 25 Minutes
- Yield: 36 Servings 1x
- Category: Home
Description
Bake a Classic Peanut Butter Blossoms Cookies Recipe! Get Nina’s personal tips, funny kitchen stories, and make these soft, sweet treats with chocolate kisses.
Ingredients
- Cookie Base Essentials:
- 1 ½ cups (180g) all-purpose flour
- ½ cup (100g) granulated sugar
- ½ cup (110g) packed light brown sugar
- ½ cup (128g) creamy peanut butter (like Jif or Skippy)
- Flavor & Sweetness:
- ½ cup (113g) unsalted butter, softened
- 1 large egg, room temperature
- 1 teaspoon vanilla extract
- Pantry Staples:
- 1 teaspoon baking soda
- ¼ teaspoon salt
- The Signature Topping:
- 36 Hershey’s Kisses, unwrapped
Instructions
- Prep Your Oven & Kisses:: First things first, preheat your oven to 375°F (190°C). While it’s warming up, go ahead and unwrap all those Hershey’s Kisses. This is the part I always forget until the cookies are already out of the oven, frantically tearing wrappers! Trust me, do it now. It makes the whole process so much smoother, and you won’t be fumbling with chocolate when the cookies are hot and ready.
- Cream the Wet Ingredients:: In a large bowl, or your stand mixer, cream together the softened butter, granulated sugar, and brown sugar until it’s light and fluffy. This usually takes me about 2-3 minutes. You want it to look pale and airy, not dense. Then, beat in the peanut butter, egg, and vanilla extract until everything is well combined and smells absolutely heavenly. Honestly, this is where the magic starts to happen!
- Combine Dry Ingredients:: In a separate, smaller bowl, whisk together your flour, baking soda, and salt. Give it a good whisk to make sure everything is evenly distributed. This step is important for consistent texture; I once just dumped it all in, and let’s just say some cookies were flatter than others. Don’t skip this, it’s quick!
- Mix Dough & Chill (If You’re Patient):: Gradually add the dry ingredients to the wet ingredients, mixing on low speed until just combined. Be careful not to overmix, or your cookies will be tough – I learned that the hard way! The dough should be soft but manageable. If it feels too sticky, a quick 15-minute chill in the fridge can help, though for this Classic Peanut Butter Blossoms Cookies Recipe, I often skip it if I’m in a rush.
- Roll ‘Em in Sugar:: Pour some extra granulated sugar into a shallow dish. Roll the cookie dough into 1-inch balls. I usually just eyeball it, but a small cookie scoop works wonders for consistency. Then, roll each ball generously in the sugar until it’s fully coated. This gives them that signature sparkle and a little extra crunch. Place them about 2 inches apart on an ungreased baking sheet.
- Bake & Blossom:: Bake for 8-10 minutes, or until the edges are lightly golden. The centers might look a little soft, and that’s okay! As soon as they come out of the oven, immediately press a Hershey’s Kiss into the center of each warm cookie. The chocolate will get all soft and melty, which is exactly what we want. Let them cool on the baking sheet for a few minutes before transferring to a wire rack to cool completely. That warm chocolate smell? Irresistible!


