
Honestly, Halloween parties in my house used to be a glorious mess of ambition and eventual exhaustion. I’d try to make everything from scratch, and bless my heart, it rarely went as planned. One year, with a house full of excited kiddos and a mountain of half-finished crafts, I realized I needed a super simple, utterly charming appetizer. That’s when the idea for these Puff Pastry Mummy Bites hit me. The smell of the flaky pastry baking, mingled with a hint of savory sausage, just filled the kitchen with that perfect spooky-fun vibe. They’re such a lifesaver when you want something festive without the fuss, and honestly, they always disappear faster than a ghost in a haunted house.
I remember the first time I made Puff Pastry Mummy Bites, I was in such a rush that I didn’t chill the pastry enough. Rookie mistake, right? It was tearing and sticking to everything, and I swear, half my hot dogs looked like they’d been in a wrestling match. My kitchen looked like a flour bomb went off! But even with my clumsy attempts, those little mummies still baked up golden and delicious, proving that even kitchen chaos can lead to something wonderfully edible.

Ingredients for Spooky Mummy Bites
- Puff Pastry: Seriously, grab the store-bought stuff. Don’t even think about making it from scratch unless you’re a pastry wizard, I tried once, and it was a disaster. It’s the flaky, buttery base for our mummies!
- Hot Dogs: Any brand you like! I usually go for the all-beef ones because they have a bit more flavor, but chicken or turkey frankfurters work too. Just avoid anything too skinny or too fat, we need a good “body” for our mummies.
- Yellow Mustard: This is our “glue” and a flavor booster. A thin smear before wrapping adds a little tang. Honestly, I didn’t expect it to make such a difference, but it does!
- Egg: Just one, beaten, for an egg wash. It gives our mummies that beautiful golden-brown color and helps them crisp up. It’s like their tanning lotion, haha!
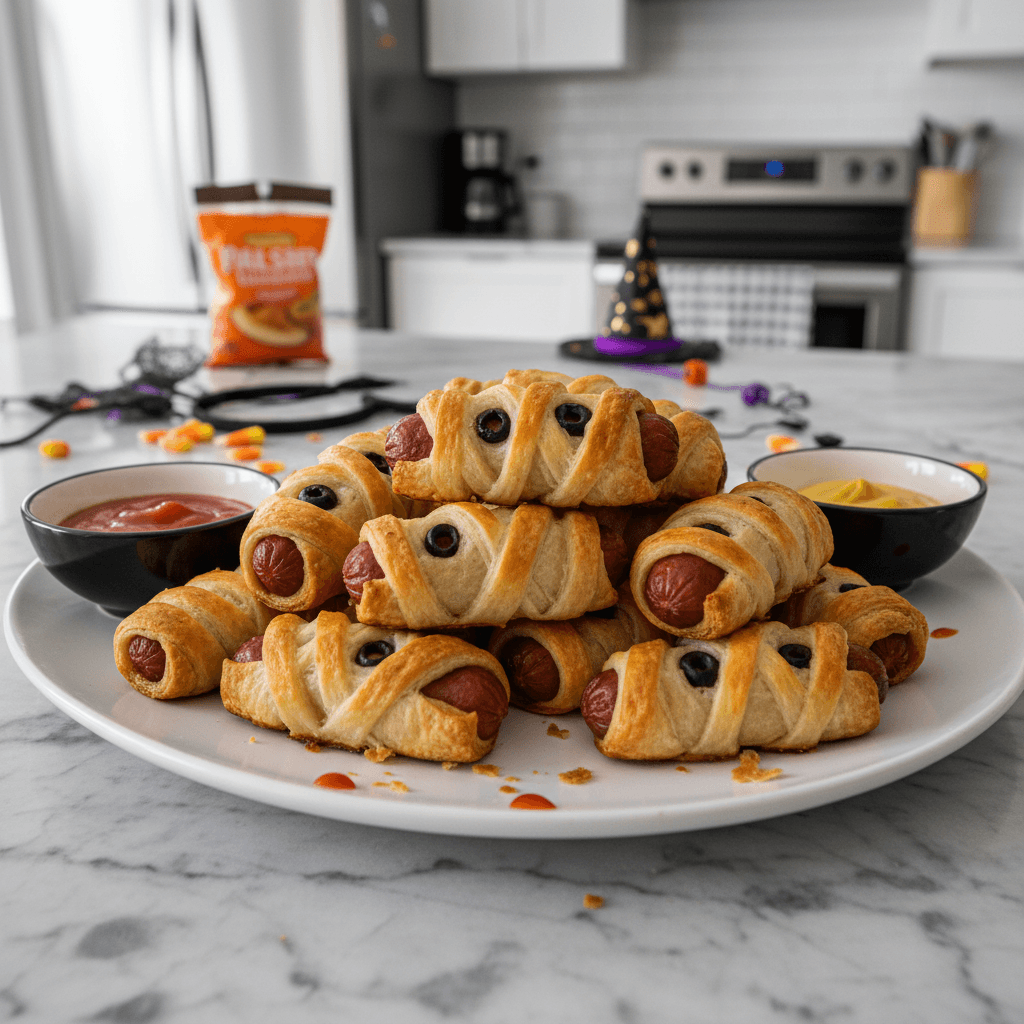
- Candy Eyes: Oh, these are the best part! You can find them in the baking aisle around Halloween. They’re what truly brings these little mummies to life. Don’t worry if they get a little melty in the oven, it just adds character.
- Flour: A little bit for dusting your work surface. Prevents sticking and keeps the pastry manageable. Honestly, a light dusting is all you need, too much makes it tough.
Crafting Your Puff Pastry Mummy Bites
- Prep the Pastry:
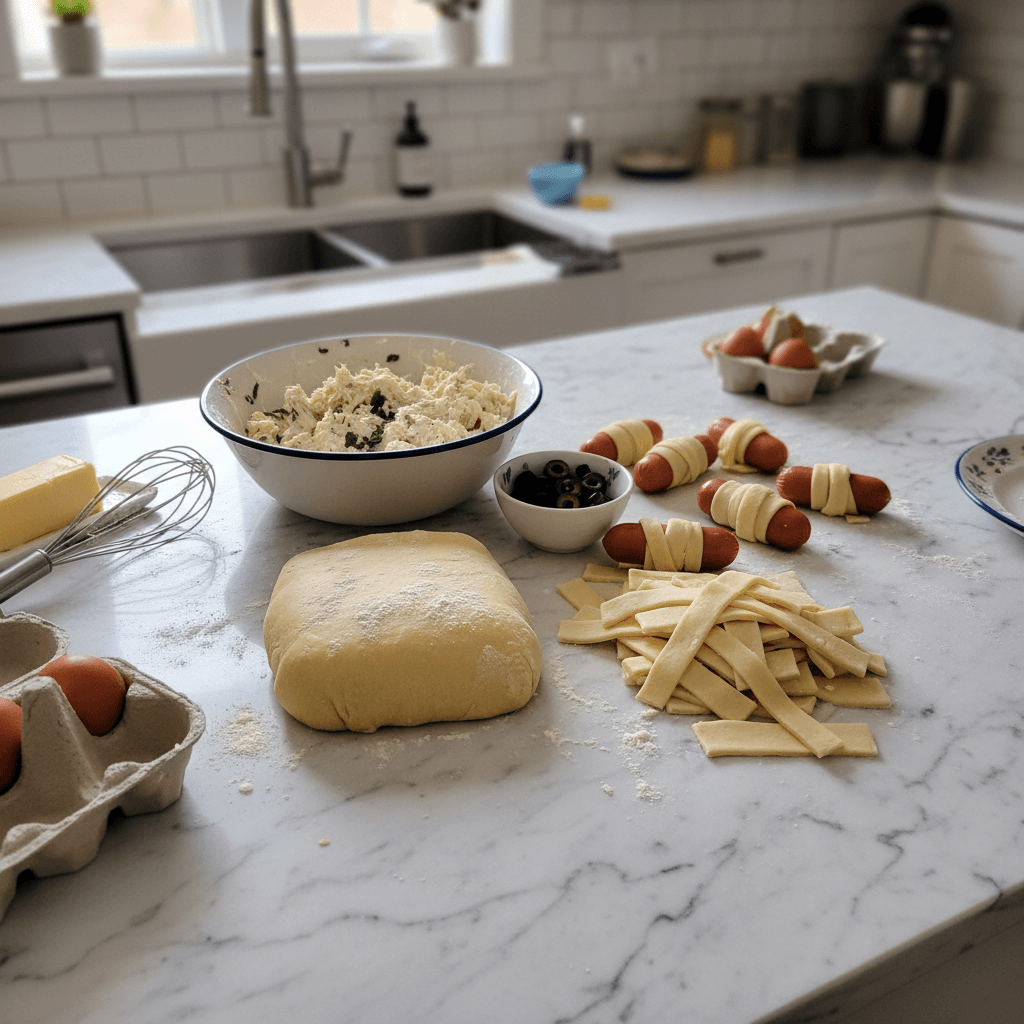
- First things first, get that puff pastry out of the freezer and let it thaw on the counter for about 30-40 minutes. You want it pliable but still cool, if it gets too warm, it’ll be a sticky mess, and honestly, I’ve had many wrestling matches with overly soft pastry. Unroll it gently onto a lightly floured surface. I usually see those lovely folds, knowing they’ll turn into flaky layers, and it makes me so happy!
- Slice and Dice:
- Now, grab a pizza cutter or a sharp knife and slice each pastry sheet into long, thin strips, about 1/4 to 1/2 inch wide. Think “bandages” for our mummies! This is where I sometimes get a little wonky with my cuts, but hey, imperfect mummies are charming, right? Don’t worry about them being perfectly uniform, it’s all part of the rustic, spooky appeal of these mummies.
- Mustard Magic:
- Take each hot dog and spread a thin layer of yellow mustard on it. This step is optional, but honestly, it adds a lovely little zing that cuts through the richness of the pastry. I didn’t expect it to matter much the first time, but trust me, it’s a subtle flavor booster. My kitchen always smells faintly of mustard and butter at this point, which is surprisingly delightful!
- Wrap ‘Em Up:
- Time to wrap! Starting at one end of a hot dog, loosely wrap a strip of puff pastry around it, working your way down to the other end, leaving a small gap near the top for the “face.” You want it to look like bandages, so overlap a bit and don’t wrap too tightly, or the pastry won’t puff properly. It’s a bit like wrapping a tiny present, but for Halloween! This is where my kids always want to help, and honestly, their “mummies” are always the most unique.
- Egg Wash & Bake:
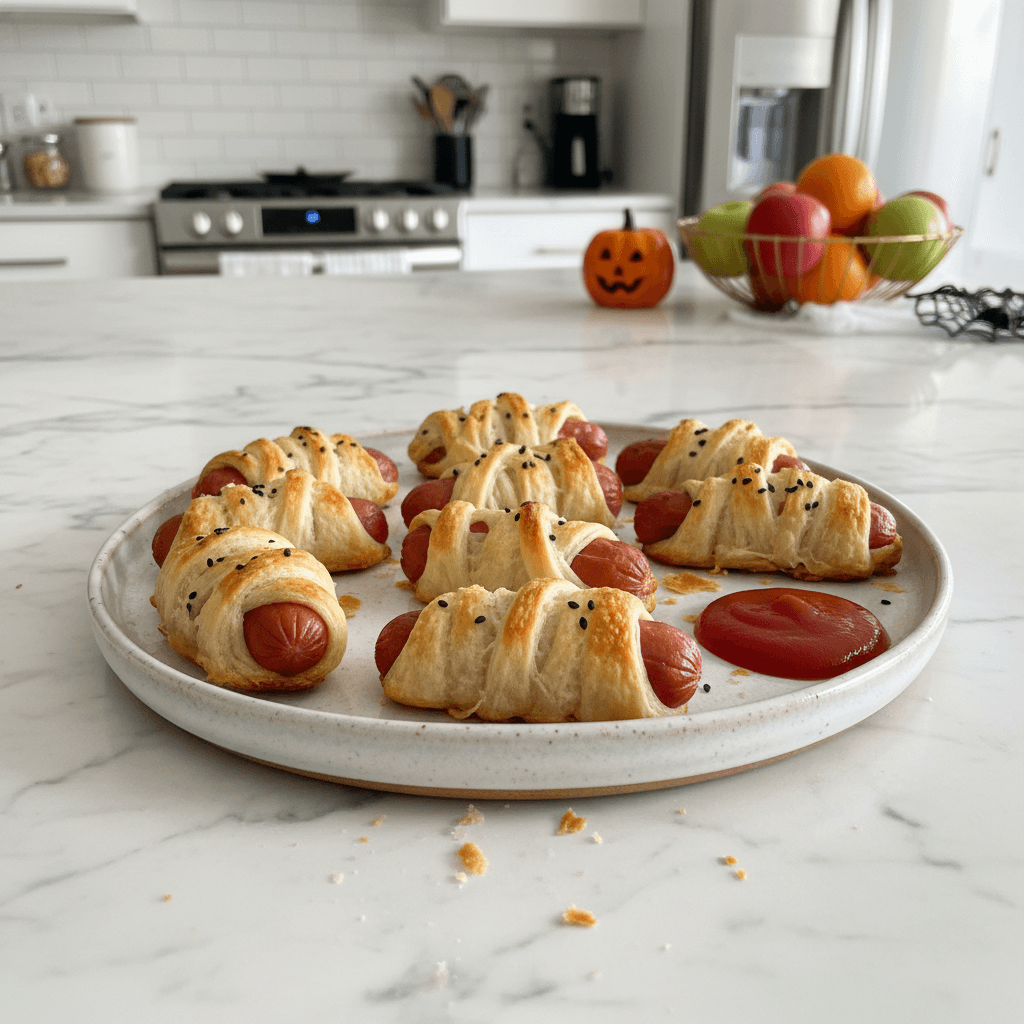
- Once all your mummy bites are wrapped, arrange them on a baking sheet lined with parchment paper. Whisk that egg in a small bowl and brush the tops of the pastry strips with the egg wash. This gives them that gorgeous golden color. Pop them into a preheated oven at 400°F (200°C) for about 12-15 minutes, or until the pastry is puffed and golden brown. I always peek through the oven door, watching them transform.
- Eye See You!:
- Immediately after taking them out of the oven, while they’re still warm, carefully place two candy eyes on each mummy, right in that gap you left. The warmth of the pastry helps the eyes stick. Sometimes they melt a little, which just makes them look even spookier, honestly! Let them cool for a few minutes before serving. The smell of warm, buttery pastry and savory hot dogs is just irresistible.
Making these spooky bites always brings a smile to my face. One time, I was so distracted by a spooky movie playing in the background that I totally forgot about the egg wash! They still tasted great, but they weren’t quite as golden and shiny. It was a funny little reminder that even when things aren’t “perfect,” the joy of creating something fun for loved ones is what truly matters in my kitchen.
Puff Pastry Mummy Bites: Storage Tips
Okay, so these Puff Pastry Mummy Bites are definitely best served fresh, right out of the oven when the pastry is super flaky and warm. But, if you do have leftovers (which is rare in my house, honestly!), you can store them in an airtight container in the fridge for up to 2-3 days. I tried microwaving them once, and the pastry got a bit soggy definitely don’t do that if you want crispness! The best way to reheat them is in a toaster oven or a regular oven at 300°F (150°C) for about 5-7 minutes, just until they’re warmed through and the pastry crisps up again. They won’t be quite as good as fresh, but still totally edible for a quick spooky snack.
Puff Pastry Mummy Bites: Substitutions
I’ve experimented with a few swaps for these spooky treats, mostly out of necessity when my pantry was looking a bit bare. If you don’t have hot dogs, mini cocktail sausages work wonderfully, though they’re a bit smaller and fiddlier to wrap. I even tried sliced veggie dogs once, and while the texture was a bit different, they still made cute mummies for my vegetarian friends kinda worked, but not my favorite, to be real. For the mustard, a little bit of honey mustard or even a thin smear of cream cheese could work, though the classic yellow gives that iconic flavor. And if you can’t find candy eyes, a tiny dot of cream cheese with a mini chocolate chip for the pupil works in a pinch, or you can just use a toothpick to dab on some melted chocolate after baking!
Puff Pastry Mummy Bites: Serving Ideas
These Puff Pastry Mummy Bites are party-ready all on their own, but they love a good dipping sauce! I usually set out a few bowls: classic ketchup, some tangy yellow mustard, and maybe a smoky BBQ sauce for those who like a little extra kick. They’re also fantastic alongside a big bowl of chili for a heartier Halloween meal, or as part of a larger appetizer spread with things like spiderweb dip and veggie “graveyard” platters. For drinks, I love serving them with a spooky green punch or even just some sparkling cider. Honestly, these and a cheesy horror movie marathon? Pure Halloween bliss!
The Fun Backstory of Mummy Bites
While these creative bites don’t have a deep, ancient culinary history, they’ve become a beloved modern Halloween tradition, especially in homes like mine. It’s a creative twist on the classic “pigs in a blanket,” transforming a simple party snack into something wonderfully festive and thematic. For me, they represent the joy of making holidays special without unnecessary stress. I first saw a version of these online years ago, and I remember thinking, “Now that’s my kind of Halloween cooking!” It’s about taking something familiar and giving it a playful, spooky makeover, making it approachable and fun for everyone involved, from the baker to the eager eaters.
And there you have it, my friends! These Puff Pastry Mummy Bites are more than just a snack, they’re a little piece of Halloween joy that always makes me smile. Seeing those goofy candy eyes staring back, knowing how easy and fun they were to make, it just warms my heart. I hope you give them a try for your next spooky gathering. Don’t forget to share your own mummy creations with me I’d love to see your kitchen chaos and triumphs!
Frequently Asked Questions about Puff Pastry Mummy Bites
- → Can I use crescent roll dough instead of puff pastry?
Yes, you totally can! I’ve done it when I was out of puff pastry. Crescent roll dough works, but it gives a softer, chewier mummy rather than the super flaky kind. Still delicious, just a different vibe for your Puff Pastry Mummy Bites!
- → What if I don’t have candy eyes for my Mummy Bites?
No candy eyes? No problem! I’ve used tiny dots of cream cheese with a mini chocolate chip pressed into each for pupils. Or, you can dab on some melted chocolate with a toothpick after they’ve cooled. Get creative with your spooky bites!
- → Why did my pastry not puff up for my Puff Pastry Mummy Bites?
This has happened to me! Usually, it’s because the pastry got too warm during handling, or you wrapped the hot dogs too tightly. Keep it cool and wrap loosely, like loose bandages, and your Puff Pastry Mummy Bites will be perfectly flaky.
- → How far in advance can I make these spooky bites?
You can assemble them the day before and keep them covered in the fridge. Then, just pop them in the oven when you’re ready to bake. I wouldn’t bake them too far in advance, as they’re really best fresh for that crisp pastry.
- → Can I make these Puff Pastry Mummy Bites vegetarian?
Absolutely! I’ve used vegetarian hot dogs or even sliced firm tofu sticks wrapped in pastry for a meat-free version. The concept works great, just make sure your veggie dogs are suitable for baking and don’t get too watery.

Crispy Puff Pastry Mummy Bites: Spooky Halloween Appetizers
- Prep Time: 15 Minutes
- Cook Time: 15 Minutes
- Total Time: 30 Minutes
- Yield: 16 Servings 1x
- Category: Home
Description
Whip up these fun Puff Pastry Mummy Bites for Halloween! Simple, spooky, and a total crowd-pleaser. Get the recipe for these easy appetizers.
Ingredients
- Mummy Base:
- 1 sheet (14 oz / 397g) puff pastry, thawed
- 8 regular-sized hot dogs (or 16 mini cocktail sausages), cut in half
- Flavor & Adhesion:
- 1–2 tablespoons yellow mustard (optional)
- 1 large egg, beaten (for egg wash)
- Spooky Touch:
- 32 small candy eyes
- Kitchen Helper:
- All-purpose flour, for dusting
Instructions
- Prep the Pastry:: First things first, get that puff pastry out of the freezer and let it thaw on the counter for about 30-40 minutes. You want it pliable but still cool; if it gets too warm, it’ll be a sticky mess, and honestly, I’ve had many wrestling matches with overly soft pastry. Unroll it gently onto a lightly floured surface. I usually see those lovely folds, knowing they’ll turn into flaky layers, and it makes me so happy!
- Slice and Dice:: Now, grab a pizza cutter or a sharp knife and slice each pastry sheet into long, thin strips, about 1/4 to 1/2 inch wide. Think “bandages” for our mummies! This is where I sometimes get a little wonky with my cuts, but hey, imperfect mummies are charming, right? Don’t worry about them being perfectly uniform; it’s all part of the rustic, spooky appeal of these mummies.
- Mustard Magic:: Take each hot dog and spread a thin layer of yellow mustard on it. This step is optional, but honestly, it adds a lovely little zing that cuts through the richness of the pastry. I didn’t expect it to matter much the first time, but trust me, it’s a subtle flavor booster. My kitchen always smells faintly of mustard and butter at this point, which is surprisingly delightful!
- Wrap ‘Em Up:: Time to wrap! Starting at one end of a hot dog, loosely wrap a strip of puff pastry around it, working your way down to the other end, leaving a small gap near the top for the “face.” You want it to look like bandages, so overlap a bit and don’t wrap too tightly, or the pastry won’t puff properly. It’s a bit like wrapping a tiny present, but for Halloween! This is where my kids always want to help, and honestly, their “mummies” are always the most unique.
- Egg Wash & Bake:: Once all your mummy bites are wrapped, arrange them on a baking sheet lined with parchment paper. Whisk that egg in a small bowl and brush the tops of the pastry strips with the egg wash. This gives them that gorgeous golden color. Pop them into a preheated oven at 400°F (200°C) for about 12-15 minutes, or until the pastry is puffed and golden brown. I always peek through the oven door, watching them transform.
- Eye See You!:: Immediately after taking them out of the oven, while they’re still warm, carefully place two candy eyes on each mummy, right in that gap you left. The warmth of the pastry helps the eyes stick. Sometimes they melt a little, which just makes them look even spookier, honestly! Let them cool for a few minutes before serving. The smell of warm, buttery pastry and savory hot dogs is just irresistible.


