
You know, some recipes just sneak into your heart and set up permanent residence. This Rustic Pumpkin Pie Crisp? Oh, hon, it’s one of those. I remember stumbling upon a similar idea years ago, trying to bake something for a potluck and realizing I was out of pie crust. Panic, right? But then, a lightbulb moment: what if I just topped that spiced pumpkin filling with something… crunchy? Something oat-y and buttery? Honestly, I didn’t expect that first messy attempt to become such a beloved fall staple, but here we are. It’s got all the warm, cozy vibes of classic pumpkin pie, but with an extra textural hug from those delightful oats. It’s comforting, a little bit rustic, and just makes the kitchen smell like pure autumn magic.
My first go at this, I totally overmixed the topping. It ended up more like a crumbly paste than a crisp, and my kitchen looked like a flour bomb went off. I mean, oats everywhere! My dog, bless her heart, thought it was a new game. But even with that minor disaster, the flavors were there, and the pumpkin filling was just dreamy. It taught me a lot about texture, and how sometimes, a little imperfection makes a dish even more charming, you know?

Ingredients for Rustic Pumpkin Pie Crisp
- Pumpkin Puree: This is the star of the show, obviously! Use 100% pure pumpkin, not pie filling. Trust me, the texture and flavor are just miles apart. I once grabbed the wrong can, and it was a sweet, spiced surprise, but not the right one for this.
- Heavy Cream: Gives the filling that luscious, creamy texture. I’ve tried milk, even half-and-half, but heavy cream just makes it so much richer. It’s that little bit of luxury that makes a difference.
Brown Sugar: Adds a deep, caramel-like sweetness to the pumpkin. I like to use dark brown sugar for a richer flavor, but light works fine too. Honestly, I’ve played with the amounts, and a little less is sometimes better if your pumpkin is naturally sweet.
Eggs: They bind the filling together, giving it that classic pumpkin pie set. Don’t skip these, they’re essential for the right consistency. I’ve forgotten them once, and it was a sad, runny mess, oops!
All-Purpose Flour: Just a touch, to thicken the filling slightly and for the oat topping. It’s the backbone of the crisp, making it hold together beautifully.
- Rolled Oats: The key to that glorious, crunchy topping! Use old-fashioned rolled oats, not quick oats. Quick oats turn mushy, and we want texture here, a real satisfying chew.
Unsalted Butter: For both the filling (just a tiny bit!) and the crisp topping. Cold butter, cut into cubes, is your friend for a flaky, crumbly topping. I swear by it.
Pumpkin Pie Spice: This blend of cinnamon, nutmeg, ginger, and cloves is what makes it taste like fall. If you don’t have it, you can totally mix your own. I tend to go a little heavier on the cinnamon, just because I love that warm aroma.
Instructions for Making Your Rustic Pumpkin Pie Crisp
- Prep the Pumpkin Filling:
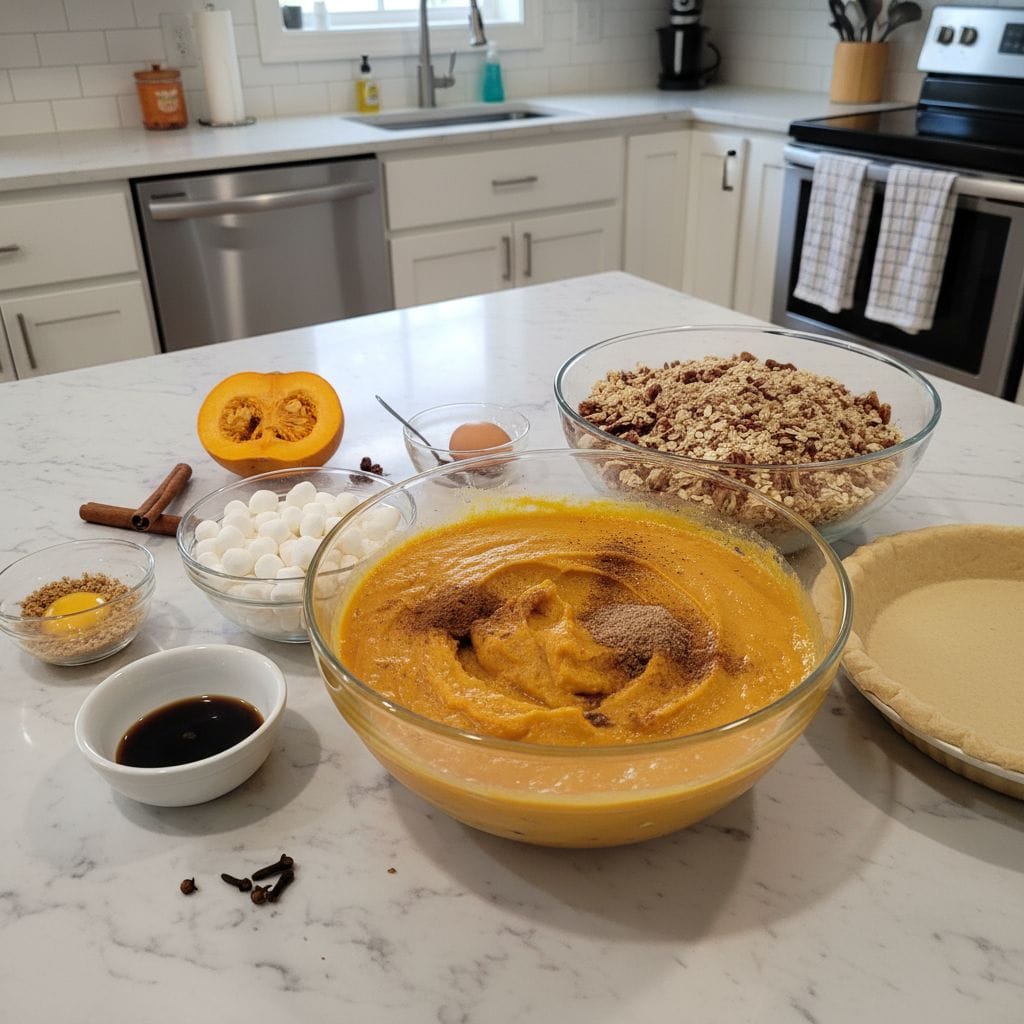
- Okay, first things first, preheat your oven to 375°F (190°C). Then, in a big mixing bowl, whisk together your pumpkin puree, heavy cream, brown sugar, eggs, and a pinch of salt. See that vibrant orange color? That’s joy, right there. Whisk it until it’s all smooth and beautifully combined. This is where the magic starts to happen, and your kitchen will begin to smell faintly of autumn. Honestly, don’t overthink this step, just get it well mixed. I always give it an extra whisk, just to be sure.
- Spice Things Up:
- Now for the flavor boosters! Add your pumpkin pie spice and a little vanilla extract to the pumpkin mixture. Mix it all up again until those warm spices are perfectly distributed. You want to see that rich, consistent color throughout. I often take a little sniff at this stage, it’s just heavenly. Pour this glorious pumpkin filling into a 9×13 inch baking dish. Don’t worry if it’s not perfectly level, it’ll sort itself out in the oven. I once accidentally poured it into a dish that was too small, and let’s just say, cleanup was a bit of a challenge!
- Craft the Crunchy Oat Topping:
- In a separate bowl, combine your rolled oats, all-purpose flour, a little more brown sugar, and a dash of cinnamon. Give it a good stir to mix the dry ingredients. Next, add your cold, cubed butter. This is the fun part! Use your fingers to cut the butter into the oat mixture until it resembles coarse crumbs. We’re talking pea-sized bits, maybe a little bigger. Don’t overmix, you want those distinct butter pieces for a truly rustic texture. This is where I sometimes get a bit messy, but it’s worth it for that crunch!
- Assemble Your Rustic Pumpkin Pie Crisp:
- Now, sprinkle that wonderful oat topping evenly over the pumpkin filling in your baking dish. You want a generous, almost haphazard layer here. Remember, it’s rustic, so don’t fret about perfection. Just make sure there’s a good blanket of oats over most of the pumpkin. The more scattered it looks, the more charming, I think. This step is where you really start to see the crisp come to life, and I always get excited for that golden-brown crust.
- Bake to Golden Perfection:
- Pop your dish into the preheated oven. Bake for about 40-50 minutes. You’re looking for the pumpkin filling to be set not jiggly in the center and the oat topping to be beautifully golden brown and crunchy. Keep an eye on it, especially towards the end, as ovens can be quirky. If the topping starts browning too quickly, you can loosely tent it with foil. I once forgot to check, and the edges were a bit too dark, but still tasty, honestly!
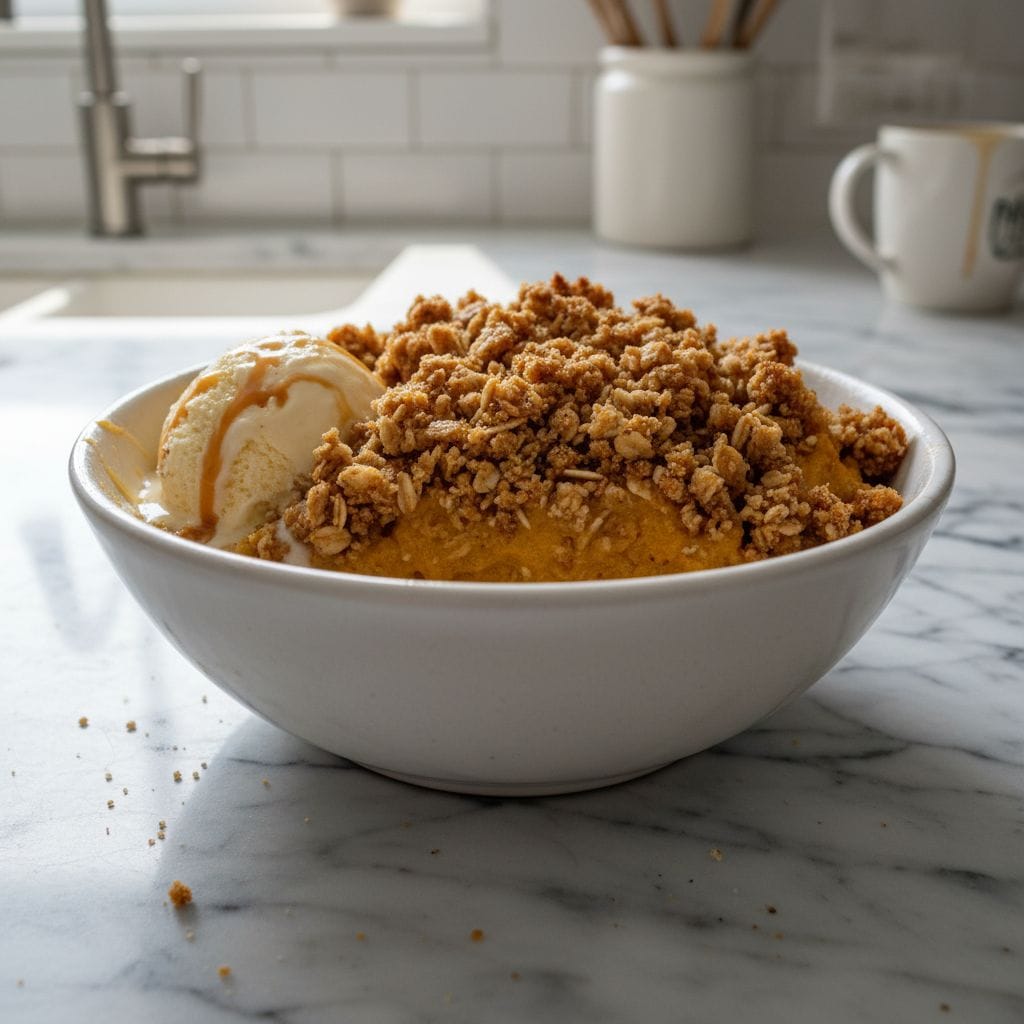
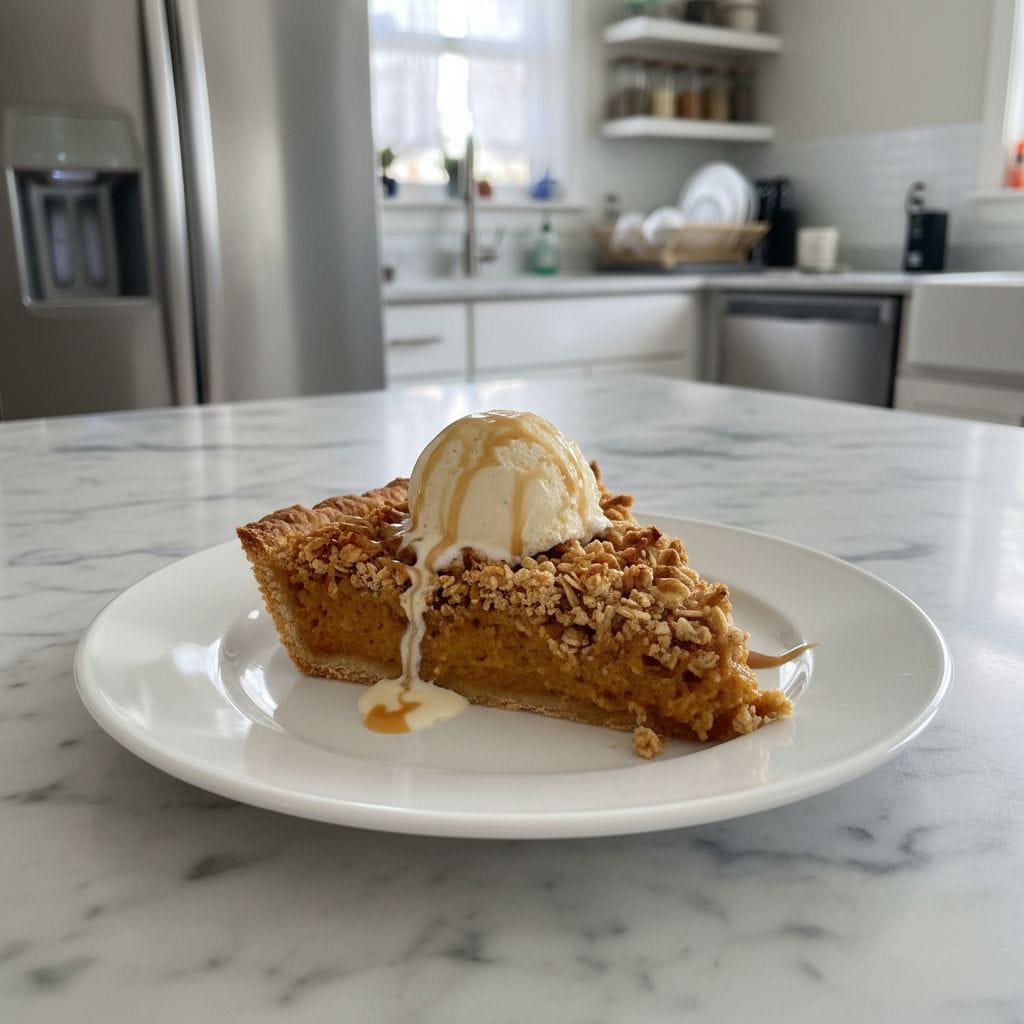
- Cool and Serve Your Rustic Pumpkin Pie Crisp:
- Once it’s out of the oven, let this glorious Rustic Pumpkin Pie Crisp cool on a wire rack for at least 15-20 minutes. This cooling time is crucial, it allows the filling to firm up a bit more, making it easier to scoop. The smells filling your kitchen right now are just incredible, aren’t they? That warm, spiced aroma is pure comfort. Serve it warm, maybe with a scoop of vanilla ice cream or a dollop of whipped cream. It’s pure autumn bliss, I promise!
There’s something so satisfying about pulling this Rustic Pumpkin Pie Crisp out of the oven, all bubbly and golden. It brings back memories of crisp fall evenings, leaves crunching underfoot, and that feeling of wanting something truly comforting. It’s a little messy to make, sure, but that’s part of its charm, isn’t it? Every little spill and flour dust just adds to the story.
Storing Your Rustic Pumpkin Pie Crisp
Okay, so storing this Rustic Pumpkin Pie Crisp is pretty straightforward, but I’ve learned a few things the hard way. Once it’s completely cooled (and I mean completely, otherwise you’ll get condensation), cover it tightly with plastic wrap or foil. You can keep it at room temperature for a day or so, especially if your kitchen isn’t too warm. But honestly, I prefer to pop it in the fridge. It’ll stay fresh for up to 3-4 days in there. Reheating is easy, a quick zap in the microwave works, but I find a few minutes in a low oven (around 300°F or 150°C) really brings back that crisp topping. I microwaved it once and the sauce separated a little, and the topping got a bit soft so don’t do that lol, unless you don’t mind a softer topping. For longer storage, you can freeze individual portions, tightly wrapped, for up to a month. Just thaw in the fridge and reheat!
Rustic Pumpkin Pie Crisp Ingredient Swaps
Life happens, and sometimes you just don’t have exactly what the recipe calls for. I get it! For the pumpkin puree, you could try an equal amount of mashed sweet potato or butternut squash puree if you’re feeling adventurous, I tried it once, and it worked… kinda, it was definitely sweeter, so adjust your sugar. If you’re out of heavy cream, whole milk or evaporated milk can work in a pinch, but the filling won’t be quite as rich. For the crunchy oat topping, if you don’t have rolled oats, you could use a mix of chopped nuts (pecans or walnuts are great!) and a bit of shredded coconut for a different kind of texture. I’ve also swapped out half the brown sugar for maple syrup in the filling for a deeper, more autumnal flavor, and that was a delicious experiment! Don’t be afraid to play around, that’s how we find new favorites.
Serving Up Rustic Pumpkin Pie Crisp
This Rustic Pumpkin Pie Crisp is just begging for some friends! My absolute favorite way to enjoy it is warm, straight from the oven, with a big scoop of vanilla bean ice cream melting into the spiced pumpkin. The contrast of warm and cold, creamy and crunchy, is just chef’s kiss. A dollop of freshly whipped cream, perhaps with a touch of cinnamon or a drizzle of maple syrup, is also divine. For drinks, a hot mug of spiced cider or a creamy chai latte pairs beautifully, especially on a chilly evening. Honestly, this dish and a rom-com? Yes please. It’s also surprisingly good alongside a strong cup of coffee for a decadent breakfast. It’s versatile enough for a fancy holiday dessert table or a casual weeknight treat. Just serve it with love, that’s the main ingredient!
Cultural Backstory of Pumpkin Crisps
Pumpkin crisps, or crumbles, are deeply rooted in the American tradition of comforting, fruit-based desserts, often drawing inspiration from European crumbles and streusels. While pumpkin pie itself has a long history, dating back to colonial times, the ‘crisp’ variation is a more modern, less formal twist. It really rose in popularity as home cooks looked for easier, less fussy ways to enjoy seasonal produce, especially during harvest season. For me, this Rustic Pumpkin Pie Crisp isn’t just a recipe, it’s a connection to those comforting, homespun traditions. My grandma used to make apple crisp every fall, and this pumpkin version feels like a natural evolution, blending that cozy crisp topping with the iconic flavors of autumn. It’s a testament to how recipes adapt and evolve, becoming a part of our personal family histories and kitchens.
Honestly, this Rustic Pumpkin Pie Crisp has become a non-negotiable part of my fall baking ritual. It’s got that perfect balance of creamy and crunchy, sweet and spiced, and it just feels like home. Every time I make it, I think of those first clumsy attempts and how far it’s come. I really hope you give it a try and make it your own. Don’t forget to tell me your kitchen chaos stories too!
Frequently Asked Questions About Rustic Pumpkin Pie Crisp
- → Can I make this Rustic Pumpkin Pie Crisp ahead of time?
Oh, absolutely! You can assemble the whole thing, topping and all, and keep it covered in the fridge for up to 24 hours before baking. Just add an extra 10-15 minutes to the baking time since it’ll be going in cold. I do this often for holiday gatherings!
- → What if I don’t have pumpkin pie spice?
No worries! I’ve been there. You can easily make your own. Just mix 1 tsp cinnamon, 1/4 tsp nutmeg, 1/4 tsp ginger, and a pinch of cloves. It works like a charm! I sometimes add a tiny bit more cinnamon because I love it.
- → My crisp topping isn’t getting crunchy. What went wrong?
Hmm, that’s usually from too much moisture or not enough baking time. Make sure your butter is cold and you’re not overmixing. If it’s still soft, try baking it for a few more minutes, or pop it under the broiler for a minute or two (watch it closely!). I’ve definitely had a few soft toppings myself.
- → How long does Rustic Pumpkin Pie Crisp last?
If you store it properly in the fridge, covered, it’ll be good for about 3-4 days. It tastes fantastic cold, too! I’ve been known to sneak a spoonful straight from the fridge for a midnight snack, honestly.
- → Can I add nuts to the oat topping?
Yes, please do! Chopped pecans or walnuts would be absolutely delicious. I often throw in a handful for extra crunch and flavor. It adds another layer of texture that’s really lovely. Experiment and see what you like!

Rustic Pumpkin Pie Crisp: Crunchy Oats & Warm Spices
- Prep Time: 20 Minutes
- Cook Time: 50 Minutes
- Total Time: 1 Hour 10 Minutes
- Yield: 8 Servings 1x
- Category: Dessert
Description
Rustic Pumpkin Pie Crisp, a warm, spiced fall dessert with a buttery, crunchy oat topping. A comforting twist on classic pumpkin pie, perfect for any gathering.
Ingredients
- Pumpkin Filling Base:
- 1 (15 oz) can 100% pure pumpkin puree
- 1/2 cup heavy cream
- 1/2 cup packed light or dark brown sugar
- 2 large eggs
- 1/4 tsp salt
- 1 tsp vanilla extract
- Flavor Enhancers:
- 2 tsp pumpkin pie spice (or homemade blend)
- 1/4 tsp ground cinnamon (extra for topping)
- Crunchy Oat Topping:
- 1 cup old-fashioned rolled oats
- 1/2 cup all-purpose flour
- 1/2 cup packed light brown sugar
- 1/2 cup (1 stick) cold unsalted butter, cut into cubes
Instructions
- Prep the Pumpkin Filling:: Okay, first things first, preheat your oven to 375°F (190°C). Then, in a big mixing bowl, whisk together your pumpkin puree, heavy cream, brown sugar, eggs, and a pinch of salt. See that vibrant orange color? That’s joy, right there. Whisk it until it’s all smooth and beautifully combined. This is where the magic starts to happen, and your kitchen will begin to smell faintly of autumn. Honestly, don’t overthink this step; just get it well mixed. I always give it an extra whisk, just to be sure.
- Spice Things Up:: Now for the flavor boosters! Add your pumpkin pie spice and a little vanilla extract to the pumpkin mixture. Mix it all up again until those warm spices are perfectly distributed. You want to see that rich, consistent color throughout. I often take a little sniff at this stage; it’s just heavenly. Pour this glorious pumpkin filling into a 9×13 inch baking dish. Don’t worry if it’s not perfectly level; it’ll sort itself out in the oven. I once accidentally poured it into a dish that was too small, and let’s just say, cleanup was a bit of a challenge!
- Craft the Crunchy Oat Topping:: In a separate bowl, combine your rolled oats, all-purpose flour, a little more brown sugar, and a dash of cinnamon. Give it a good stir to mix the dry ingredients. Next, add your cold, cubed butter. This is the fun part! Use your fingers to cut the butter into the oat mixture until it resembles coarse crumbs. We’re talking pea-sized bits, maybe a little bigger. Don’t overmix; you want those distinct butter pieces for a truly rustic texture. This is where I sometimes get a bit messy, but it’s worth it for that crunch!
- Assemble Your Rustic Pumpkin Pie Crisp:: Now, sprinkle that wonderful oat topping evenly over the pumpkin filling in your baking dish. You want a generous, almost haphazard layer here. Remember, it’s rustic, so don’t fret about perfection. Just make sure there’s a good blanket of oats over most of the pumpkin. The more scattered it looks, the more charming, I think. This step is where you really start to see the crisp come to life, and I always get excited for that golden-brown crust.
- Bake to Golden Perfection:: Pop your dish into the preheated oven. Bake for about 40-50 minutes. You’re looking for the pumpkin filling to be set – not jiggly in the center – and the oat topping to be beautifully golden brown and crunchy. Keep an eye on it, especially towards the end, as ovens can be quirky. If the topping starts browning too quickly, you can loosely tent it with foil. I once forgot to check, and the edges were a bit too dark, but still tasty, honestly!
- Cool and Serve Your Rustic Pumpkin Pie Crisp:: Once it’s out of the oven, let this glorious Rustic Pumpkin Pie Crisp cool on a wire rack for at least 15-20 minutes. This cooling time is crucial; it allows the filling to firm up a bit more, making it easier to scoop. The smells filling your kitchen right now are just incredible, aren’t they? That warm, spiced aroma is pure comfort. Serve it warm, maybe with a scoop of vanilla ice cream or a dollop of whipped cream. It’s pure autumn bliss, I promise!


