
I remember my first attempt at anything apple-fritter-like. It was a complete, glorious mess! I was maybe ten, trying to recreate something I’d had at a local fair, and ended up with what looked like apple-studded hockey pucks. But oh, the smell! That warm cinnamon-apple scent filled the kitchen and, honestly, even those dense little pucks tasted pretty good. Fast forward a few decades, and I’ve finally nailed these Baked Apple Fritters with Glaze. They’re everything I wanted back then: tender, bursting with apple, and kissed with a sweet, simple glaze. No deep-fryer needed, which is a win in my book!
One time, I was so excited to get these Baked Apple Fritters with Glaze in the oven, I completely forgot to add the eggs! The dough was a crumbly, sad mess. I stared at it for a good minute, then sheepishly mixed in the eggs. Miraculously, they still turned out alright, though a little denser than usual. A good reminder that kitchen ‘oops’ moments often lead to tasty, albeit unexpected, results!

Ingredients
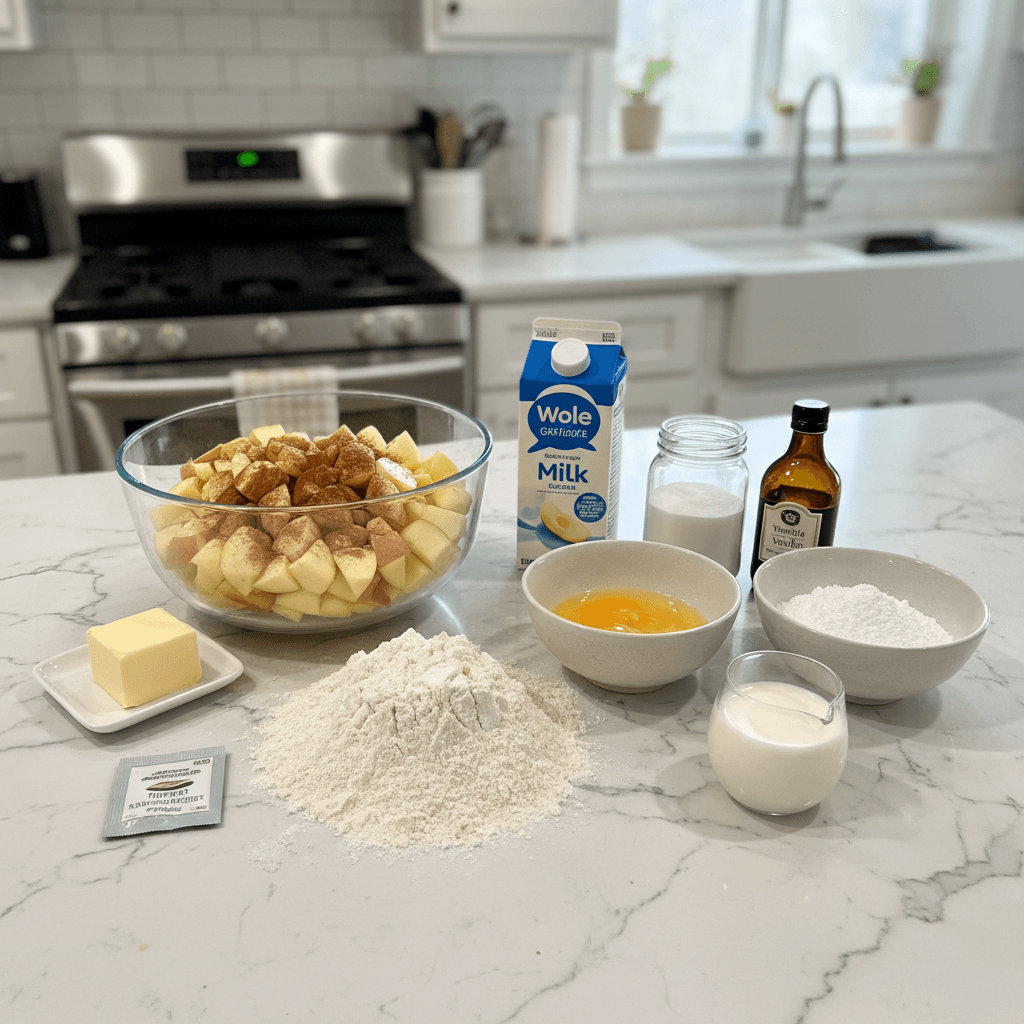
- All-purpose flour: The backbone of our fritters. Don’t go for cake flour, we want a bit of chew. I once tried whole wheat, and while healthy, it just didn’t hit the same.
- Granulated sugar: Just enough sweetness for the fritters themselves. I’m a firm believer in not overdoing it here, since the glaze brings its own party.
Baking powder: Our leavening agent! This is what gives us that light, airy texture. I always make sure mine’s fresh, otherwise, you end up with flat little discs, which I’ve done more times than I’d like to admit.
Salt: Balances all the sweet and brightens up the flavors. Honestly, a pinch of salt makes everything better, even baked goods. I swear by it.
Ground cinnamon: The quintessential apple spice! It just smells like home, doesn’t it? Don’t skimp here, it’s what makes these fritters sing.
- Milk: Whole milk, please! Don’t even think about skim, you need that fat for tenderness. I once used almond milk in a pinch, and it worked, kinda, but the richness wasn’t there.
Egg: Binds everything together and adds richness. I forgot this once, remember? Not ideal!
Unsalted butter (melted): Adds moisture and flavor. Make sure it’s cooled a bit before adding to the wet ingredients, or you might accidentally scramble your egg a little. Oops!
Apples (Granny Smith or Honeycrisp): The star of our Baked Apple Fritters with Glaze! I love Granny Smiths for their tartness, which cuts through the sweetness, but Honeycrisp gives a lovely texture. I’ve tried softer apples, and they just turn to mush, which is a no-go for fritters.
Vanilla extract: Enhances all the other flavors. Use the real stuff, hon. Artificial vanilla just doesn’t have that warm, comforting depth.
Powdered sugar: For that classic, smooth glaze. Sift it if you can, otherwise, you’ll be fighting lumps, and who has time for that?
Milk or cream (for glaze): Just a splash to thin out the glaze. Cream makes it extra decadent, which, let’s be real, is usually my choice!
Instructions
- Get Your Oven Ready:
- First things first, preheat your oven to 375°F (190°C) and line a baking sheet with parchment paper. This parchment paper is your best friend, honestly, it saves so much cleanup later. I skipped it once, and spent way too long scraping sticky glaze off the pan. Learn from my mistakes, folks!
- Whisk the Dry Bits:
- In a big bowl, whisk together your flour, granulated sugar, baking powder, cinnamon, and salt. Give it a good whisk, making sure everything is combined. This ensures your leavening is evenly distributed, so you don’t end up with a fritter that’s half fluffy, half dense. I remember thinking ‘it’s just flour, what’s the big deal?’ and ended up with lopsided fritters.
- Mix the Wet Bits:
- In a separate, smaller bowl, whisk your milk, egg, and melted butter (make sure it’s cooled a bit!). Add the vanilla extract here too. I always take a moment to smell that vanilla, it just smells so comforting. This step is about getting everything liquid ready to greet the dry ingredients.
- Combine and Add Apples:
- Pour the wet mixture into the dry ingredients. Mix until just combined. Seriously, don’t overmix! Lumps are okay. Then, gently fold in your diced apples. You want that dough to look shaggy, not smooth. Overmixing develops the gluten, making your Baked Apple Fritters with Glaze tough. I learned that the hard way, resulting in fritters that were more rubbery than tender.
- Scoop and Bake:
- Using two spoons, or a small ice cream scoop (my personal favorite for consistency), drop spoonfuls of the batter onto your prepared baking sheet. They don’t need to be perfectly round, these are rustic, remember? Leave a little space between each one. I usually aim for about 8-10 fritters, depending on how generous I’m feeling with my scoops.
- Bake ‘Til Golden:
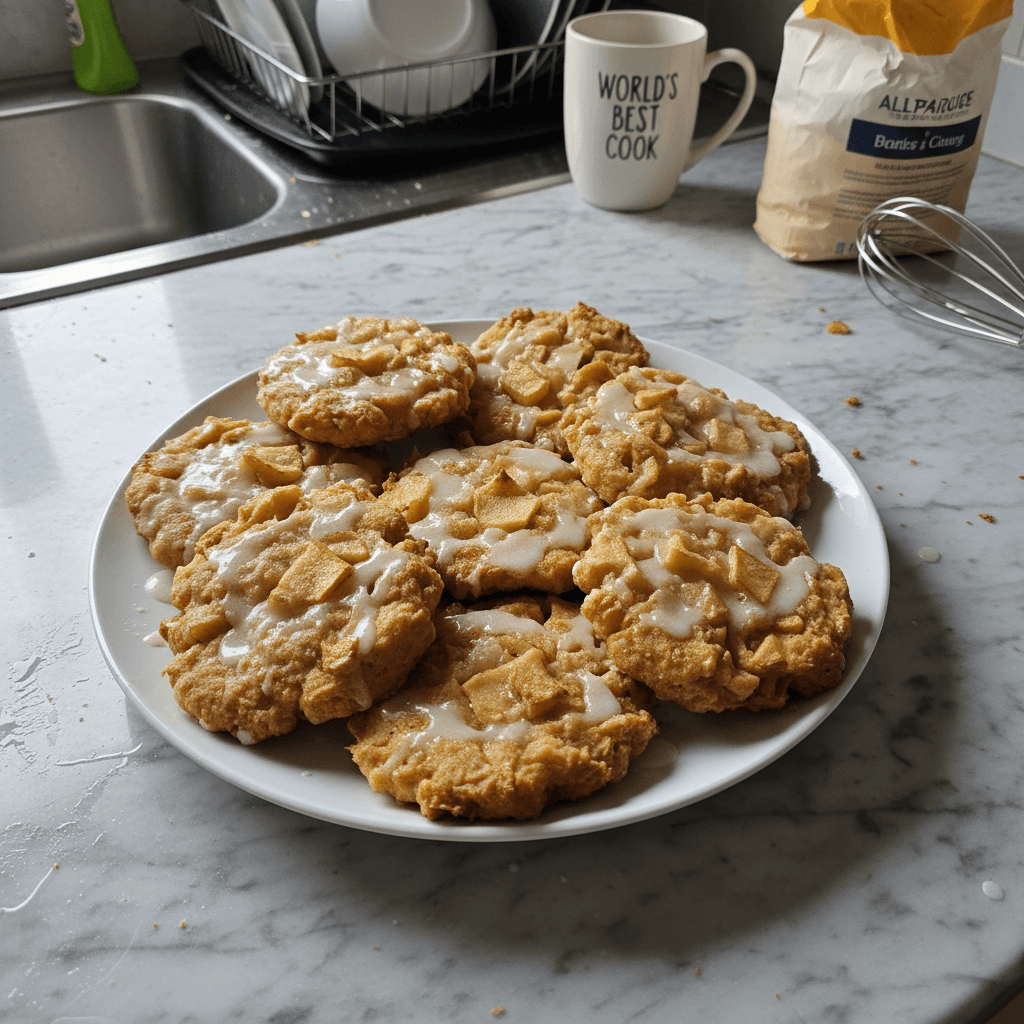
- Pop them into the preheated oven and bake for 18-25 minutes, or until they’re golden brown and cooked through. You’ll know they’re done when a toothpick inserted into the center comes out clean. The smell at this stage? Oh my goodness. Your kitchen will smell like pure autumn magic! Let them cool on the baking sheet for a few minutes while you whip up the glaze.
- Whip Up the Glaze:
- In a small bowl, whisk together your powdered sugar and a tablespoon of milk or cream. Add more liquid, a tiny bit at a time, until you have a smooth, pourable glaze. You want it thick enough to coat a spoon but thin enough to drip. I always go for slightly thicker because, let’s be real, more glaze is always better on Baked Apple Fritters with Glaze!
- Glaze and Devour:
- Once the fritters have cooled slightly (they should still be warm), drizzle or dunk them into the glaze. Let the glaze set for a minute or two, then serve immediately. The contrast of the warm fritter and the sweet, slightly firm glaze is just heavenly. Honestly, try to wait a minute, but I usually can’t!
There’s something so satisfying about pulling these Baked Apple Fritters with Glaze from the oven. That golden-brown crust, the way the apples peek out, and the immediate rush of cinnamon-sugar aroma. I often find myself just staring at them for a moment, remembering all the kitchen adventures that led to this recipe. Sometimes a bit of glaze drips onto the parchment, and honestly, that’s just a bonus snack for the cook!
Baked Apple Fritters with Glaze Storage Tips
Okay, so here’s the deal with storing these. Baked Apple Fritters with Glaze are definitely at their absolute best fresh, still warm from the oven. But, if you do manage to have some leftovers (which, let’s be real, is rare in my house), they’ll keep in an airtight container at room temperature for up to 2 days. I’ve tried refrigerating them, and they get a bit dense and lose some of their charm, so I usually avoid that. Reheating them gently in the microwave for about 15-20 seconds can bring back some warmth, but honestly, the glaze can get a little sticky. My personal tip? If you know you’ll have leftovers, glaze them just before serving, and store the unglazed fritters separately. Then you can warm the fritters and add fresh glaze!

Baked Apple Fritters with Glaze Ingredient Substitutions
I’ve played around with a few swaps over the years, mostly out of necessity when I was missing an ingredient. For the apples, you can totally use other firm, tart varieties like Fuji or Braeburn if Granny Smith isn’t your jam. I tried Golden Delicious once, and it worked, kinda, but they got a bit too soft for my liking in the Baked Apple Fritters with Glaze. If you’re out of regular milk, almond milk or oat milk can work, but the fritters might be a touch less rich. I’ve used plain Greek yogurt thinned with a little water in place of milk for extra tang, and that was actually a fun twist! For the glaze, a dash of lemon juice instead of milk can give it a bright, zesty kick, which is a nice variation when you want something a little less sweet. Just be brave and experiment, that’s what I always say!
Baked Apple Fritters with Glaze Serving Suggestions
Oh, the possibilities! These Baked Apple Fritters with Glaze are already a complete treat on their own, but if you want to elevate the experience, I’ve got ideas. A strong cup of coffee or a milky chai latte is my go-to for a morning pairing. For a dessert vibe, a scoop of really good vanilla bean ice cream melting over a warm fritter? Yes please, that’s pure bliss. Or, for an extra indulgent touch, a drizzle of warm caramel sauce. Honestly, a plate of these, a good book, and a cozy blanket on a chilly evening? That’s my kind of date night. They also make a fantastic addition to a brunch spread, alongside some crispy bacon and fresh fruit. Don’t forget, these Baked Apple Fritters with Glaze pair wonderfully with friendly conversation!
Cultural Backstory
Fritters have such a rich, diverse history, appearing in countless cultures around the world in various forms. While our Baked Apple Fritters with Glaze lean into a more American comfort food tradition, the idea of frying or baking fruit-filled dough goes back centuries. My own connection to fritters started with those fairground treats, you know, the ones that smell so good you just have to have one. This baked version, though, feels more like the kind of recipe my grandma would have whipped up simple ingredients, honest flavors, and a whole lot of love. It’s about taking those nostalgic feelings and making them accessible for a home kitchen, without all the fuss of deep-frying. It’s my little nod to tradition, with a modern, less messy twist, perfect for making new memories around the kitchen table.
And there you have it, my dear friends. These Baked Apple Fritters with Glaze are more than just a recipe, they’re a little piece of home, a taste of comfort, and a reminder that even kitchen ‘oops’ moments can lead to something wonderful. I hope you make them, make them your own, and fill your home with that incredible aroma. Please, tell me about your fritter adventures!
Frequently Asked Questions
- → Can I use different types of apples for Baked Apple Fritters with Glaze?
Absolutely! I usually go for Granny Smith or Honeycrisp for their texture and tartness, but firm varieties like Fuji or Braeburn work well too. Just avoid super soft apples, they tend to get mushy.
- → My fritters didn’t rise much. What went wrong?
Oh, I’ve been there! It’s usually one of two things: either your baking powder isn’t fresh, or you overmixed the batter. Gentle mixing and fresh leavening are key to fluffy fritters!
- → Can I deep-fry these instead of baking them?
This recipe is specifically developed for baking, so the batter consistency is a bit different from traditional deep-fried fritters. While you could try, I can’t guarantee the same results. For these, baking is the way to go!
- → How long do Baked Apple Fritters with Glaze stay fresh?
Honestly, they’re best eaten warm, right after glazing! But if you have leftovers, store them in an airtight container at room temperature for up to 2 days. Reheating them gently in the microwave works okay.
- → Can I add other spices to the fritters?
Definitely! A pinch of nutmeg, allspice, or even a tiny bit of cardamom would be lovely. I love playing around with spices to give my Baked Apple Fritters with Glaze a unique twist. Have fun with it!
Homestyle Baked Apple Fritters with Glaze
- Prep Time: 20 Minutes
- Cook Time: 25 Minutes
- Total Time: 45 Minutes
- Yield: 8 Servings 1x
- Category: Dinner
Description
Warm, tender Baked Apple Fritters with Glaze. A simple, comforting treat that brings back sweet memories without the deep-fry mess. Pure apple bliss!
Ingredients
- Fritter Dough Essentials:
- 1 ½ cups all-purpose flour
- ¼ cup granulated sugar
- 2 teaspoons baking powder
- ½ teaspoon salt
- ½ cup milk (whole milk recommended)
- 1 large egg
- 2 tablespoons unsalted butter, melted and cooled
- Apple Goodness:
- 1 large apple (Granny Smith or Honeycrisp), peeled, cored, and finely diced
- Flavor Boosters:
- 1 teaspoon ground cinnamon
- 1 teaspoon vanilla extract
- Sweet Glaze Finish:
- 1 cup powdered sugar
- 2–3 tablespoons milk or cream
Instructions
- Get Your Oven Ready:: First things first, preheat your oven to 375°F (190°C) and line a baking sheet with parchment paper. This parchment paper is your best friend, honestly, it saves so much cleanup later. I skipped it once, and spent way too long scraping sticky glaze off the pan. Learn from my mistakes, folks!
- Whisk the Dry Bits:: In a big bowl, whisk together your flour, granulated sugar, baking powder, cinnamon, and salt. Give it a good whisk, making sure everything is combined. This ensures your leavening is evenly distributed, so you don’t end up with a fritter that’s half fluffy, half dense. I remember thinking ‘it’s just flour, what’s the big deal?’ and ended up with lopsided fritters.
- Mix the Wet Bits:: In a separate, smaller bowl, whisk your milk, egg, and melted butter (make sure it’s cooled a bit!). Add the vanilla extract here too. I always take a moment to smell that vanilla, it just smells so comforting. This step is about getting everything liquid ready to greet the dry ingredients.
- Combine and Add Apples:: Pour the wet mixture into the dry ingredients. Mix until *just* combined. Seriously, don’t overmix! Lumps are okay. Then, gently fold in your diced apples. You want that dough to look shaggy, not smooth. Overmixing develops the gluten, making your Baked Apple Fritters with Glaze tough. I learned that the hard way, resulting in fritters that were more rubbery than tender.
- Scoop and Bake:: Using two spoons, or a small ice cream scoop (my personal favorite for consistency), drop spoonfuls of the batter onto your prepared baking sheet. They don’t need to be perfectly round; these are rustic, remember? Leave a little space between each one. I usually aim for about 8-10 fritters, depending on how generous I’m feeling with my scoops.
- Bake ‘Til Golden:: Pop them into the preheated oven and bake for 18-25 minutes, or until they’re golden brown and cooked through. You’ll know they’re done when a toothpick inserted into the center comes out clean. The smell at this stage? Oh my goodness. Your kitchen will smell like pure autumn magic! Let them cool on the baking sheet for a few minutes while you whip up the glaze.
- Whip Up the Glaze:: In a small bowl, whisk together your powdered sugar and a tablespoon of milk or cream. Add more liquid, a tiny bit at a time, until you have a smooth, pourable glaze. You want it thick enough to coat a spoon but thin enough to drip. I always go for slightly thicker because, let’s be real, more glaze is always better on Baked Apple Fritters with Glaze!
- Glaze and Devour:: Once the fritters have cooled slightly (they should still be warm), drizzle or dunk them into the glaze. Let the glaze set for a minute or two, then serve immediately. The contrast of the warm fritter and the sweet, slightly firm glaze is just heavenly. Honestly, try to wait a minute, but I usually can’t!


