Introduction to Mini Loaf Cakes
There’s something undeniably comforting about the aroma of freshly baked Mini Loaf Cakes wafting through your home. I still remember the first time I attempted this delightful treat-my kitchen transformed into a cozy bakery, and my kids were instantly drawn in by the sweet scent. Whether you’re juggling work calls or soccer practice, this recipe for Mini Loaf Cakes is your new best friend. These charming little cakes are not only adorable but also incredibly versatile, allowing you to enjoy your creativity with flavors and toppings. excellent for breakfast, snacks, or dessert, they bring a touch of joy to any occasion.
What makes Mini Loaf Cakes special is their ability to evoke nostalgia while offering a modern twist. Each bite bursts with flavor, making them a delightful treat for both kids and adults alike. Plus, their small size means you can enjoy a slice without the guilt of a bigger cake. So, let’s dive into this delightful recipe and discover how easy it is to bake your own batch of Mini Loaf Cakes that will leave everyone asking for seconds!

Why You’ll Love This Mini Loaf Cakes
Picture this: a rainy afternoon, and you’re craving something sweet. Mini loaf cakes are like a cozy blanket for your taste buds, offering that excellent balance of warmth and indulgence. Whether you’re juggling work calls or soccer practice, this recipe is your new best friend. No more 6 PM panic-dinner or dessert is ready faster than a microwave meal, allowing you to savor those precious moments with your loved ones.
Not only does it save time, but it also delivers delightful flavors that transport you to a quaint bakery with every bite. The moist texture and enticing aroma of freshly baked mini loaf cakes will have your kitchen smelling like heaven. Plus, they are incredibly versatile! You can whip them up in a flash, making them an ideal treat for unexpected guests or a sweet addition to your weekly meal prep. Trust me, once you try these mini loaf cakes, you’ll be hooked!
Ingredients for Mini Loaf Cakes
The beauty of Mini Loaf Cakes lies as much in their ingredients as in their delightful taste. Whether you’re juggling work calls or soccer practice, this recipe for Mini Loaf Cakes is your new best friend. With a simple list of ingredients, you can whip up these charming treats that bring joy to any occasion. Let’s dive into what you’ll need to create these scrumptious bites!
To start, gather the basics for your Mini Loaf Cakes:
- All-purpose flour: This is the backbone of your cakes, providing structure and a light texture.
- Sugar: Sweetness is key! Granulated sugar offers a delightful contrast to the cake’s richness.
- Baking powder: This leavening agent helps your cakes rise to fluffy perfection.
- Salt: A pinch enhances the flavors, making the sweetness pop.
- Eggs: Eggs bind everything together, adding moisture and richness.
- Butter: Melted butter adds a luscious flavor and keeps your cakes moist.
- Milk: This brings everything together, creating a tender crumb.
Feel free to get creative with your Mini Loaf Cakes! Here are some fun options:
- Chocolate chips: Toss in some chocolate chips for an indulgent touch-because who doesn’t love chocolate?
- Nuts: Chopped walnuts or pecans add a delightful crunch-your secret’s safe with me if you decide to skip them!
- Fruit: Fresh berries or mashed bananas can add a burst of flavor and moisture.
- Spices: A dash of cinnamon or nutmeg can elevate your cakes to cozy heights.
With these ingredients in hand, you’re well on your way to creating Mini Loaf Cakes that will charm everyone who tries them! Remember, the exact quantities will be listed at the bottom of the recipe, so don’t worry about measuring just yet.
How to Make Mini Loaf Cakes
Creating mini loaf cakes is not only a delightful baking experience but also a wonderful way to share some sweetness with loved ones. Whether you’re juggling work calls or soccer practice, this recipe for Mini Loaf Cakes is your new best friend. The best part? They’re excellent for any occasion-just imagine the smiles when you serve these delightful treats at your next gathering!
- Step 1: Gather Your Ingredients
Start by preheating your oven to 350°F (175°C). While the oven heats up, gather all your ingredients. You’ll need flour, sugar, butter, eggs, and your choice of flavors like vanilla or cocoa. Measure them out carefully. I like to use clear bowls so I can see exactly what I’m working with. This makes the next steps a breeze! - Step 2: Mixing the Batter
In a large mixing bowl, cream together the butter and sugar until it’s light and fluffy-about 3 to 5 minutes. This step is crucial as it incorporates air into your batter, making your mini loaf cakes light. Next, beat in the eggs one at a time, ensuring each is well combined before adding the next. Remember, patience is key! Once the eggs are in, add your chosen flavoring. It’s like adding a secret ingredient that will make your mini loaf cakes stand out! - Step 3: Combining Dry Ingredients
In a separate bowl, whisk together the flour, baking powder, and a pinch of salt. This step ensures even distribution of the leavening agent, which is essential for a fluffy texture. Gradually add the dry ingredients to the wet mixture, stirring gently until just combined. Don’t overmix; it’s okay to have a few lumps. This is your moment to shine-imagine the aroma as these mini loaf cakes bake! - Step 4: Pouring and Baking
Now, grease your mini loaf pans with butter or cooking spray to prevent sticking. Pour the batter into each pan, filling them about two-thirds full. This allows room for the cakes to rise. Place them in the preheated oven and bake for 25 to 30 minutes, or until a toothpick inserted in the center comes out clean. The anticipation builds as your kitchen fills with the sweet scent of baking! - Step 5: Cooling and Serving
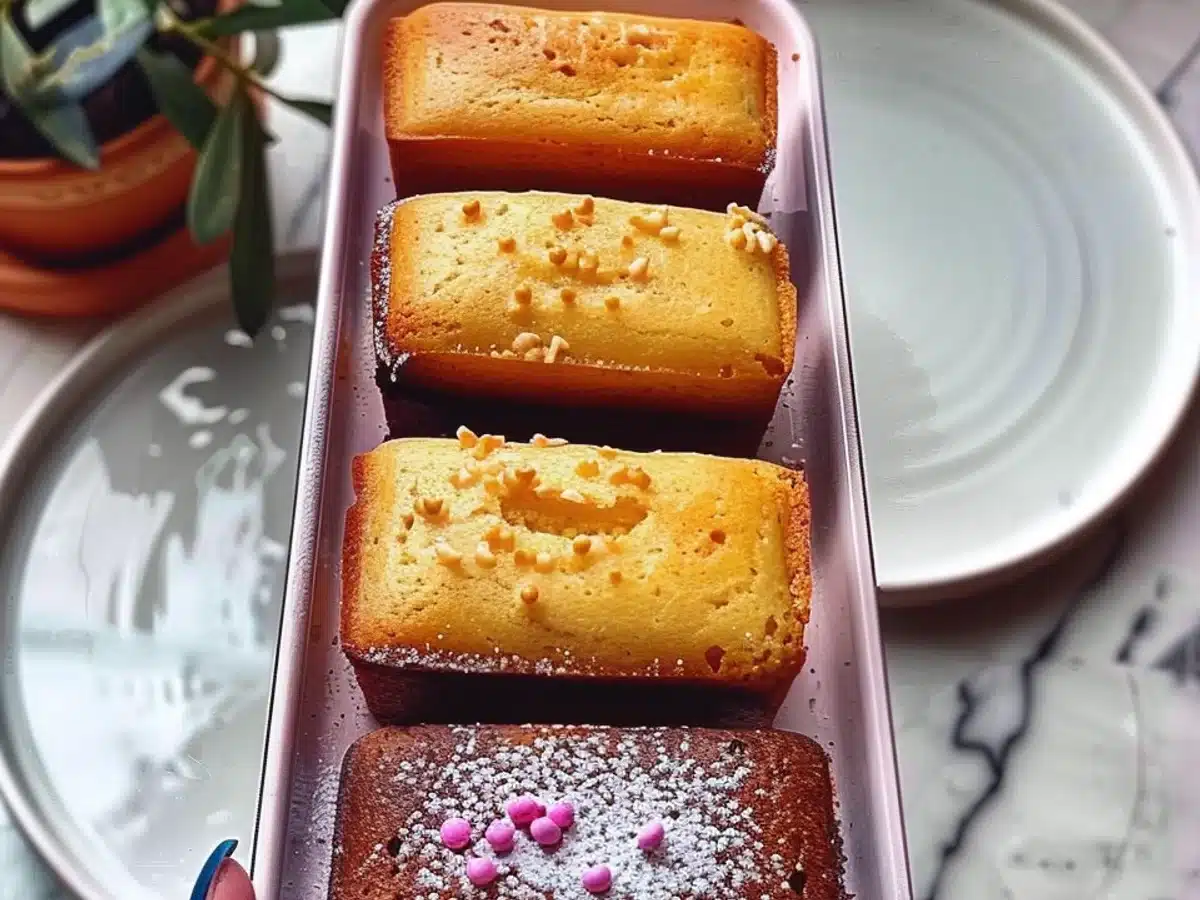
Once baked, remove the mini loaf cakes from the oven and let them cool in the pans for about 10 minutes. Then, gently transfer them to a wire rack to cool completely. You can serve them plain or dress them up with a dusting of powdered sugar or a drizzle of glaze. Imagine the smiles when your family bites into these moist, flavorful treats!
Making mini loaf cakes is a simple yet rewarding process. They are excellent for sharing, and each bite is a little slice of happiness. Enjoy the fun of baking!
Tips for Success
When it comes to baking Mini Loaf Cakes, a few simple tips can elevate your results from good to great. Whether you’re making these delightful treats for a special occasion or just because, following these pointers will ensure you achieve that excellent balance of flavor and texture. Let’s dive into the essentials!
- Use Room Temperature Ingredients: Bring your eggs and butter to room temperature before mixing. This helps create a smooth batter and results in a lighter, fluffier cake.
- Don’t Overmix: Mix your batter until just combined. Overmixing can lead to dense Mini Loaf Cakes-nobody wants that!
- Check for Doneness: Insert a toothpick into the center of a loaf. If it comes out clean, your cakes are ready. If not, give them a few more minutes.
- Cool in the Pan: Allow your Mini Loaf Cakes to cool in the pan for about 10 minutes. This will help them maintain their shape when you transfer them to a wire rack.
- Experiment with Flavors: Feel free to add nuts, chocolate chips, or dried fruit for a tasty twist. Each variation of Mini Loaf Cakes can be a new adventure!
- Proper Storage: Keep your Mini Loaf Cakes in an airtight container at room temperature for a few days. For longer storage, freeze them for up to three months-excellent for a quick treat later!
By incorporating these tips, your Mini Loaf Cakes will not only look fantastic but taste incredible too. Happy baking!
Equipment Needed
When diving into the delightful world of Mini Loaf Cakes, you don’t need a treasure trove of fancy gadgets. In fact, some of the best baking tools are simple and reliable. Here’s a handy list of essential equipment to get you started:
- Mini loaf pans: These are crucial for shaping your cakes perfectly. If you don’t have them, use a standard muffin tin as a backup.
- Mixing bowls: A few medium and large bowls will keep your ingredients organized. Don’t shy away from repurposing your trusty salad bowl!
- Measuring cups and spoons: Precision is key in baking. If you’re in a pinch, a standard coffee cup can be a makeshift measuring tool.
- Whisk or electric mixer: While a whisk is great for mixing by hand, an electric mixer can save you time and effort-excellent for busy schedules!
- Spatula: A silicone spatula is ideal for scraping down the sides of your bowl, ensuring nothing goes to waste.
- Cooling rack: To let your mini loaf cakes cool evenly. If you don’t have one, a plate will suffice-just make sure to elevate your cakes!
With these essential tools, you’re well on your way to creating tasty Mini Loaf Cakes that will impress family and friends alike. Happy baking!
Variations
When it comes to Mini Loaf Cakes, the possibilities are as endless as your imagination! Whether you’re craving something fruity, nutty, or even a little spicy, this recipe can adapt beautifully to your preferences. Here are some creative variations to help you customize your mini masterpieces:
- Dietary-Friendly Tweaks: Swap traditional flour for almond or coconut flour to create gluten-free Mini Loaf Cakes. This change not only caters to dietary restrictions but also adds a nutty flavor that pairs wonderfully with sweet ingredients.
- Fruit-Infused Delights: Try mixing in mashed bananas or applesauce for a moist texture and natural sweetness. A dash of cinnamon elevates these flavors, making your Mini Loaf Cakes reminiscent of a cozy autumn afternoon.
- Chocolate Lover’s Dream: Add cocoa powder to the batter for rich chocolate Mini Loaf Cakes. Toss in chocolate chips for an extra indulgent treat that melts in your mouth with each bite.
- Nutty Additions: Incorporate chopped walnuts or pecans for a delightful crunch. Not only do they add texture, but they also enhance the overall flavor profile of your cakes.
- Seasonal Twists: In the fall, fold in roasted pumpkin puree and spices like nutmeg and ginger for a seasonal take on Mini Loaf Cakes. It’s like wrapping your taste buds in a warm, festive hug!
- Citrus Zest: Brighten up your Mini Loaf Cakes with lemon or orange zest. This punch of freshness awakens the flavors, making every slice a burst of sunshine.
- Cheesecake Filling: For a decadent option, create a simple cheesecake filling by blending cream cheese, sugar, and vanilla. Swirl it into the batter before baking for a delightful surprise in every loaf.
With these variations, your Mini Loaf Cakes can cater to any occasion or craving. So go ahead, experiment with flavors and discover your own unique twist on this delightful treat!
Print
Mini Loaf Cakes: Discover Irresistible Recipes Today!
- Prep Time: 15 minutes
- Cook Time: 30 minutes
- Total Time: 45 minutes
- Yield: 6 mini loaves 1x
- Category: Dessert
- Cuisine: American
Description
Mini loaf cakes are delightful, individual-sized cakes perfect for snacking or dessert, often flavored with fruits, nuts, or chocolate.
Ingredients
- 1 1/2 cups all-purpose flour
- 1 cup granulated sugar
- 1/2 cup unsalted butter, softened
- 2 large eggs
- 1/2 cup milk
- 1 tsp vanilla extract
- 1 tsp baking powder
- 1/2 tsp baking soda
- 1/4 tsp salt
Instructions
- Preheat the oven to 350°F (175°C) and grease mini loaf pans.
- In a large bowl, cream together the butter and sugar until light and fluffy.
- Add the eggs one at a time, mixing well after each addition.
- Stir in the milk and vanilla extract.
- In another bowl, whisk together the flour, baking powder, baking soda, and salt.
- Gradually add the dry ingredients to the wet ingredients, mixing until just combined.
- Pour the batter into the prepared mini loaf pans, filling each about 2/3 full.
- Bake for 25-30 minutes, or until a toothpick inserted into the center comes out clean.
- Let the cakes cool in the pans for 10 minutes before transferring to a wire rack to cool completely.
Notes
- Feel free to add chocolate chips, dried fruits, or nuts for extra flavor.
- Store in an airtight container for up to 3 days.
- These cakes can be frozen for up to 2 months.
Nutrition
- Serving Size: 1 mini loaf
- Calories: 220
- Sugar: 15g
- Sodium: 150mg
- Fat: 10g
- Saturated Fat: 5g
- Carbohydrates: 30g
- Fiber: 1g
- Protein: 3g
- Cholesterol: 40mg