
I remember the first time I attempted sweet and sour chicken. It was a Friday night, I was exhausted, and my fridge was, honestly, a bit sad. I had takeout menus scattered everywhere, but a tiny voice in my head (probably my wallet) said, “You can do this!” I dove in, skeptical, and emerged 30 minutes later with a dish that smelled like pure joy. That’s why this Easy Sweet and Sour Chicken recipe means so much to me, it’s a reminder that even on the busiest days, a homemade, comforting meal is totally within reach. This version is quick, tangy, and always hits the spot.
Oh, the kitchen chaos! One time, I was so excited to get this Easy Sweet and Sour Chicken on the table, I accidentally swapped the cornstarch for baking soda in the chicken coating. The result? A weirdly puffy, slightly bitter chicken that still makes me chuckle. Lesson learned: always double-check your white powders, hon! Now, I keep my cornstarch in a clearly labeled jar, just in case.

Easy Sweet and Sour Chicken Ingredients
Chicken & Coating
- Chicken Breasts: I usually grab boneless, skinless breasts, about a pound. You want them cut into bite-sized pieces, roughly an inch. Why? They cook super fast, which is key for a 30-minute meal. I tried thighs once, and while tasty, they just didn’t get as crispy for me.
- Cornstarch: This is our magic dust for crispy chicken! It creates that lovely, light coating. Don’t skip it, or your chicken will just be, well, chicken. I once ran out and used flour, and it was okay, but not the same satisfying crunch.
- Egg: Just one, beaten. It helps the cornstarch stick to the chicken. Honestly, I’ve forgotten this step before, and the cornstarch just kind of slid off. Oops!
- Salt & Black Pepper: Simple, but crucial for seasoning the chicken itself. Don’t be shy here, bland chicken makes for a bland dish, even with the best sauce.
Sweet & Sour Sauce Staples
- Ketchup: The base of our tangy, sweet sauce. I know, I know, ketchup, but trust me, it’s the secret weapon for that classic flavor. I opt for a brand with less high-fructose corn syrup, just because.
- Rice Vinegar: This brings the ‘sour’ to our sweet and sour chicken. It’s milder than white vinegar, giving a more balanced tang. I tried apple cider vinegar once, and it was a bit too aggressive for this dish, to be real.
- Brown Sugar: For the ‘sweet’! I prefer light brown sugar for its subtle molasses notes, but dark works too if that’s what you have. Don’t stress too much on this, adjust to your sweet preference.
- Soy Sauce: Adds that essential umami depth. I use low-sodium because I like to control the saltiness myself. A splash of tamari works perfectly if you’re gluten-free!
- Water or Chicken Broth: Thins out the sauce to the right consistency. Broth adds a little extra flavor, but water is totally fine. I’ve used both, and it’s always delicious.
Veggies & Aromatics
- Bell Peppers (Red & Green): These add color, crunch, and a lovely sweetness. Cut them into 1-inch squares. I swear, the smell of them sizzling in the pan always makes my kitchen feel alive.
- Pineapple Chunks: Canned or fresh, these are essential for that signature sweet and sour fruitiness. The warmth brings out their juicy flavor. I once forgot them, and the dish just felt… incomplete.
- Garlic: Freshly minced, always! It adds so much aromatic goodness. I’m a garlic fiend, so I usually sneak in an extra clove or two. Don’t use the jarred stuff, it just doesn’t hit the same.
- Ginger: Freshly grated ginger is a game-changer. It gives a zesty warmth that complements the sauce beautifully. A little goes a long way, but it’s worth the tiny bit of effort.
Finishing Touches
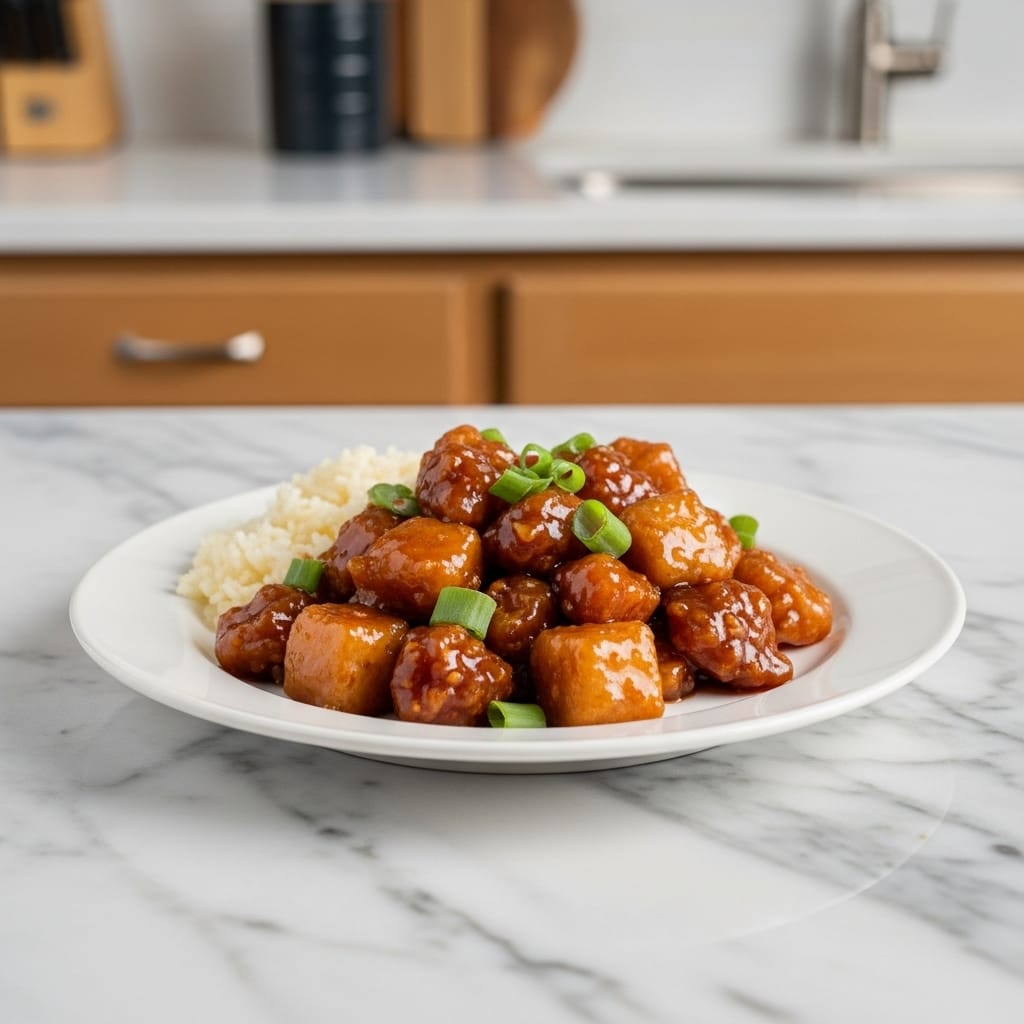
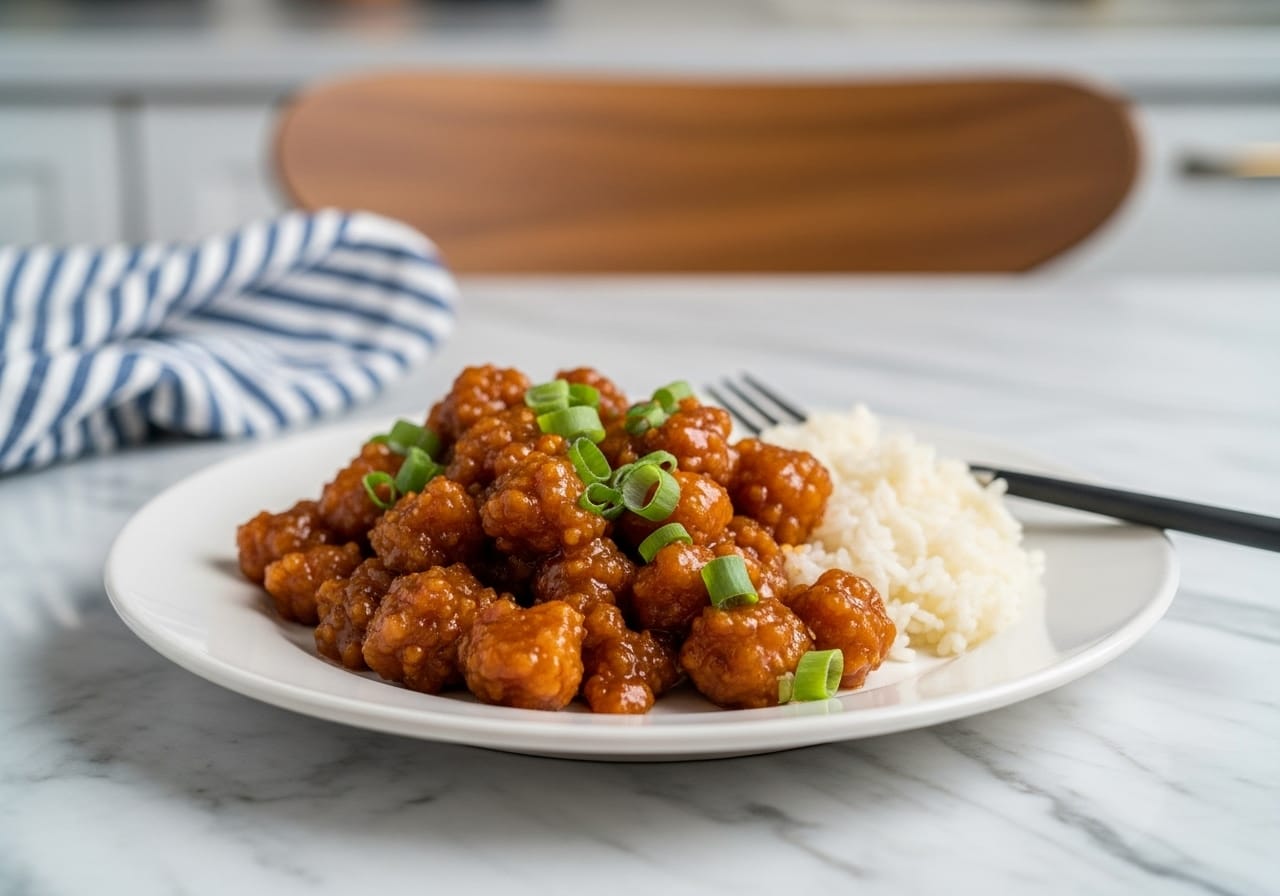
- Sesame Oil: A drizzle at the end for that nutty, aromatic finish. It’s a small touch, but it makes a big difference.
- Green Onions (Scallions): Thinly sliced, for a fresh, mild oniony bite and a pop of color. I usually sprinkle them over everything right before serving.
Crafting Your Quick Sweet and Sour Chicken
- Prep the Chicken & Whisk the Sauce:
- First things first, let’s get that chicken ready! Grab your boneless, skinless chicken breasts and cut them into nice, even bite-sized pieces. We want them about an inch big so they cook up super quick. In a bowl, whisk that egg, then toss the chicken in it. Now, sprinkle over the cornstarch, salt, and pepper, making sure every piece is coated. Honestly, this is where I usually get a little messy, but it’s worth it! While that’s sitting for a sec, grab another bowl and whisk together your ketchup, rice vinegar, brown sugar, soy sauce, and water (or broth) for the sauce. Give it a good whisk until the sugar dissolves. It smells tangy already, doesn’t it?
- Sear the Chicken to Golden Perfection:
- Heat a large skillet or wok over medium-high heat with a splash of oil. Once it’s shimmering, add your coated chicken in a single layer. Don’t overcrowd the pan, hon! If you do, the chicken will steam instead of getting that lovely golden-brown crisp, and we definitely don’t want soggy chicken. You might need to do this in batches. Let it cook for about 3-4 minutes per side until it’s beautifully golden and cooked through. I always sneak a tiny piece here to “test” it it’s a chef’s perk, right? Remove the chicken and set it aside.
- Sauté the Veggies & Aromatics:
- Using the same skillet (don’t clean it, those bits are flavor!), add a tiny bit more oil if needed. Toss in your chopped bell peppers, minced garlic, and grated ginger. Sauté for about 2-3 minutes until the peppers are just starting to soften but still have a nice crunch. We’re not looking for mushy here, just vibrant and fragrant. The smell of the garlic and ginger cooking together? Oh, it’s just the best, instantly makes my kitchen feel warm and inviting. This step is super fast, so keep an eye on it!
- Introduce the Easy Sweet and Sour Sauce:
- Pour that whisked sweet and sour sauce mixture into the skillet with the veggies. Stir it all together, scraping up any delicious bits from the bottom of the pan. Bring the sauce to a gentle simmer, and watch as it starts to thicken. This usually takes just a couple of minutes. The cornstarch in the chicken coating, and any residual on the pan, will help it along. It should coat the back of a spoon. If it gets too thick, a tiny splash of water will fix it right up!
- Combine & Stir in the Pineapple:
- Once the sauce is thick and glossy, it’s time to bring back our star! Add the seared chicken pieces back into the skillet. Toss everything gently to coat the chicken and veggies completely in that luscious sweet and sour sauce. Now, add your pineapple chunks. I love how the pineapple warms through and releases its juices into the sauce. This is where the magic truly happens, seeing all the vibrant colors come together.
- Final Touches & Serve Your Easy Sweet and Sour Chicken:
- Give it one last gentle stir to ensure everything is coated and heated through. Drizzle with a tiny bit of sesame oil for that irresistible nutty aroma it’s a small touch that makes a huge difference, trust me! Sprinkle with freshly sliced green onions. Your Easy Sweet and Sour Chicken is ready! It should look glossy, smell amazing, and taste like pure comfort. Serve it immediately over fluffy rice, and honestly, you’ll feel so proud of what you just whipped up in 30 minutes.
Sometimes, after a long day, I just crave something familiar and flavorful, and this Easy Sweet and Sour Chicken always comes to the rescue. I remember one evening, my little one helped me toss the chicken in cornstarch, and it ended up everywhere on the counter, on her nose, even in my hair! We just laughed, wiped up the mess, and still had dinner on the table in record time. It’s those imperfect, messy moments that make cooking so real and wonderful.
Storage Tips for Your Sweet and Sour Chicken
Okay, so let’s talk leftovers. This Sweet and Sour Chicken actually holds up pretty well, which is a total win for meal prep. I usually store any extras in an airtight container in the fridge for up to 3-4 days. Now, a little confession: I microwaved it once without adding a splash of water, and the sauce got a bit glumpy, and the chicken dried out. So, don’t do that lol! When reheating, I like to add a tablespoon or two of water or broth to loosen the sauce and gently warm it on the stovetop over low heat. It helps keep the chicken tender and the sauce glossy. It’s never quite as crispy as fresh, but the flavors are still totally there.
Sweet and Sour Chicken Ingredient Substitutions
I’ve definitely experimented with this Easy Sweet and Sour Chicken recipe when my pantry was looking a little bare. No bell peppers? I’ve used snap peas or even thinly sliced carrots, and while the texture is different, the flavors still work. I tried red onion once, and it was a bit too pungent for my taste, kinda overwhelmed the sweet and sour notes. If you’re out of pineapple, a handful of mandarin orange segments (canned, drained) can add a similar burst of fruity sweetness. For the rice vinegar, white vinegar can work in a pinch, but use a bit less because it’s stronger, and add a tiny bit more sugar to balance it out. I’ve also swapped chicken for pork tenderloin, sliced thin, and it was pretty delicious!
Serving Your Easy Sweet and Sour Chicken
This Sweet and Sour Chicken is a showstopper on its own, but it truly shines with a few simple additions. My absolute favorite way to serve it is over a mound of fluffy jasmine rice, which soaks up all that incredible sauce. For a lighter touch, sometimes I’ll do a quick side of steamed broccoli or green beans. Honestly, a simple green salad with a light vinaigrette is also fantastic to cut through the richness. And for a truly cozy night in? This dish with a good rom-com and a cold glass of sparkling water (or a crisp white wine, if you’re feeling fancy) is just chef’s kiss. It’s a meal that feels special, even when it’s super quick to make.
Cultural Backstory
Sweet and sour chicken, as we know it today, is a beloved dish that actually has a fascinating journey. While its roots are firmly in Chinese cuisine, particularly Cantonese cooking, the version popular in Western countries, like this Easy Sweet and Sour Chicken, has evolved quite a bit. Traditional Chinese sweet and sour dishes often use different vinegars and less vibrant, ketchup-based sauces. This particular style, with its bright red-orange hue and pineapple chunks, became widely popular in Chinese-American restaurants, adapting to local tastes. For me, it was always a special occasion takeout order as a kid, a taste of something exotic and exciting. Now, making it at home, it feels like bringing a little piece of that childhood wonder into my own kitchen, but with my own quick, comforting twist.
And there you have it, friends! A truly Easy Sweet and Sour Chicken that tastes like you spent hours on it, but really, it was just 30 minutes of kitchen fun. Every time I make this, I’m reminded that good food doesn’t have to be complicated to be incredibly satisfying. It’s become a staple in my home, a comforting classic that always brings smiles. I hope you give this one a whirl and make it your own. Let me know how it turns out, and if you have any “oops” moments or brilliant tweaks, I’d love to hear them! Happy cooking!
Frequently Asked Questions About Sweet and Sour Chicken
- → Can I use frozen chicken for this Easy Sweet and Sour Chicken recipe?
Honestly, yes, you can! Just make sure it’s completely thawed and patted very dry before you cut and coat it. Wet chicken won’t crisp up as nicely, and trust me, I’ve tried to rush it once, and it was a bit of a soggy disaster. Pat, pat, pat!
- → What if I don’t have rice vinegar for the sauce?
You can try apple cider vinegar, but use about half the amount and taste as you go, it’s much stronger. Or, if you have white vinegar, use a little less and add a tiny bit more sugar to balance the tartness. I’ve done both, and they work, just not quite the same subtle tang.
- → My sauce isn’t thickening. What did I do wrong with my Sweet and Sour Chicken?
Don’t fret, it happens! Usually, it means the heat isn’t quite high enough, or it hasn’t simmered long enough. Make sure it’s at a gentle bubble, and give it another minute or two. A tiny cornstarch slurry (1 tsp cornstarch mixed with 1 tsp cold water) can be whisked in for an instant fix, I’ve done it many times!
- → How long does Easy Sweet and Sour Chicken last in the fridge?
It’s usually good for about 3-4 days in an airtight container. The chicken might lose a little crispness, but the flavors actually meld even more. I always make extra just for lunch the next day, it’s a total lifesaver!
- → Can I add other vegetables to this Sweet and Sour Chicken?
Absolutely! That’s the beauty of home cooking. Broccoli florets, sliced carrots, or even some snow peas would be fantastic additions. Just add them in with the bell peppers and cook until tender-crisp. I’ve thrown in everything from mushrooms to zucchini!

Quick Sweet and Sour Chicken in 30 Minutes
- Prep Time: 10 Minutes
- Cook Time: 20 Minutes
- Total Time: 30 Minutes
- Yield: 4 Servings 1x
- Category: Lunch
Description
Easy Sweet and Sour Chicken in 30 minutes! Get dinner on the table fast with tangy, sweet flavors. Your busy weeknights just got tastier.
Ingredients
- Chicken & Coating:
- 1 lb boneless, skinless chicken breasts, cut into 1-inch pieces
- 1/4 cup cornstarch
- 1 large egg, beaten
- 1/2 tsp salt
- 1/4 tsp black pepper
- 2 tbsp vegetable oil (for frying)
- Sweet & Sour Sauce Staples:
- 1/2 cup ketchup
- 1/4 cup rice vinegar
- 1/4 cup light brown sugar, packed
- 2 tbsp low-sodium soy sauce
- 1/4 cup water or chicken broth
- Veggies & Aromatics:
- 1 red bell pepper, cut into 1-inch squares
- 1 green bell pepper, cut into 1-inch squares
- 1 cup pineapple chunks (canned, drained, or fresh)
- 2 cloves garlic, minced
- 1 tbsp fresh ginger, grated
- Finishing Touches:
- 1/2 tsp sesame oil
- 2 green onions (scallions), thinly sliced
Instructions
- Prep the Chicken & Whisk the Sauce: First things first, let’s get that chicken ready! Grab your boneless, skinless chicken breasts and cut them into nice, even bite-sized pieces. We want them about an inch big so they cook up super quick. In a bowl, whisk that egg, then toss the chicken in it. Now, sprinkle over the cornstarch, salt, and pepper, making sure every piece is coated. Honestly, this is where I usually get a little messy, but it’s worth it! While that’s sitting for a sec, grab another bowl and whisk together your ketchup, rice vinegar, brown sugar, soy sauce, and water (or broth) for the sauce. Give it a good whisk until the sugar dissolves. It smells tangy already, doesn’t it?
- Sear the Chicken to Golden Perfection: Heat a large skillet or wok over medium-high heat with a splash of oil. Once it’s shimmering, add your coated chicken in a single layer. Don’t overcrowd the pan, hon! If you do, the chicken will steam instead of getting that lovely golden-brown crisp, and we definitely don’t want soggy chicken. You might need to do this in batches. Let it cook for about 3-4 minutes per side until it’s beautifully golden and cooked through. I always sneak a tiny piece here to “test” it – it’s a chef’s perk, right? Remove the chicken and set it aside.
- Sauté the Veggies & Aromatics: Using the same skillet (don’t clean it, those bits are flavor!), add a tiny bit more oil if needed. Toss in your chopped bell peppers, minced garlic, and grated ginger. Sauté for about 2-3 minutes until the peppers are just starting to soften but still have a nice crunch. We’re not looking for mushy here, just vibrant and fragrant. The smell of the garlic and ginger cooking together? Oh, it’s just the best, instantly makes my kitchen feel warm and inviting. This step is super fast, so keep an eye on it!
- Introduce the Easy Sweet and Sour Sauce: Pour that whisked sweet and sour sauce mixture into the skillet with the veggies. Stir it all together, scraping up any delicious bits from the bottom of the pan. Bring the sauce to a gentle simmer, and watch as it starts to thicken. This usually takes just a couple of minutes. The cornstarch in the chicken coating, and any residual on the pan, will help it along. It should coat the back of a spoon. If it gets too thick, a tiny splash of water will fix it right up!
- Combine & Stir in the Pineapple: Once the sauce is thick and glossy, it’s time to bring back our star! Add the seared chicken pieces back into the skillet. Toss everything gently to coat the chicken and veggies completely in that luscious sweet and sour sauce. Now, add your pineapple chunks. I love how the pineapple warms through and releases its juices into the sauce. This is where the magic truly happens, seeing all the vibrant colors come together.
- Final Touches & Serve Your Easy Sweet and Sour Chicken: Give it one last gentle stir to ensure everything is coated and heated through. Drizzle with a tiny bit of sesame oil for that irresistible nutty aroma – it’s a small touch that makes a huge difference, trust me! Sprinkle with freshly sliced green onions. Your Easy Sweet and Sour Chicken is ready! It should look glossy, smell amazing, and taste like pure comfort. Serve it immediately over fluffy rice, and honestly, you’ll feel so proud of what you just whipped up in 30 minutes.


