
Introduction to Cookie Monster Cheesecake Recipe
Growing up, I was captivated by the whimsical charm of Cookie Monster, with his insatiable love for cookies. Fast forward to today, and I’ve channeled that nostalgic joy into a deliciously creamy treat: the Cookie Monster Cheesecake Recipe. Whether you’re juggling work calls or soccer practice, this recipe is your new best friend. It combines the velvety texture of cheesecake with the delightful crunch of cookie pieces, creating a dessert that feels both comforting and indulgent.
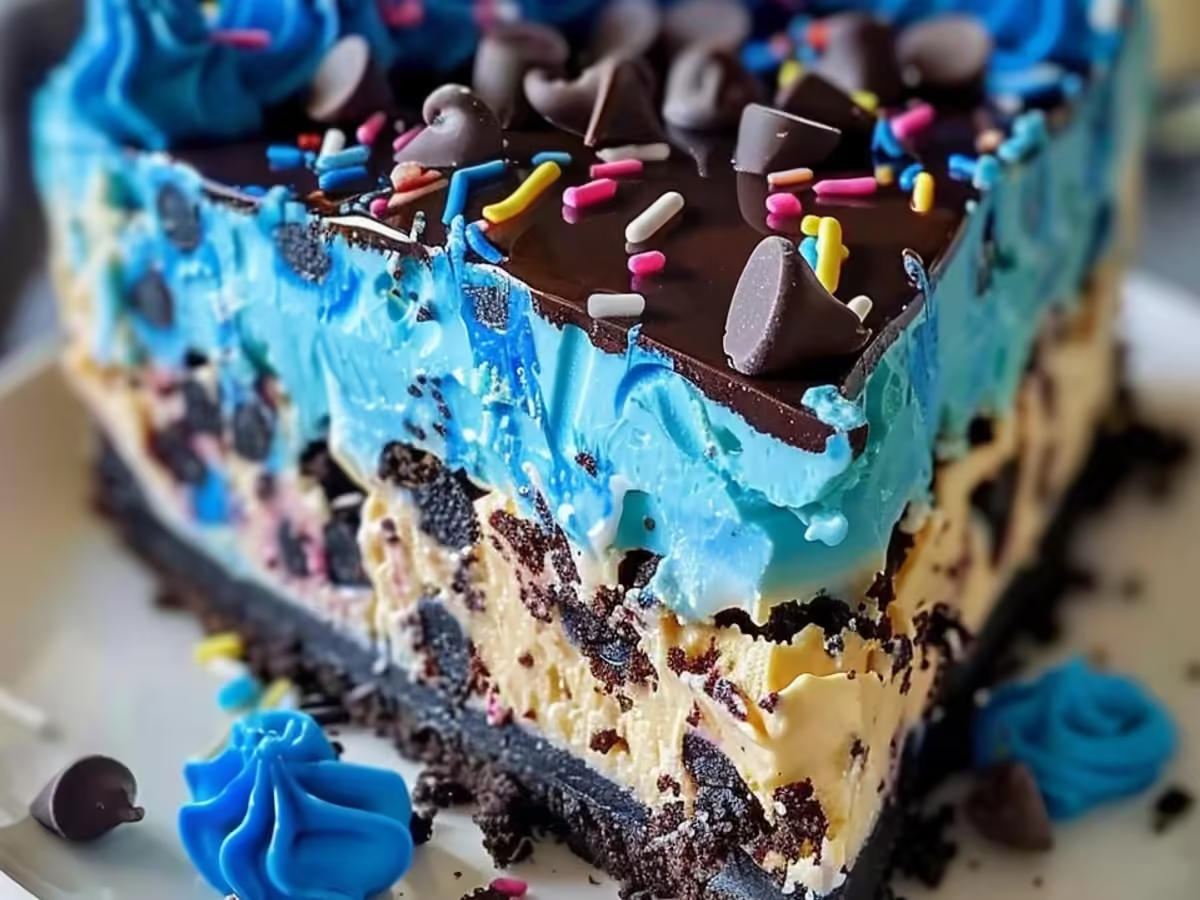
This Cookie Monster Cheesecake is excellent for celebrations or a simple family gathering. Imagine slicing into a rich, blue-tinted cheesecake dotted with cookie chunks that evoke childhood memories. Each bite delivers a sweet, playful surprise that will leave everyone grinning. So, roll up your sleeves and prepare to treat your taste buds to a delightful twist on a classic favorite! This recipe is not just a dessert; it’s a celebration of fun and flavor.

Why You’ll Love This Cookie Monster Cheesecake Recipe
Imagine coming home after a long day, juggling work calls and soccer practice, and being greeted by the delightful aroma of freshly baked cheesecake. This Cookie Monster Cheesecake Recipe is like a cozy blanket for your taste buds, wrapping you in a sweet embrace that soothes the soul. Not only does it save time, but it also brings a playful twist to your dessert table that everyone will adore.
One bite into this rich, creamy cheesecake topped with crumbled cookies will have you grinning from ear to ear. It’s not just a dessert; it’s a moment of joy that you can share with friends and family. Whether you’re hosting a gathering or just treating yourself, this recipe is your new best friend. The combination of chocolatey cookie goodness and velvety cheesecake is absolutely irresistible, making it a nice choice for any occasion.
So, why wait? This Cookie Monster Cheesecake Recipe is here to elevate your dessert game and bring smiles all around. You’ll love how easy it is to whip up, leaving you more time to enjoy the sweet moments in life. With this recipe, your kitchen will become the heart of celebrations, filled with laughter and joy.
Ingredients for Cookie Monster Cheesecake Recipe
When it comes to creating the excellent Cookie Monster Cheesecake Recipe, the ingredients are what truly bring this delightful dessert to life. Picture this: a luscious cheesecake base paired with chunks of cookie dough and a swirl of vibrant blue frosting. It’s a feast for your eyes and taste buds! Whether you’re celebrating a special occasion or just want to treat yourself, gathering the right ingredients is the first step to achieving that heavenly balance of flavors.
To make your Cookie Monster Cheesecake, start with the core ingredients:
- Cream cheese: This provides the rich, creamy texture that makes cheesecake irresistible.
- Sour cream: A dollop of sour cream adds tanginess and enhances the cheesecake’s smoothness.
- Granulated sugar: Sweetness is key! It balances the cream cheese and enhances overall flavor.
- Vanilla extract: This aromatic ingredient brings warmth and depth, making each bite memorable.
- Eggs: They act as a binder, giving the cheesecake its structure and creaminess.
- Cookie dough: Mini chocolate chip cookie dough bites add texture and the signature Cookie Monster flair.
- Blue frosting: A colorful swirl on top creates that iconic Cookie Monster look.
Don’t hesitate to get creative with your Cookie Monster Cheesecake Recipe! Here are some fun variations:
- Chocolate cookie crust: Swap a traditional graham cracker crust for a chocolate cookie crust to intensify flavors.
- Nut butter: For a nutty twist, consider adding a spoonful of peanut butter or almond butter into the cheesecake batter.
- Sprinkles: Rainbow sprinkles can add a festive touch-because who doesn’t love a little extra color?
- Gluten-free options: Use gluten-free cookies for the crust and cookie dough to accommodate dietary preferences.
Gather these ingredients, and you’ll be on your way to whipping up a Cookie Monster Cheesecake that looks as good as it tastes. Remember, the quantities are crucial, so check the recipe for exact measurements to ensure your cheesecake turns out perfectly every time!
How to Make Cookie Monster Cheesecake Recipe
When it comes to desserts, the Cookie Monster Cheesecake Recipe is like a delightful party for your taste buds! Whether you’re juggling work calls or soccer practice, this recipe is your new best friend. It combines the creamy indulgence of cheesecake with the playful crunch of cookies, creating a dessert that’s both whimsical and satisfying. So, let’s dive into how to make this tasty treat that will leave everyone craving more!
- Step 1: Prepare Your Crust
Start by preheating your oven to 325°F (160°C). In a mixing bowl, combine 2 cups of crushed chocolate sandwich cookies (think Oreos) with ½ cup of melted butter. Mix until the crumbs are well-coated. Press this mixture firmly into the bottom of a 9-inch springform pan. This will be your cheesecake’s base, providing that classic crunch. Bake for about 10 minutes, then remove it from the oven and let it cool while you prepare the filling. This step ensures that the crust sets nicely, giving you that excellent texture. - Step 2: Make the Cheesecake Filling
In another bowl, beat 24 ounces of softened cream cheese until it’s smooth and creamy. Gradually add in 1 cup of granulated sugar and continue mixing until fully incorporated. Next, blend in 1 teaspoon of vanilla extract and 3 large eggs, one at a time. Mix just until combined-overmixing can lead to cracks in your cheesecake. Now, fold in 1 cup of mini chocolate chip cookies, which brings that Cookie Monster flair. This filling will be rich and creamy, with bursts of cookie goodness throughout! - Step 3: Bake to Perfection
Pour the cheesecake filling over your cooled crust. Bake it in the oven for about 55-60 minutes. You’ll know it’s done when the edges are set, but the center still has a slight jiggle. This is key to achieving that smooth texture we all love in cheesecakes. Once baked, turn off the oven and crack the door, letting the cheesecake cool slowly for about an hour. This gentle cooling process helps prevent cracking, ensuring your cheesecake looks as good as it tastes. - Step 4: Chill and Top
After the cheesecake has cooled, refrigerate it for at least 4 hours, preferably overnight. This chilling time allows the flavors to meld beautifully and gives the cheesecake its signature thickness. When you’re ready to serve, top it with a generous dollop of whipped cream and sprinkle extra mini chocolate chips and cookie crumbs on top. This finishing touch doesn’t just look amazing-it adds an extra crunch that will have everyone asking for seconds!
And there you have it! Your homemade Cookie Monster Cheesecake is ready to impress. This delightful dessert is excellent for gatherings or just a sweet treat for yourself. Enjoy every creamy, cookie-filled bite!
Tips for Success
When it comes to mastering the Cookie Monster Cheesecake Recipe, a few tips can elevate your baking game and ensure your dessert is a showstopper. Whether you’re channeling your inner pastry chef or whipping this up for a casual gathering, these practical pointers will guide you to tasty success. So, let’s dive into the essentials!
- Chill Wisely: Allow your cheesecake to rest in the refrigerator for at least four hours, or even overnight. This helps the flavors meld beautifully and sets the texture perfectly.
- Mix with Care: When incorporating the cream cheese, mix until smooth but don’t overbeat. Overmixing can introduce unwanted air bubbles and crack your cheesecake.
- Cookie Crust Tip: For a flavorful cookie crust, pulse your cookies to a fine crumb but leave a few larger pieces for added texture. This will give your crust a delightful bite.
- Don’t Skip the Toppings: The final layer of crushed cookies and whipped cream isn’t just for looks; it adds an extra crunch and flavor that perfectly complements the cheesecake.
- Room Temperature Ingredients: Ensure your cream cheese and eggs are at room temperature before mixing. This helps achieve a smooth, creamy batter without lumps.
By following these tips, your Cookie Monster Cheesecake will not only taste amazing but also impress everyone at the table. Happy baking!
Equipment Needed
When embarking on your adventure to create a delightful Cookie Monster Cheesecake Recipe, having the right tools at your fingertips will make the process a breeze. Whether you’re a seasoned baker or a kitchen novice, these essentials will help you achieve that excellent creamy texture and cookie crunch. Here’s what you’ll need:
- Springform Pan: This is a must-have for cheesecakes. It allows for easy removal without damaging the delicate crust.
- Electric Mixer: A handheld or stand mixer will save you time and effort while ensuring a smooth cheesecake batter.
- Mixing Bowls: A set of nesting bowls will help you keep your ingredients organized as you layer flavors.
- Spatula: A silicone spatula is excellent for scraping down the sides of the bowl and folding in those tasty cookie chunks.
- Baking Sheet: Use this for toasting any additional cookies you want to sprinkle on top.
- Measuring Cups and Spoons: Accurate measurements are key to achieving the right balance of flavors in your Cookie Monster Cheesecake Recipe.
With these essential tools, you’ll be well on your way to creating a cheesecake that will make Cookie Monster himself proud. Happy baking!
Variations
If you love the classic Cookie Monster Cheesecake Recipe but want to switch things up, you’re in luck! There are countless ways to customize this delightful dessert to suit your taste or dietary needs. Here are some creative variations to consider:
- Dietary-Friendly Tweaks: Swap traditional cream cheese for a dairy-free cream cheese alternative. This simple change makes the Cookie Monster Cheesecake excellent for your vegan friends!
- Gluten-Free Option: Use gluten-free cookies in the crust. Your gluten-intolerant pals will appreciate this thoughtful touch, and they’ll never know the difference!
- Seasonal Twists: Add pumpkin spice in the fall for a cozy vibe. Just imagine a slice of pumpkin-spiced Cookie Monster Cheesecake, excellent for your Thanksgiving table.
- Flavor Infusions: Try incorporating peanut butter into the cheesecake filling. The mix of chocolate and peanut butter will turn this dessert into a heavenly treat!
- Cookie Varieties: Experiment with different cookie types for the crust. Whether it’s Oreos, chocolate chip, or even ginger snaps, each will bring a unique flavor to your Cookie Monster Cheesecake.
- Fruit Additions: Toss in some crushed berries or even a layer of fruit compote on top. This adds a refreshing twist to the creamy richness of the cheesecake!
- Chocolate Lovers’ Dream: Drizzle chocolate ganache over the top before serving. It’s like a chocolate hug for your Cookie Monster Cheesecake!
Each of these variations gives you the freedom to create a version of the Cookie Monster Cheesecake Recipe that speaks to your taste buds. Whether you’re looking for healthier options or just want to have fun with flavors, these suggestions will surely impress everyone at your next gathering.
Print
Cookie Monster Cheesecake Recipe That Will Delight You!
- Prep Time: 20 minutes
- Cook Time: 60 minutes
- Total Time: 4 hours 20 minutes
- Yield: 12 servings 1x
- Category: Dessert
- Cuisine: American
Description
A deliciously creamy cheesecake inspired by the Cookie Monster, featuring a blue cookie dough layer and topped with chocolate chip cookies.
Ingredients
- 1 ½ cups of graham cracker crumbs
- ½ cup of unsalted butter, melted
- 2 cups of cream cheese, softened
- 1 cup of granulated sugar
- 1 teaspoon of vanilla extract
- 3 large eggs
- 1 cup of blue cookie dough, cut into small pieces
- 1 cup of mini chocolate chips
Instructions
- Preheat your oven to 325°F (160°C).
- In a bowl, mix graham cracker crumbs with melted butter and press into the bottom of a springform pan to form the crust.
- In a large mixing bowl, beat the cream cheese, sugar, and vanilla until smooth.
- Add the eggs one at a time, mixing well after each addition.
- Fold in the blue cookie dough pieces and mini chocolate chips.
- Pour the cheesecake mixture over the crust in the springform pan.
- Bake for 50-60 minutes, or until the center is set. The edges may slightly crack.
- Turn off the oven and let the cheesecake cool inside for an hour.
- Remove from the oven and refrigerate for at least 4 hours or overnight before serving.
Notes
- For the blue cookie dough, you can use store-bought or homemade cookie dough dyed with blue food coloring.
- Let the cheesecake come to room temperature before serving for best flavor.
- Top with additional chocolate chip cookies if desired.
Nutrition
- Serving Size: 1 slice
- Calories: 350
- Sugar: 25g
- Sodium: 200mg
- Fat: 22g
- Saturated Fat: 12g
- Carbohydrates: 30g
- Fiber: 1g
- Protein: 4g
- Cholesterol: 80mg


